Hyper Bridge 0.6.0 introduces the Custom Translators Framework, a declarative engine that lets you customize exactly how notifications from any app are transformed into native Xiaomi HyperOS HyperIsland (HyperIsland) cards and compact status pills.
Whether you want to highlight messages from VIP contacts, turn delivery progress notifications into live tracked waypoints, add 1-tap OTP verification buttons, or hide redundant notification actions, Custom Translators give you full control.
Check out the Advanced Translators Technical Specification.
What is a Custom Translator?#
A Translator acts as a rule-based bridge between standard Android notifications (StatusBarNotification) and the Xiaomi HyperIsland notification framework.
Each translator defines:
- Target Scope & Conditions: Which app(s), channels, or notification types to intercept (using pattern matching, keywords, or regex).
- Data & Progress Extraction: How to extract numbers, delivery percentages, or contact names from the notification text.
- Action Buttons & Smart Actions: Which action buttons appear on the island, including 1-tap OTP copying, map navigation, and inline replies.
- Presentation & Compact Pill Design: The visual layout template, dynamic text variables, and compact pill styling.
- Theme & Appearance: Custom accent colors, icon shapes, and bindings to installed HyperThemes.
- Behavior & Engine Mode: Float display duration, dismissal behavior, and whether to use the Custom Island or Native Live Updates engine.
Managing Translators in the App#
Hyper Bridge provides intuitive access to your translators across the application:
1. From the Design Hub#
In the Design tab of Hyper Bridge:
- Bento Card (
Translators): Tap the card to open the Translator Manager, or tap the+action on the card to launch the Visual Translator Editor immediately. - Floating Action Button (
+): Tap the main+FAB and select Smart Translator.
2. Translator Manager Screen#
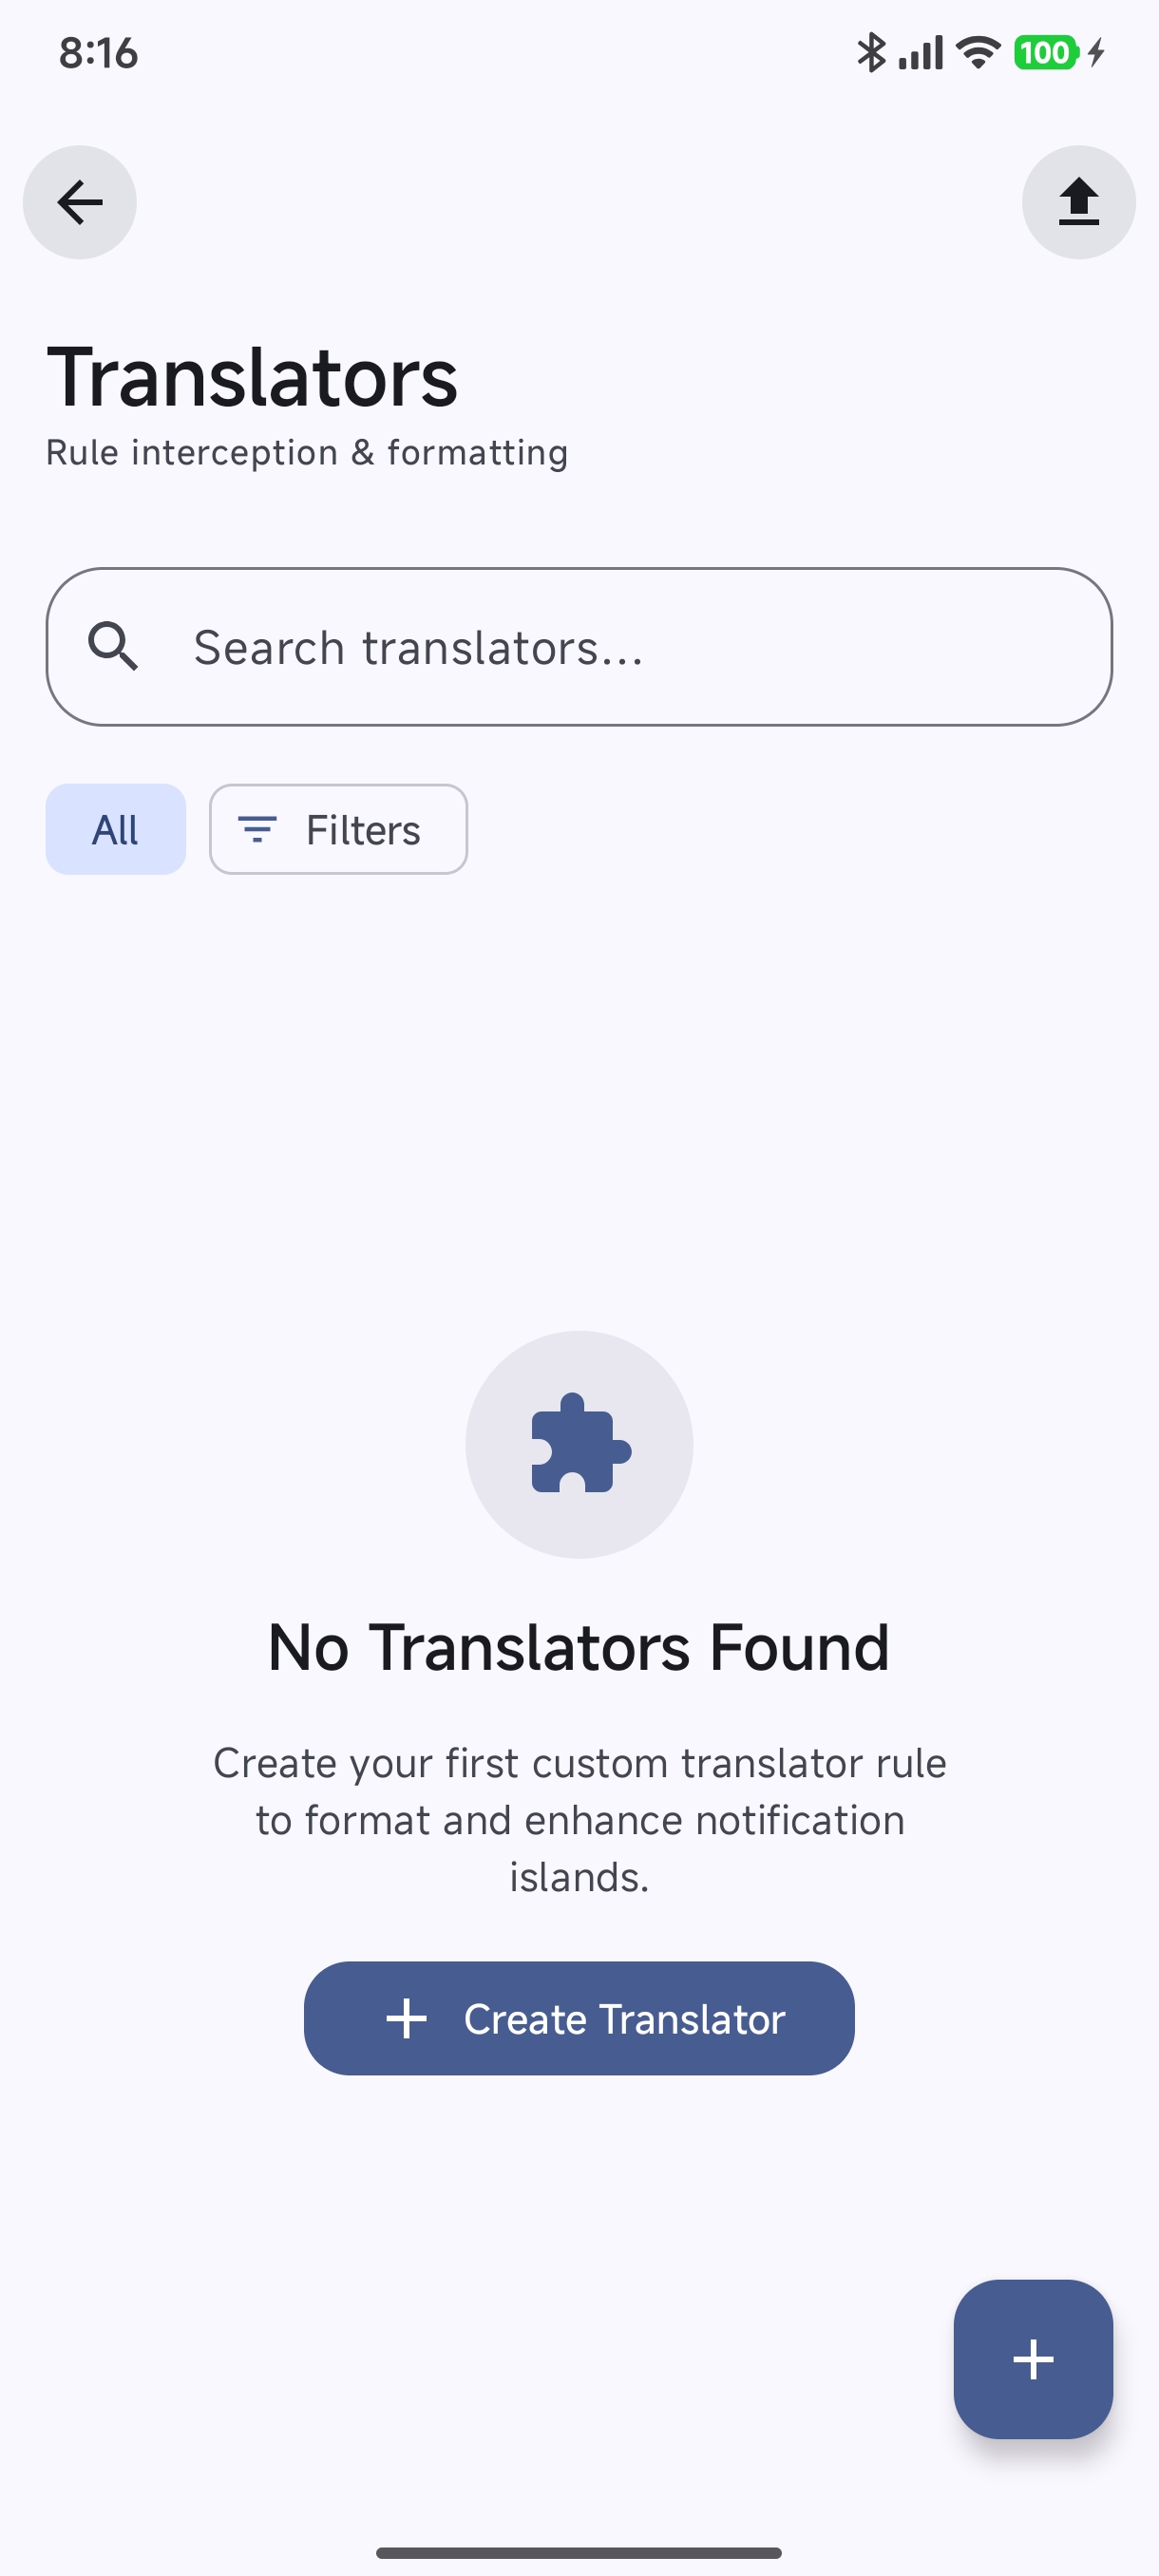
The Translator Manager (DesignRoute.TRANSLATOR_MANAGER) is your central control panel:
- Rule Overview & Search: Browse all registered translators or use the search bar to filter by rule name, author, or target package.
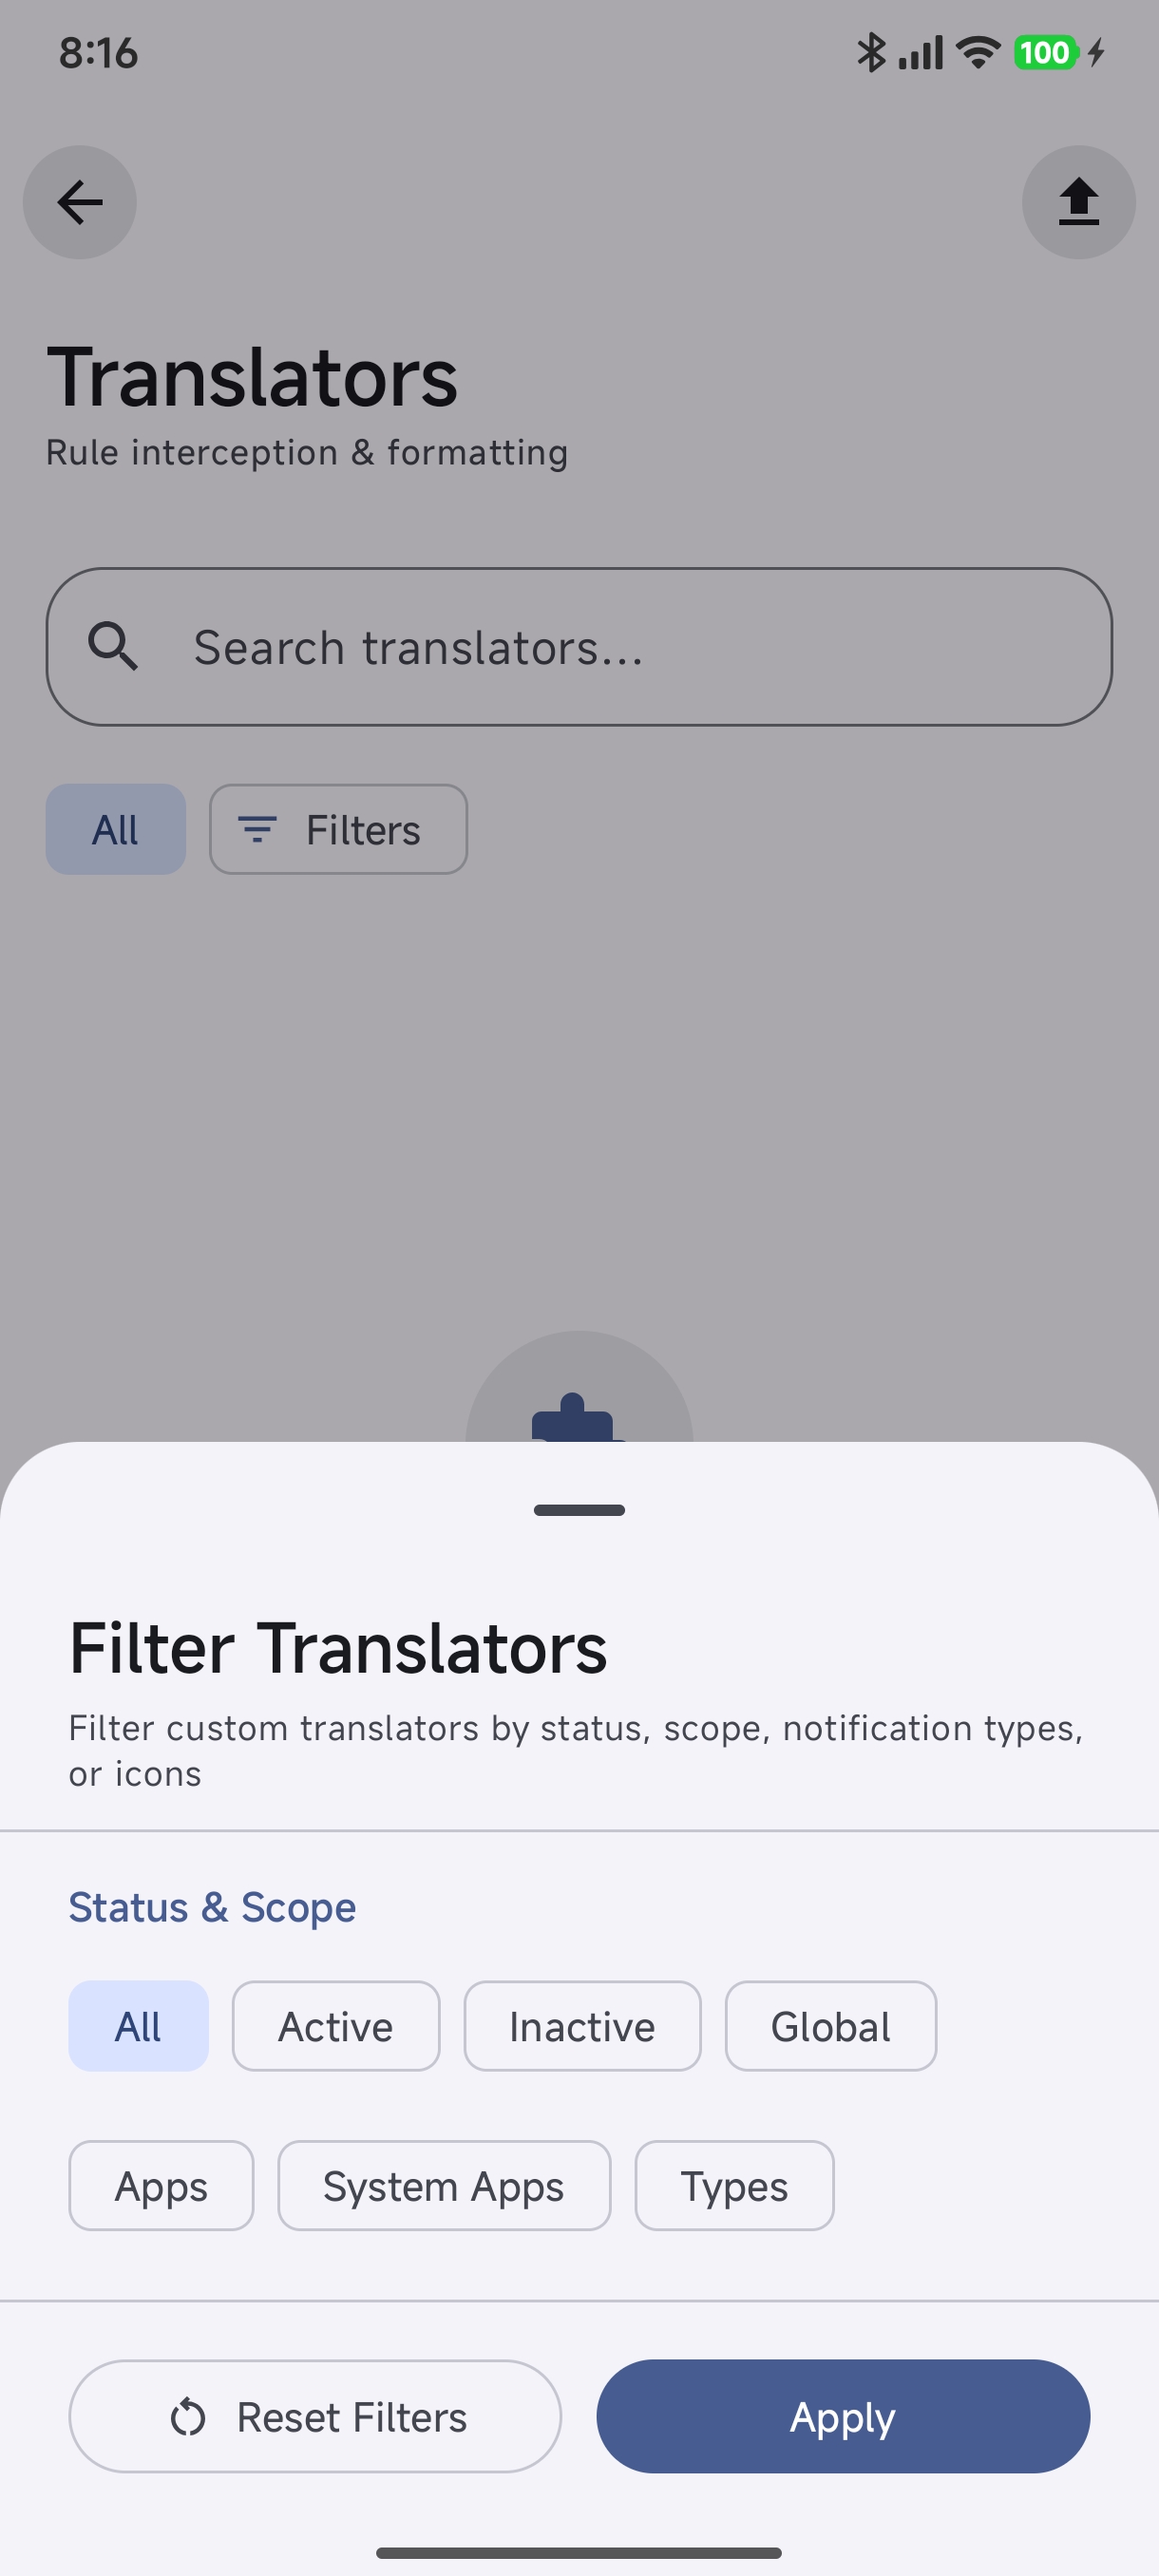
- Multi-Dimensional Filtering: Tap Filters to narrow down translators by Status (Active/Inactive), Scope (Global, Specific Apps, System Apps), or Notification Category.
- Priority Reordering & Toggle: Adjust priority ordering or toggle rules on/off with a single tap.
- SAF Import & Export: Import community
.htrans/.jsonrules or export your own creations directly to device storage.
3. Creating a Translator#
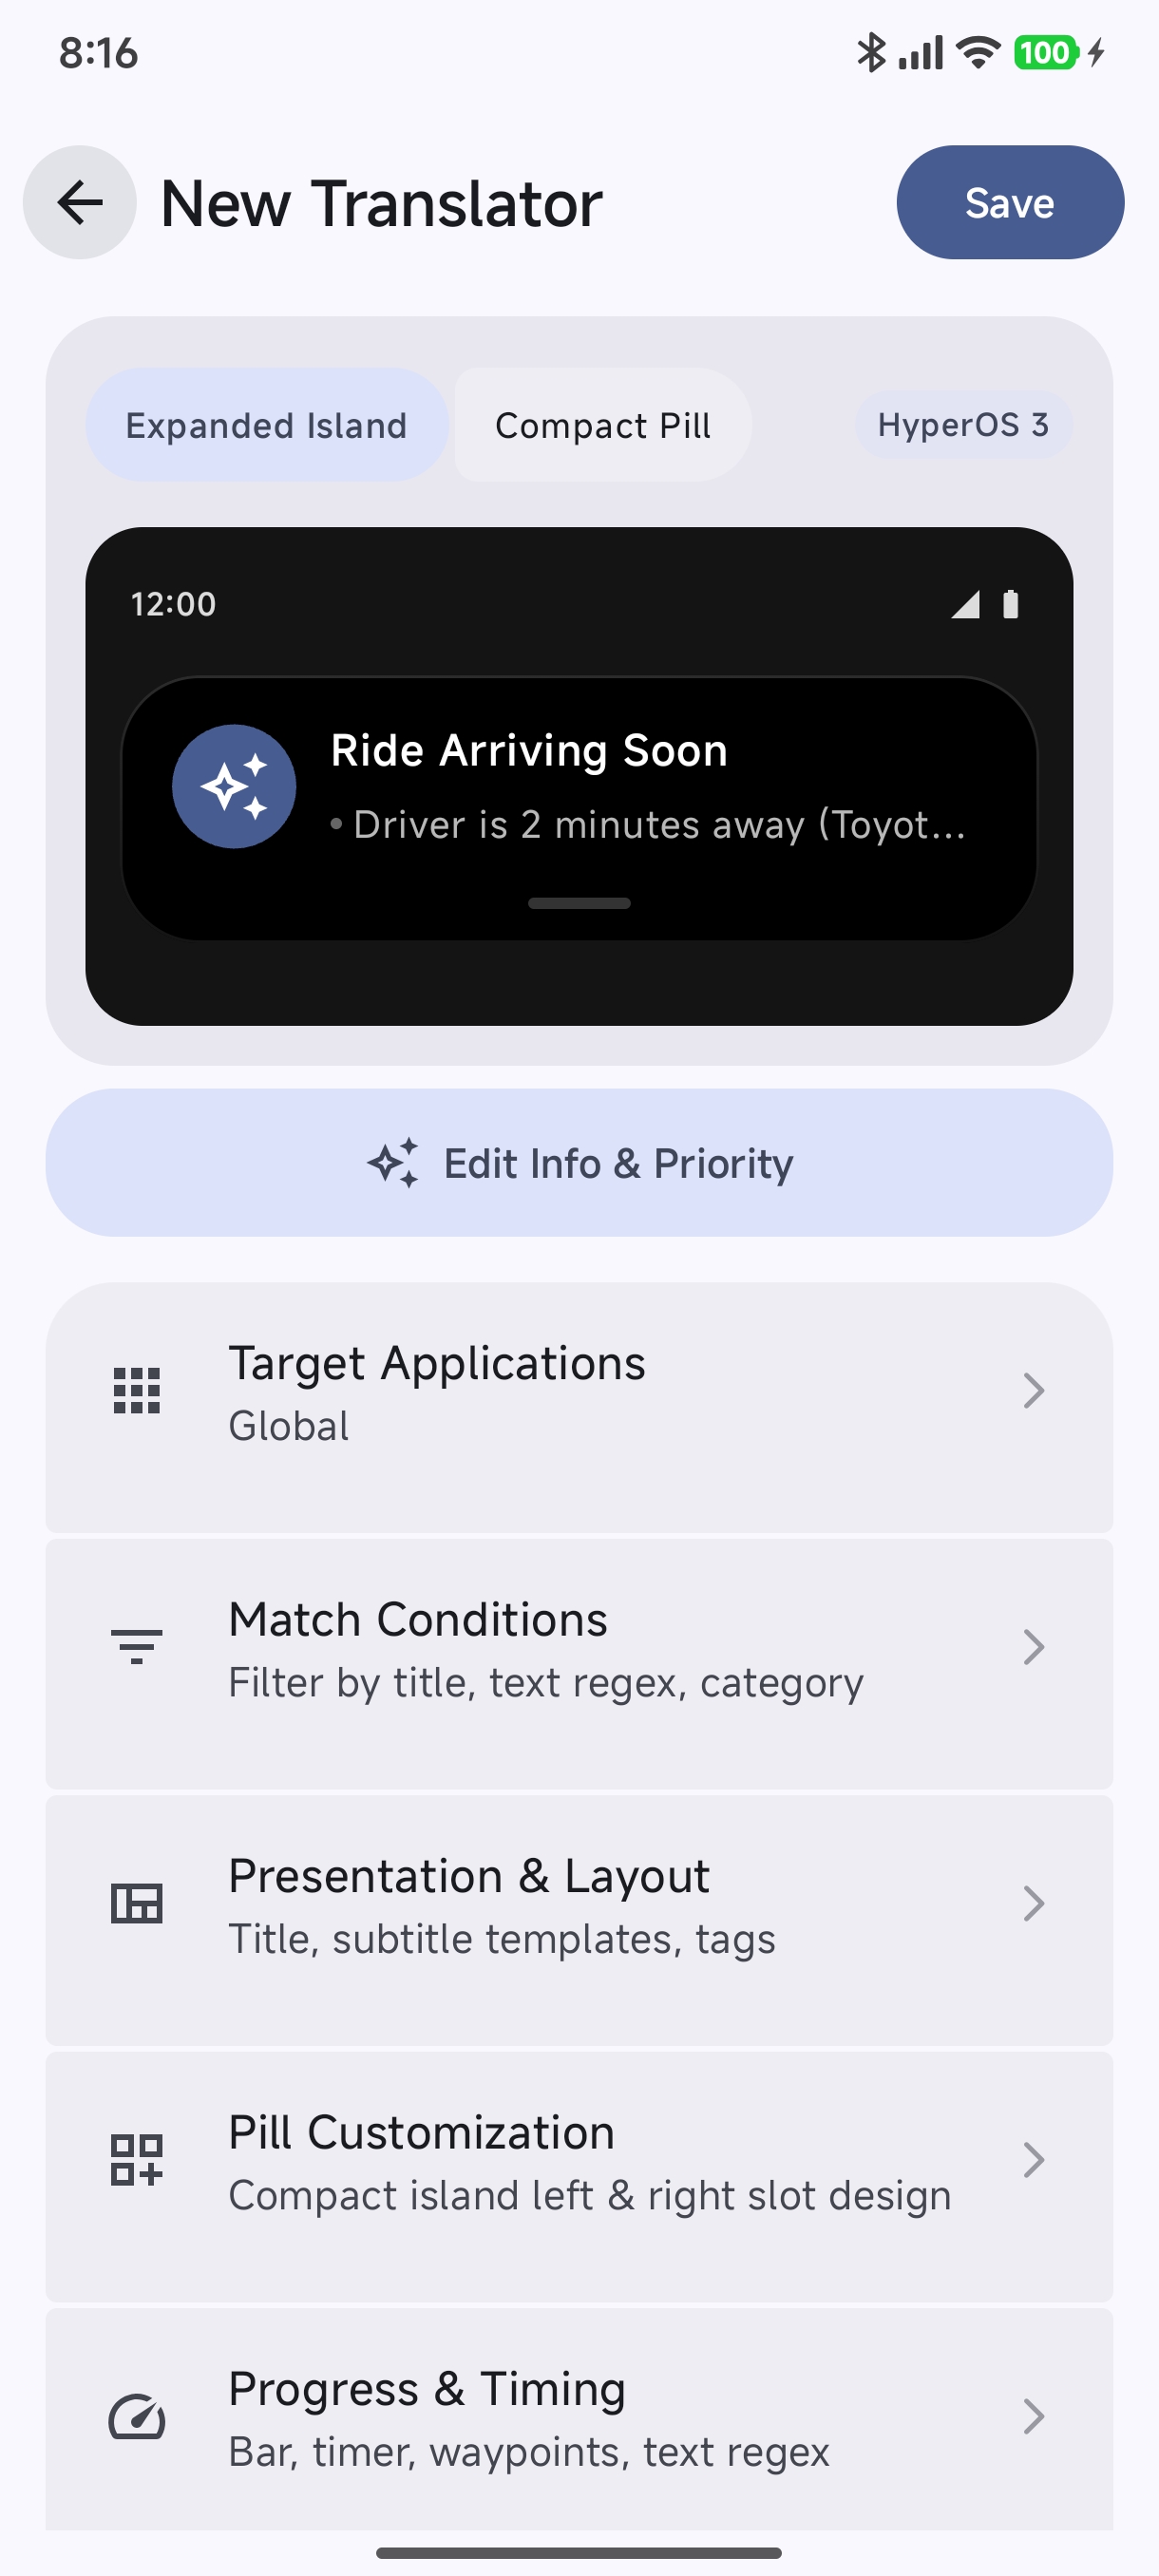
When tapping Create Translator (or when editing an existing template design), the visual editor opens with the live HyperIsland interactive preview:
Step-by-Step: The Visual Editor Options & Modules#
The Visual Editor is divided into specialized modules. Every design and translator can be customized across each of these modules:
Module 1: Editor Overview & Live Preview#
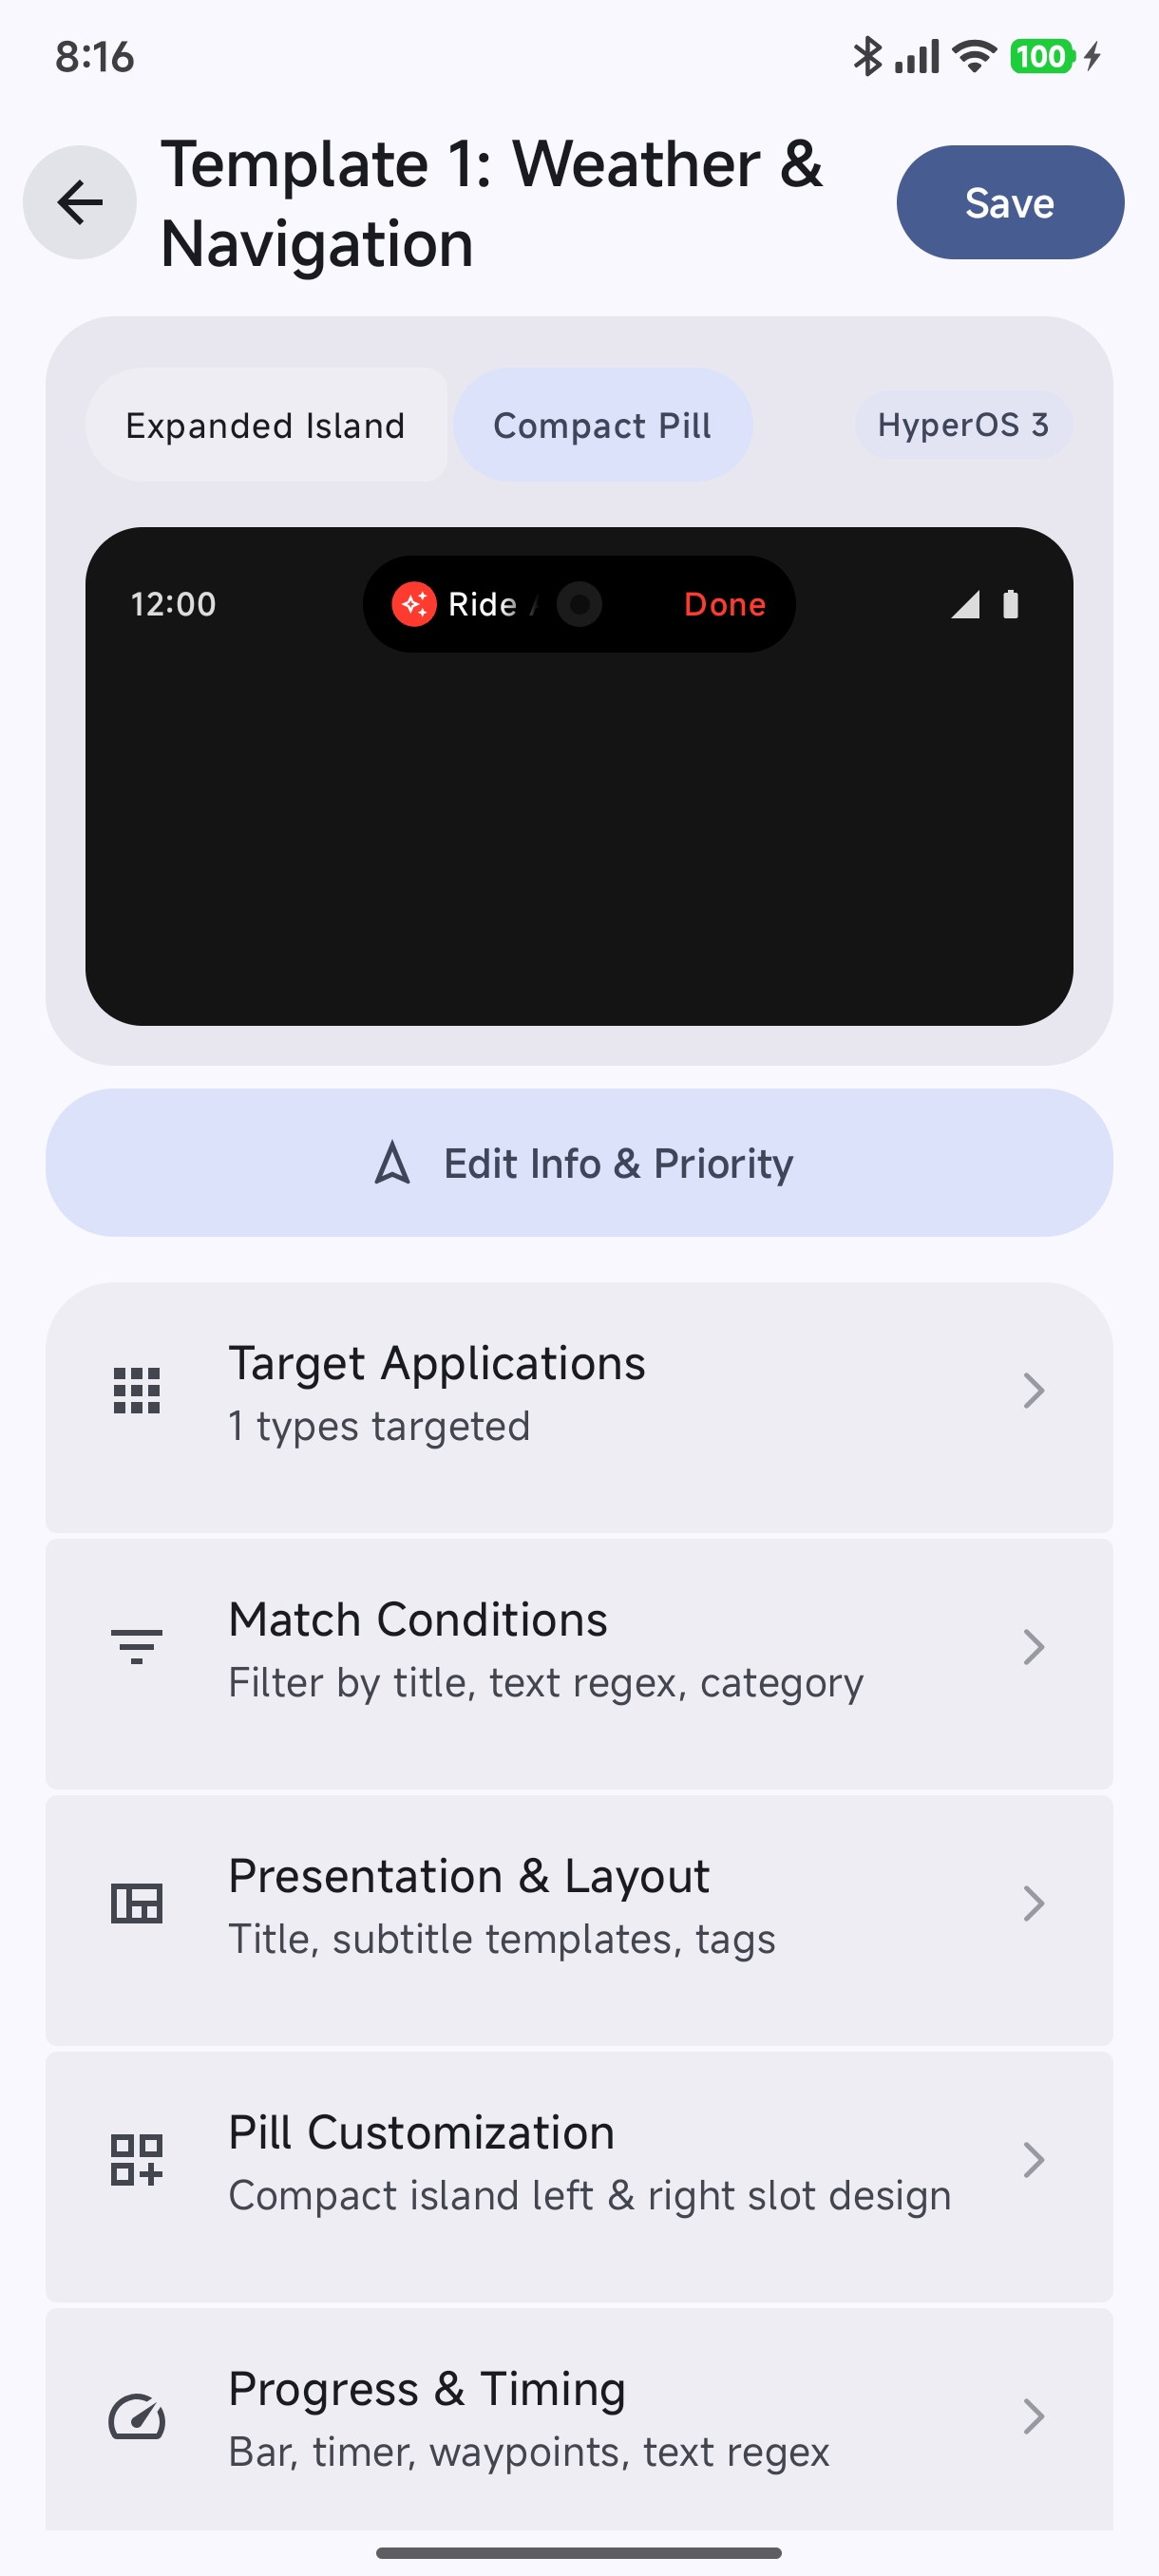
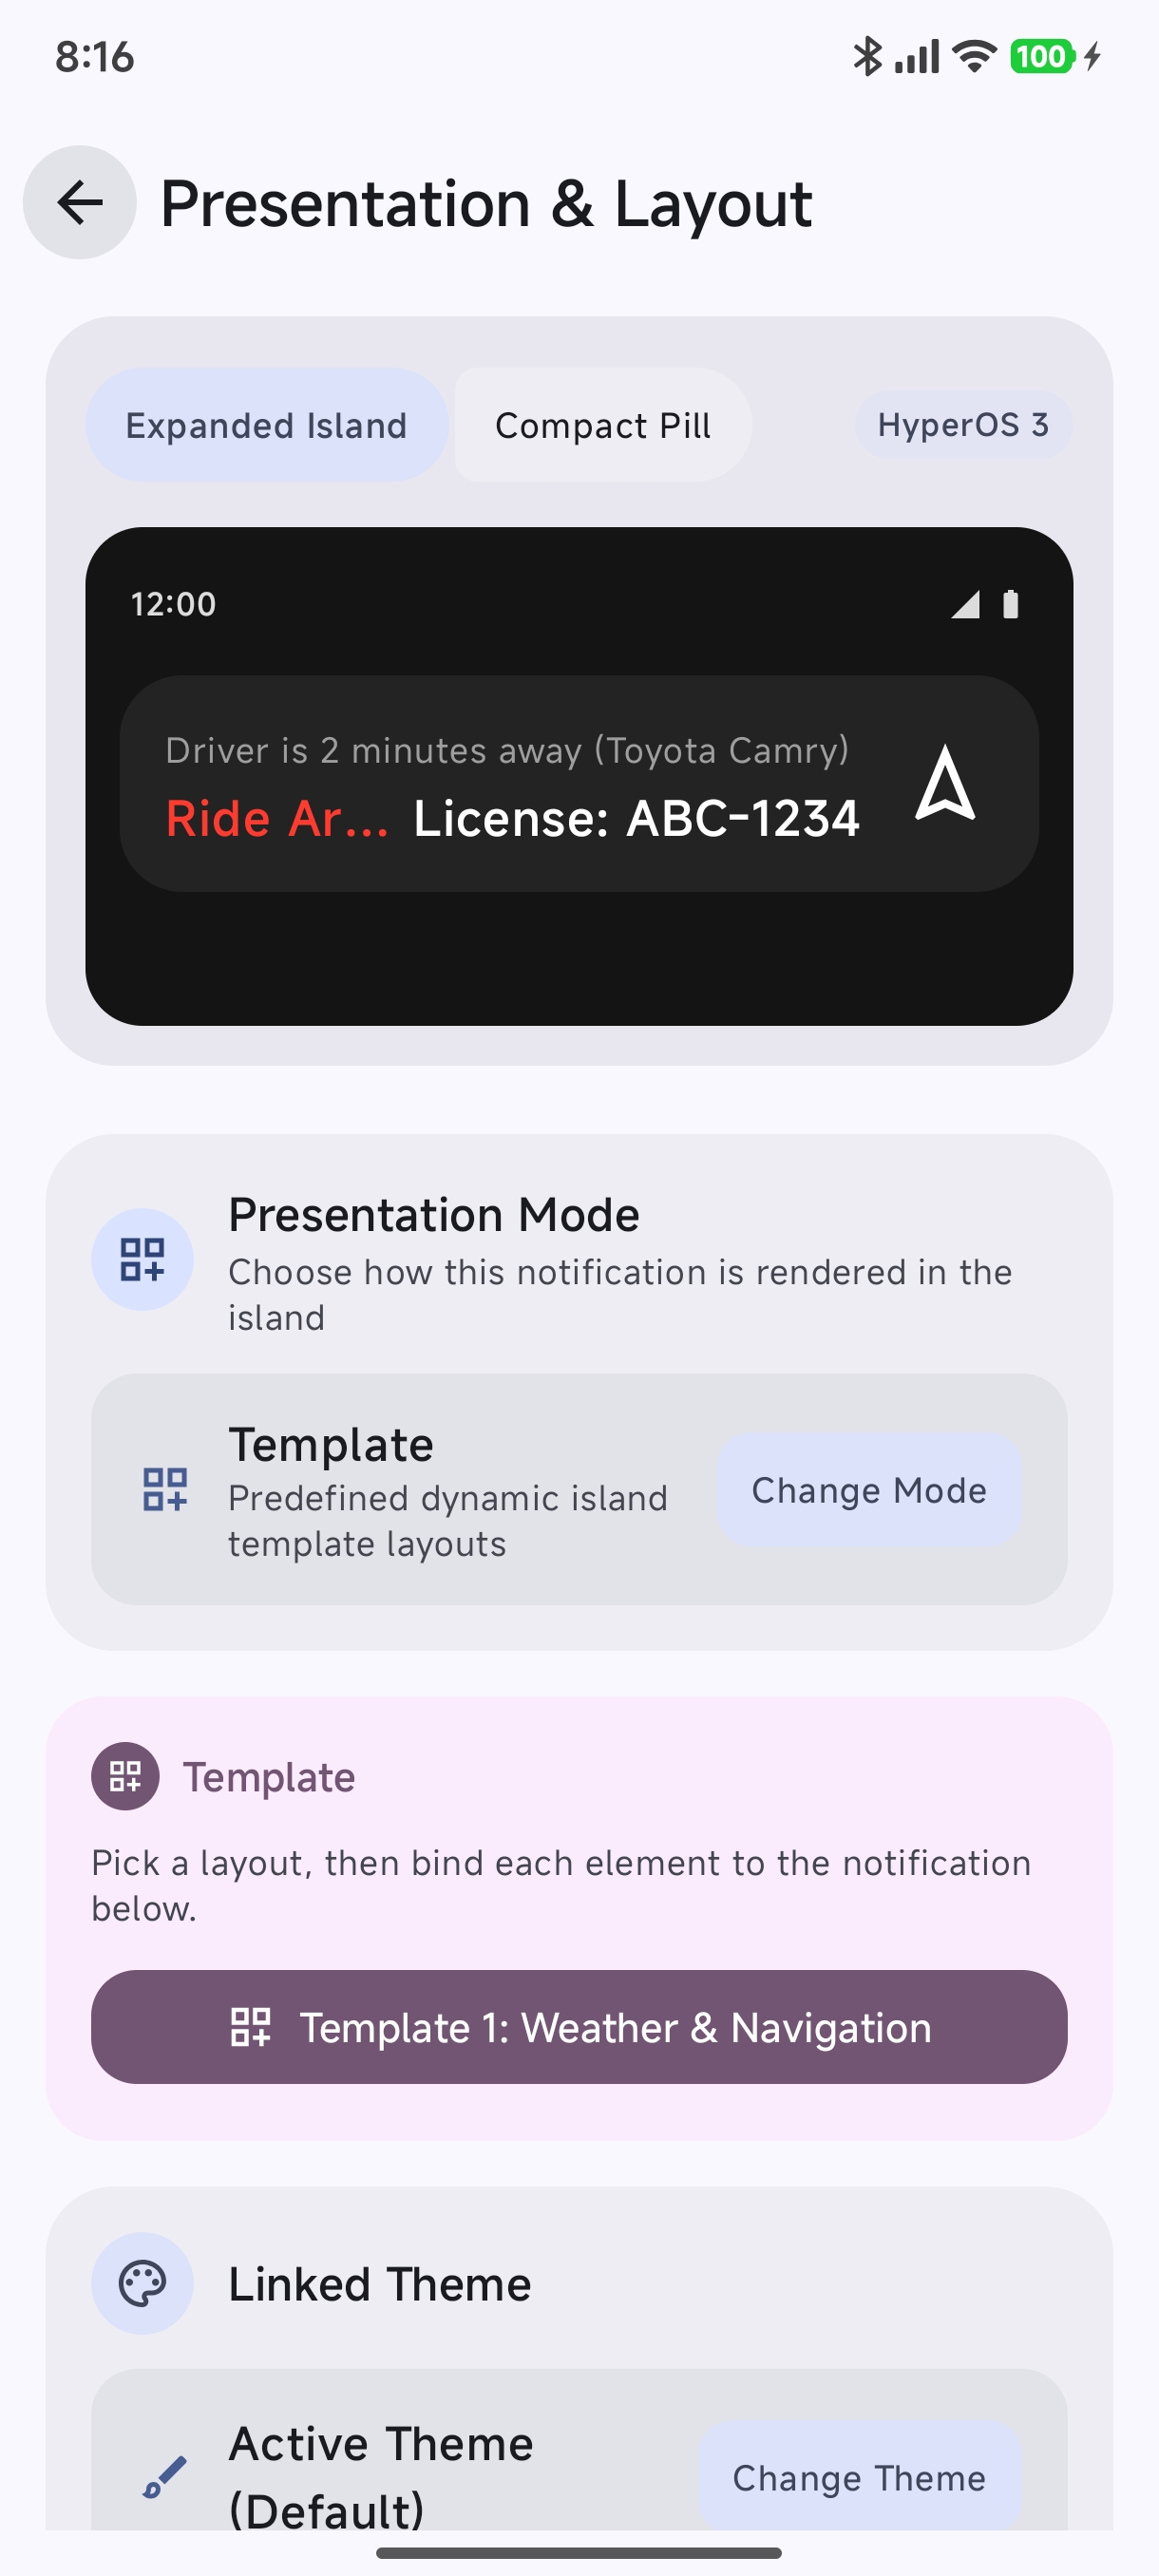
At the top of the editor, a real-time preview showcases how the notification appears as an Expanded Island, a Compact Pill, or in HyperOS 3 styling. Tap between preview modes at any time to verify layout changes.
Module 2: Rule Info & Priority#
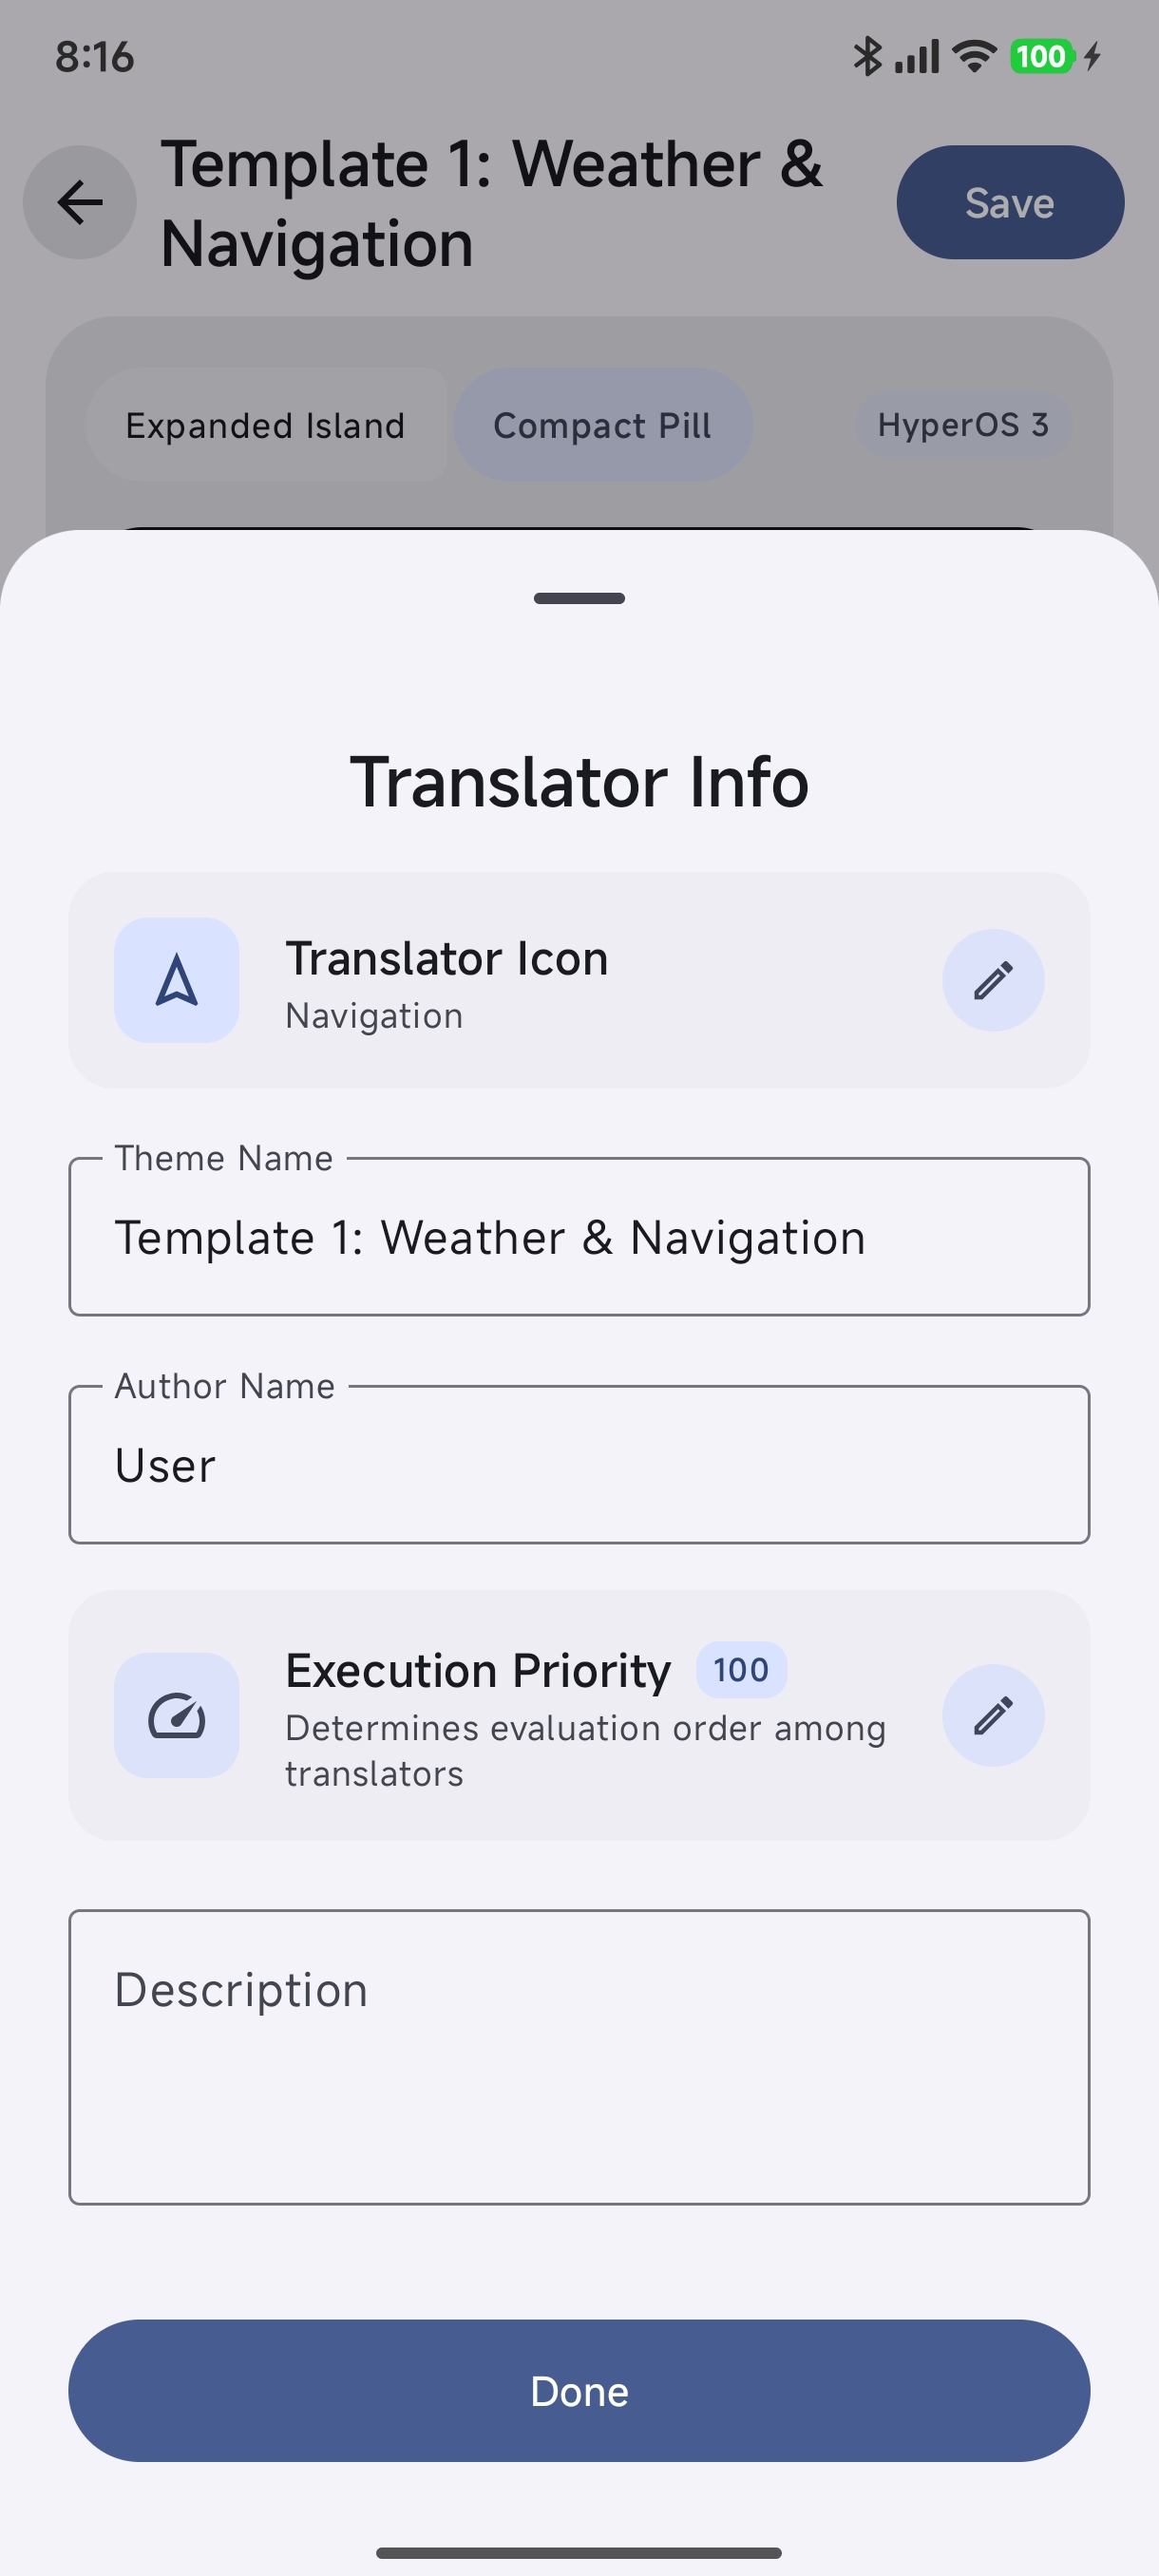
Tap Edit Info & Priority to configure identity and execution sequence:
- Translator Icon: Select a badge icon representing your rule.
- Theme Name: Set a unique descriptive title (e.g.
Weather & Navigation). - Author Name: Identify the creator.
- Execution Priority: Value (e.g.
100) determining evaluation precedence over generic rules. - Description: Document purpose and behavioral notes.
Module 3: Target Applications & Scope#
Configure which apps or notification types this rule targets:
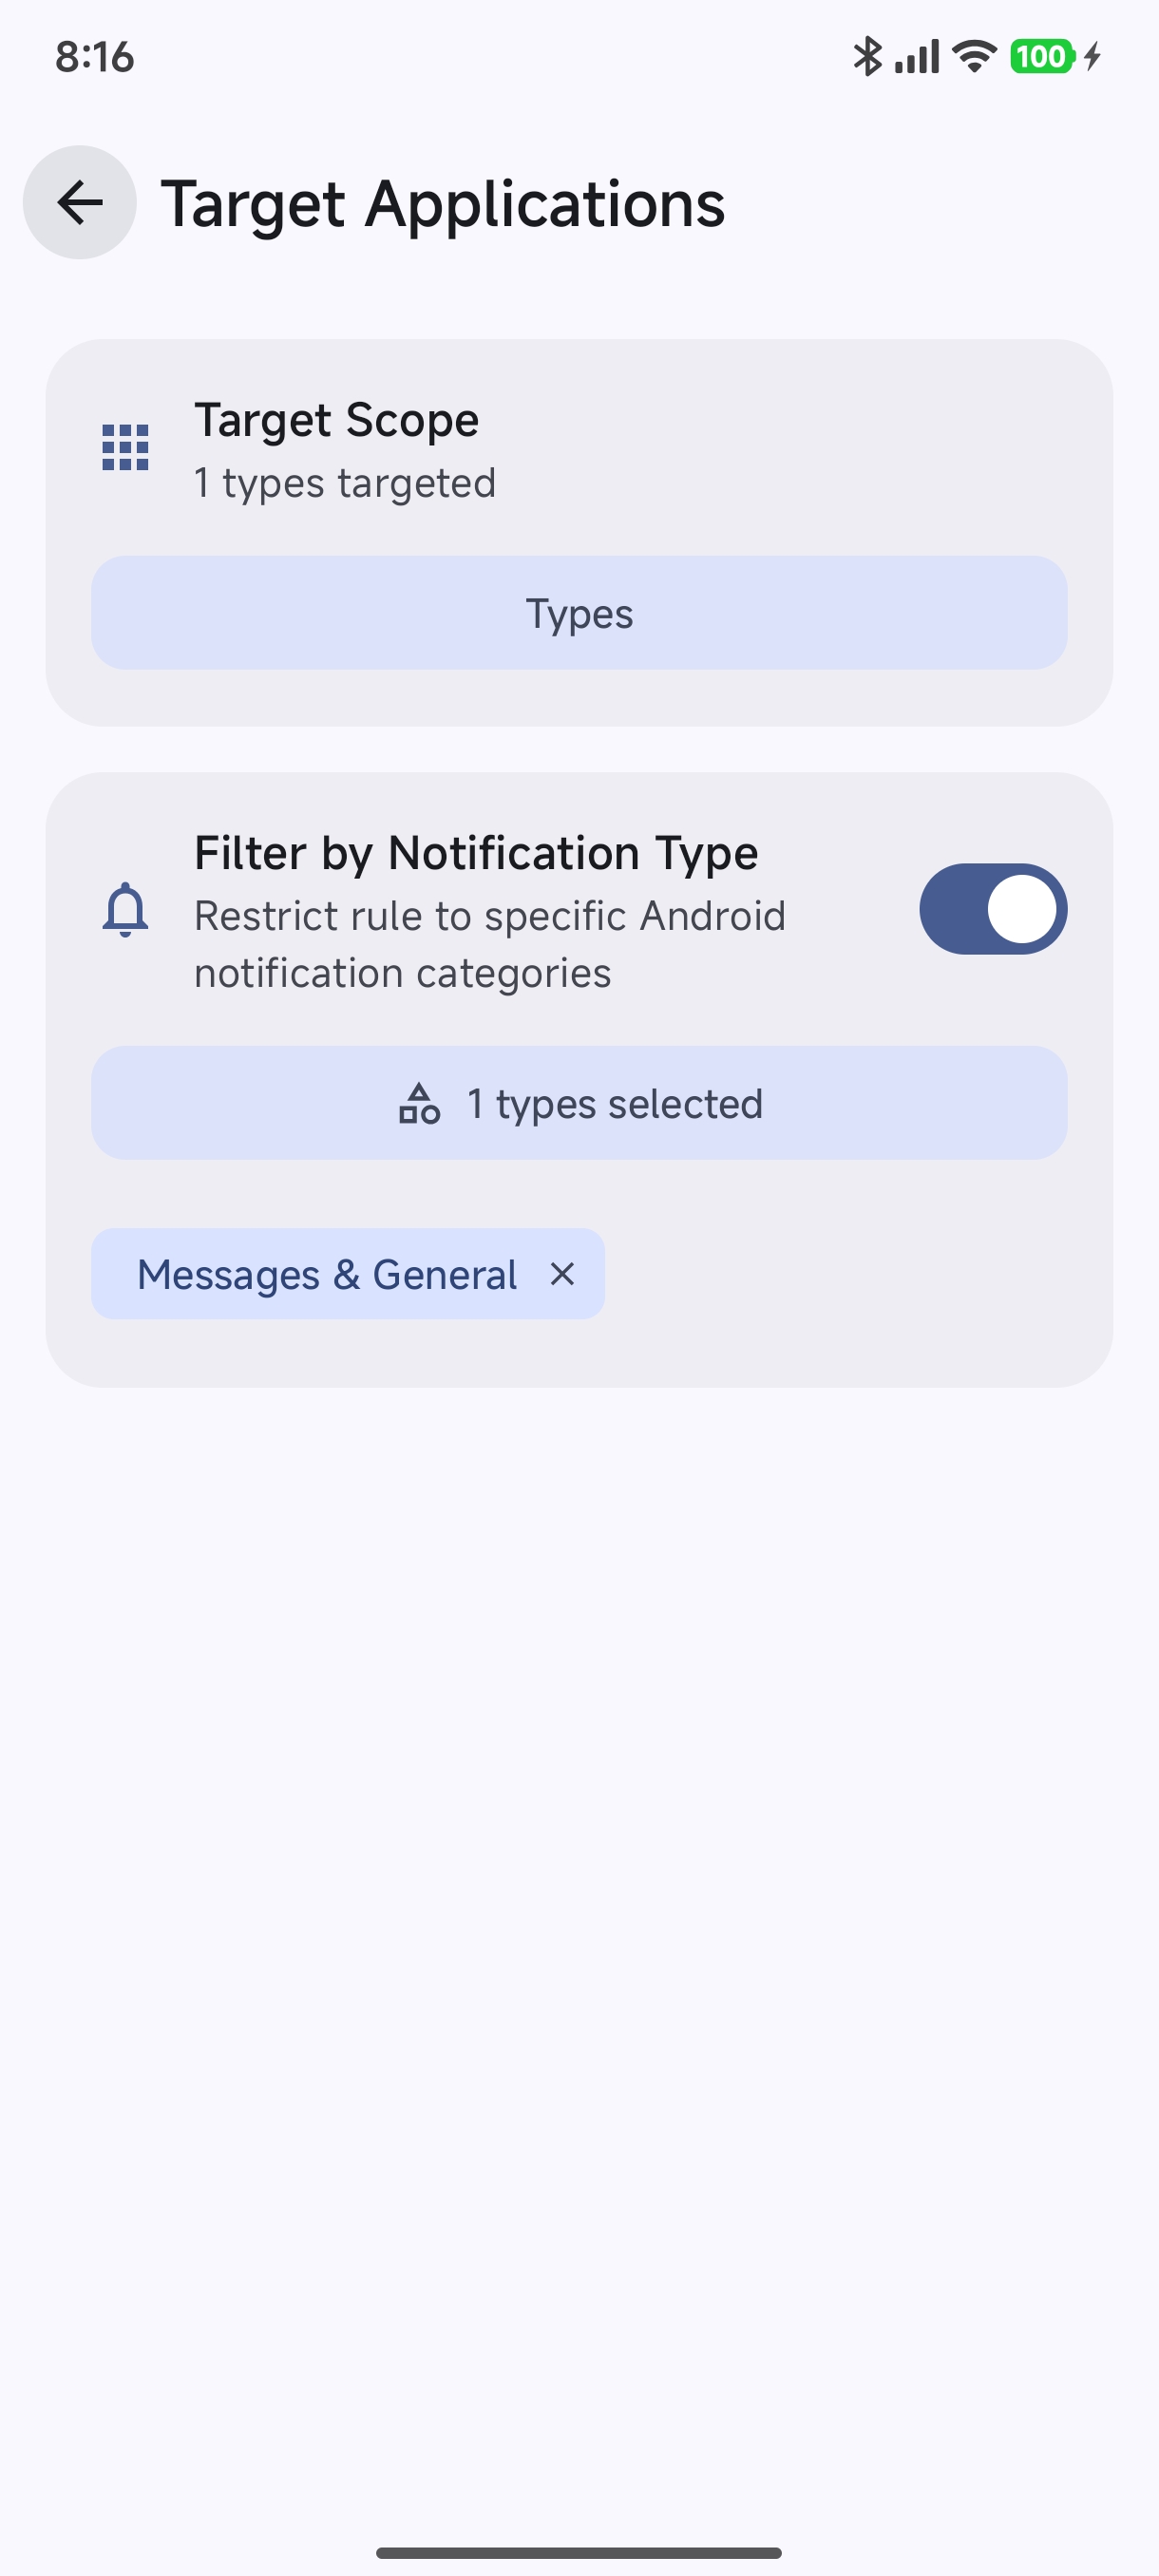
- Tap Target Applications to inspect active rules and types.
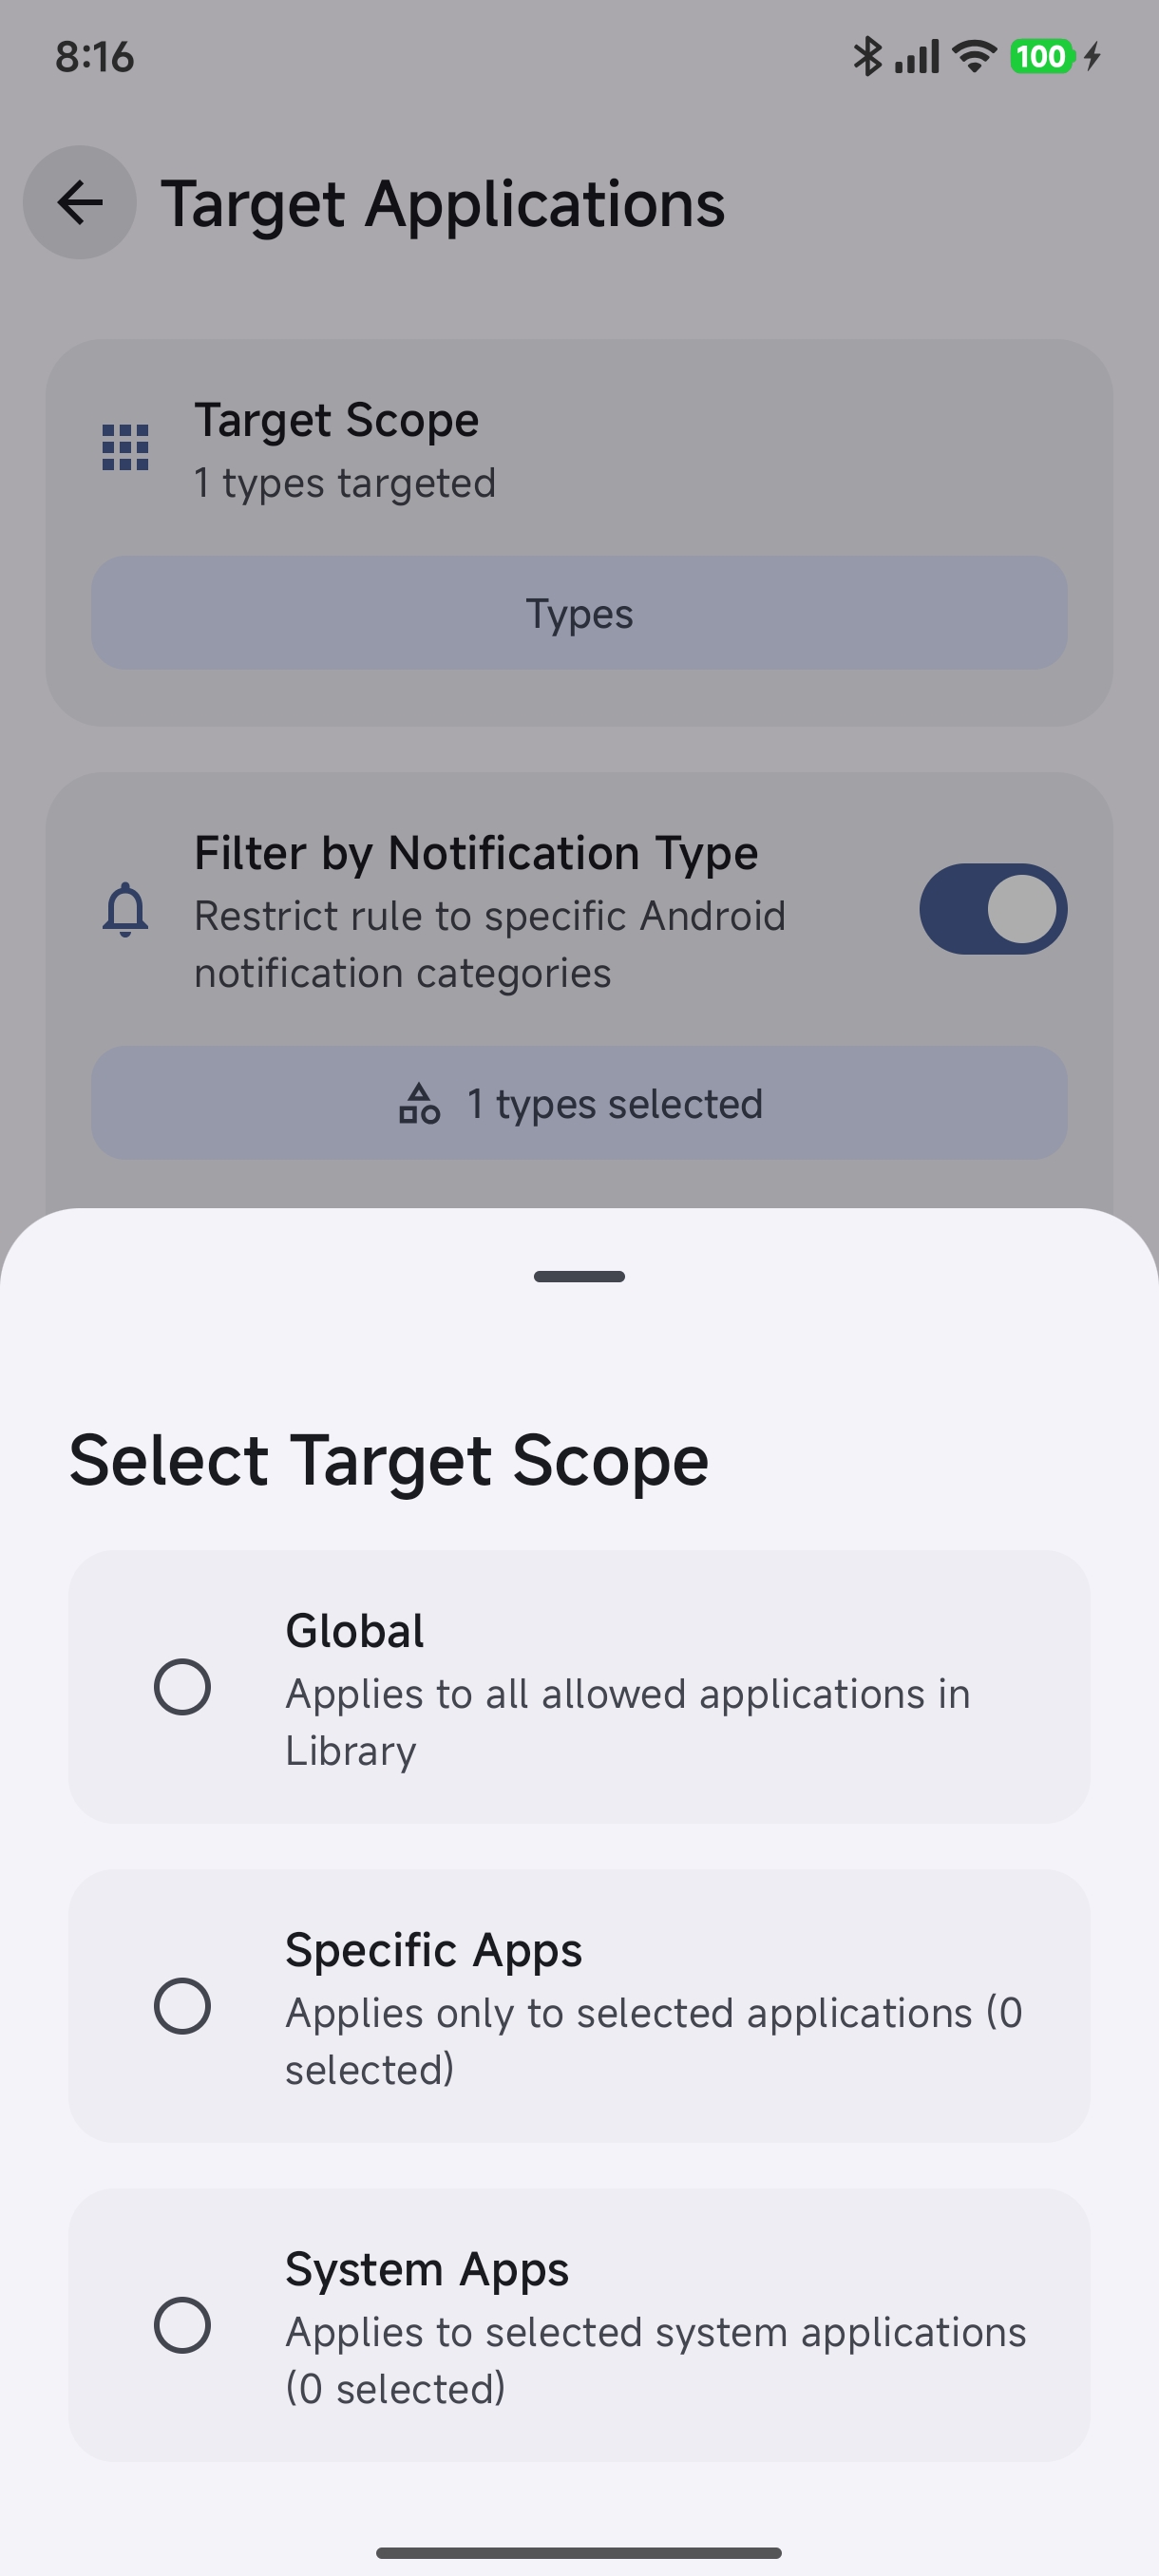
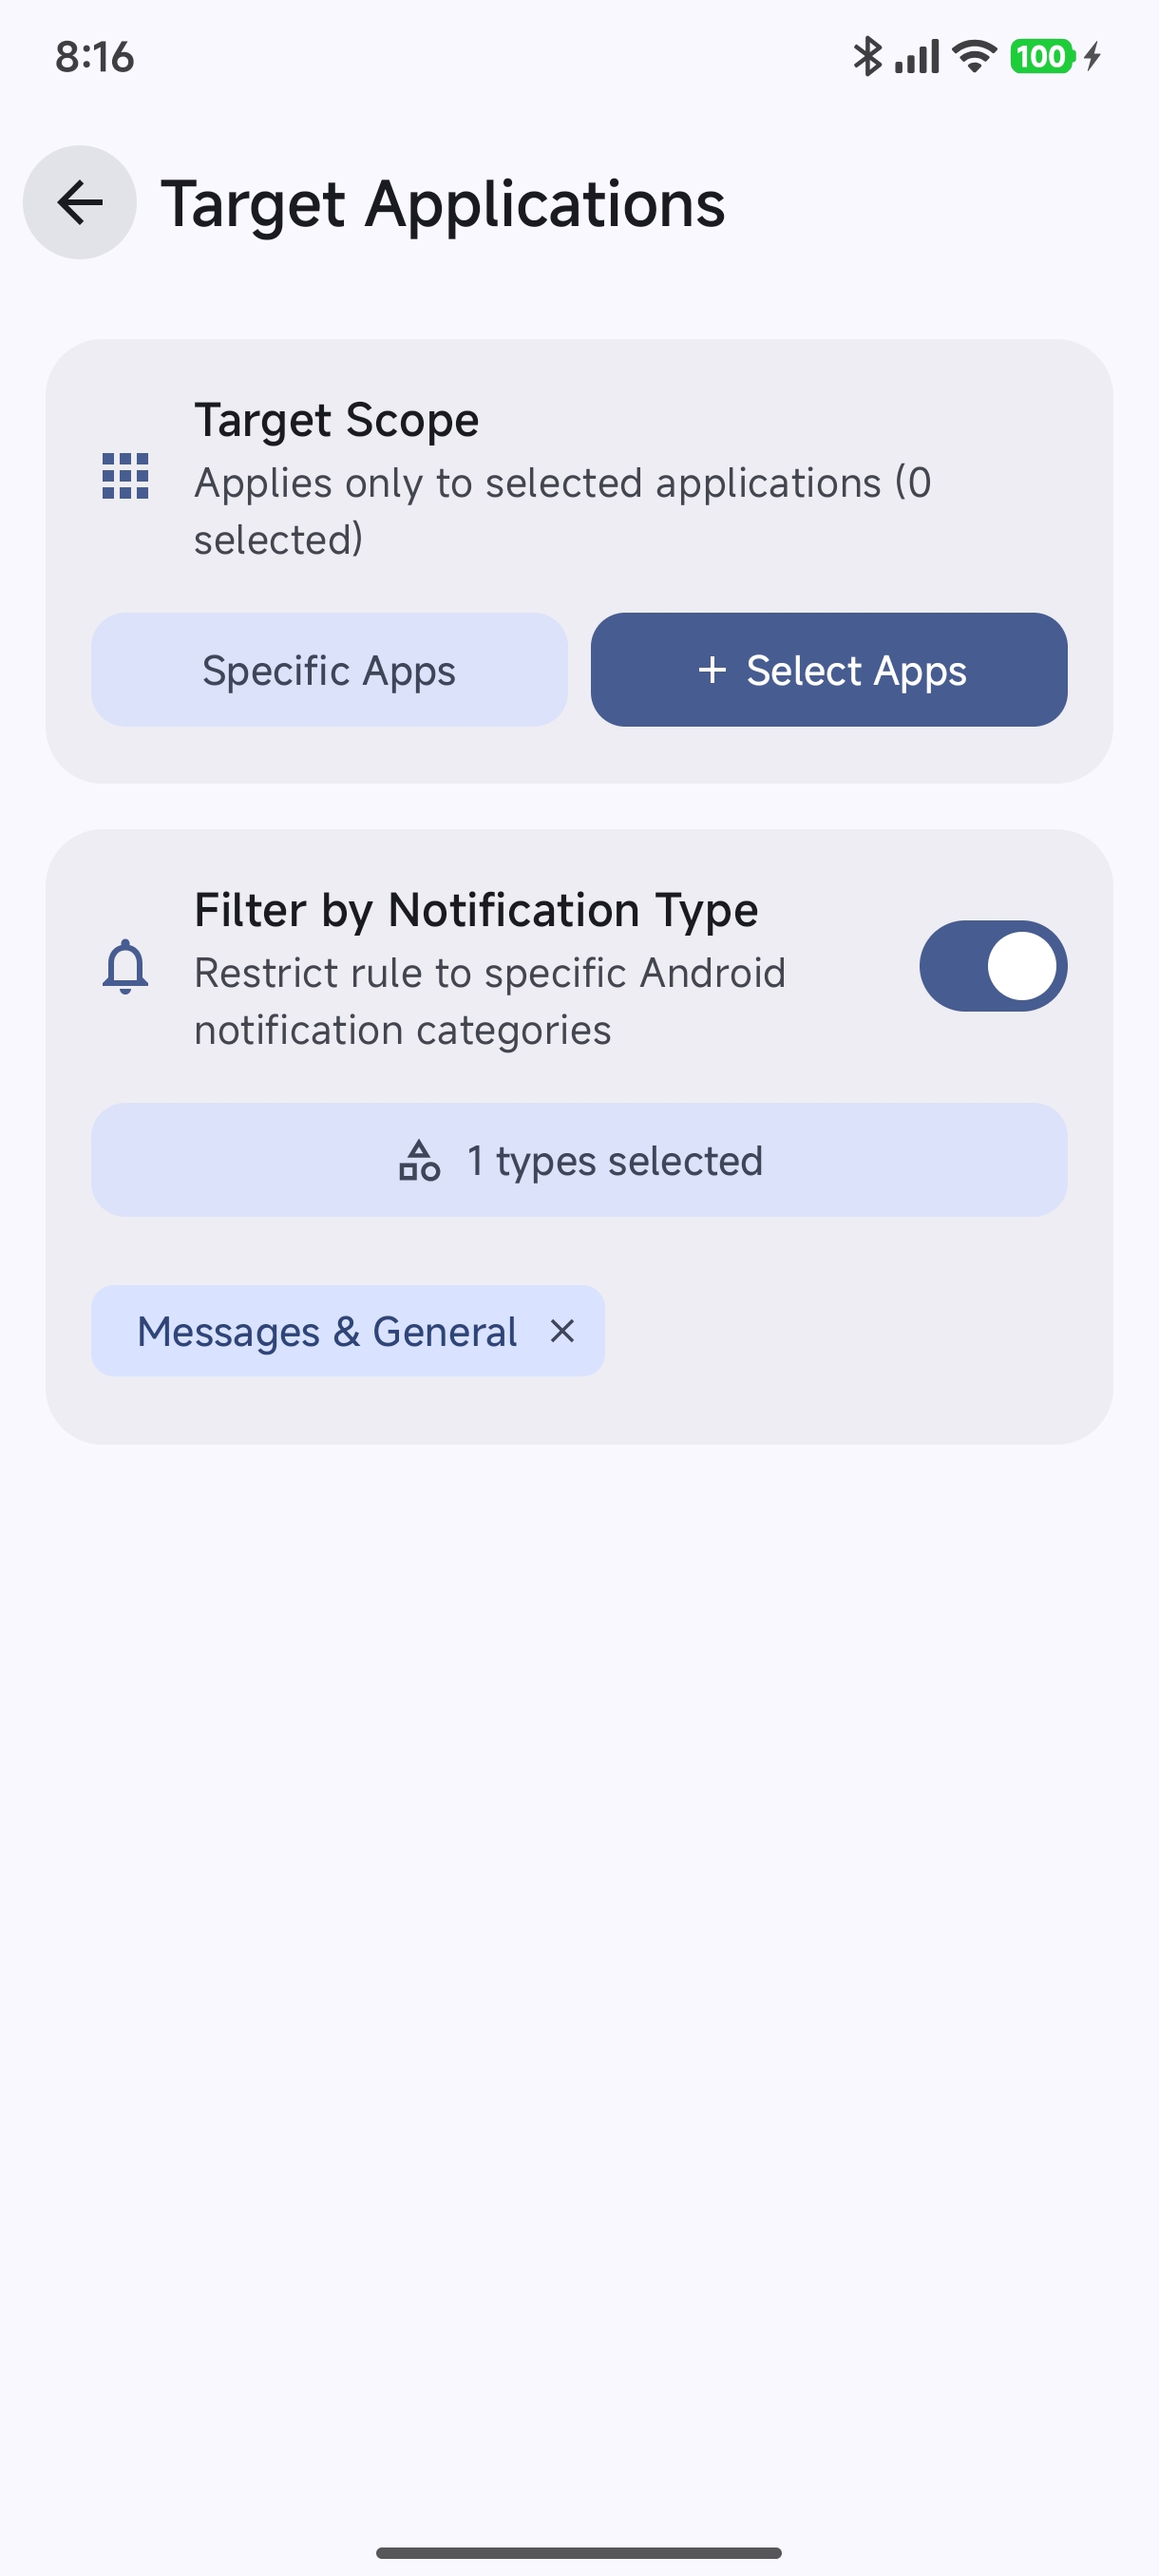
- Select Target Scope:
- Global: Applies to all allowed applications in your Library.
- Specific Apps: Explicitly limits the rule to selected installed apps.
- System Apps: Targets system apps (e.g. Screen Recorder, Downloads).
- Types: Restricts rule to broad notification types (Messaging, Media, Calls, Downloads, Navigation).
- Toggle Filter by Notification Type to restrict rule matching to designated Android notification categories (e.g., Messages & General).
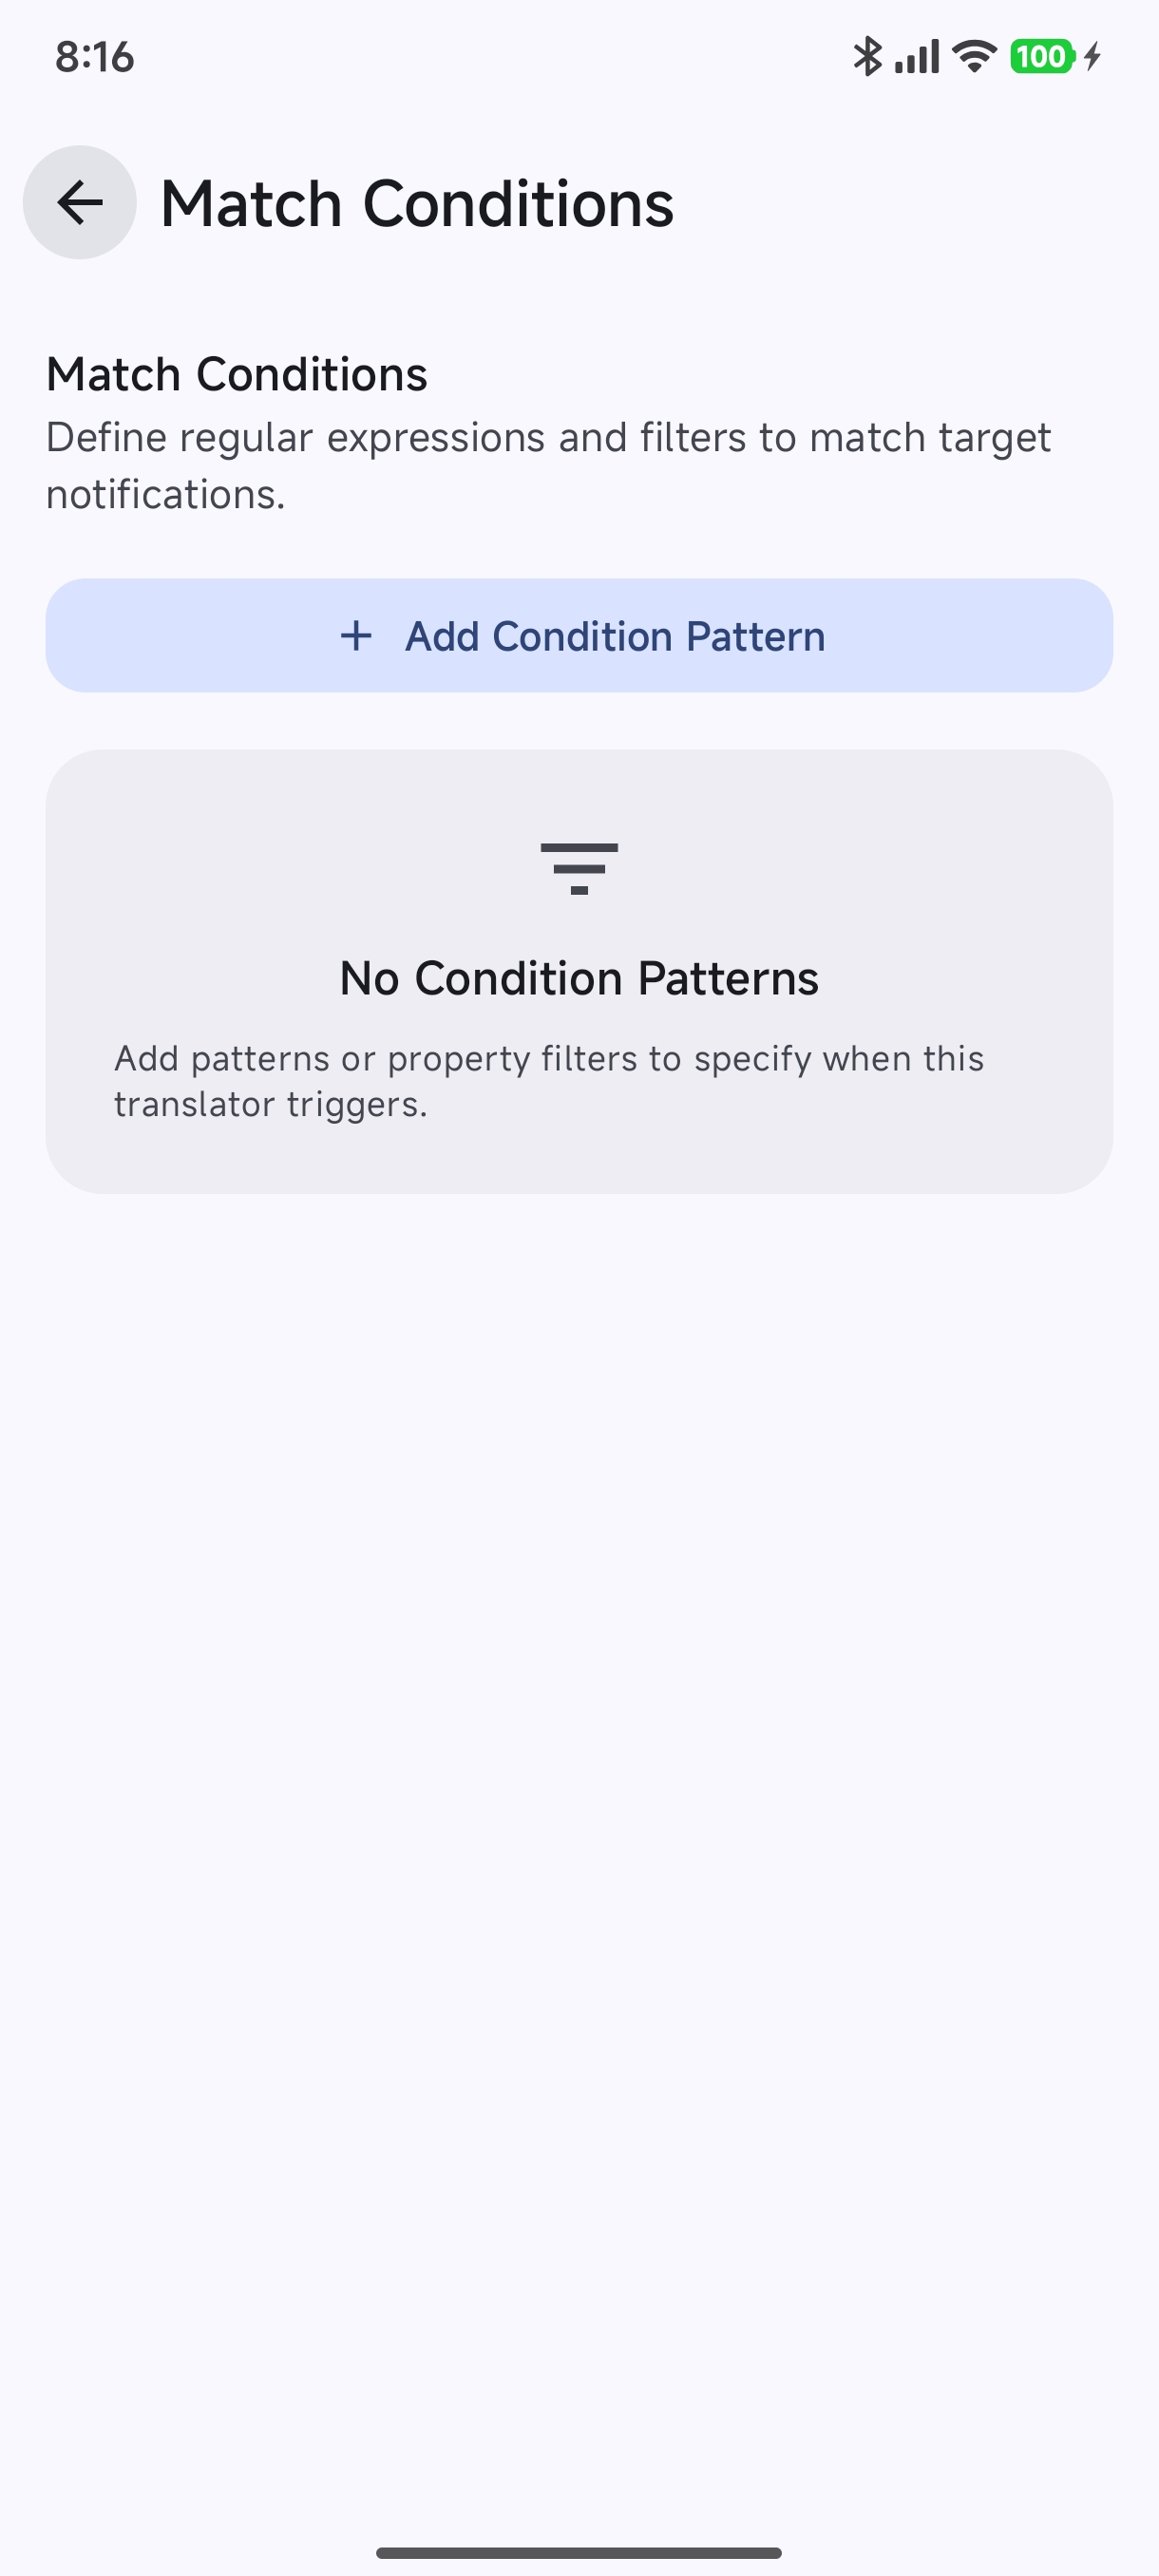
Module 4: Match Conditions & Regex Rules#
Define regular expression patterns and criteria to match incoming notifications:
- Open Match Conditions to view configured pattern rules.
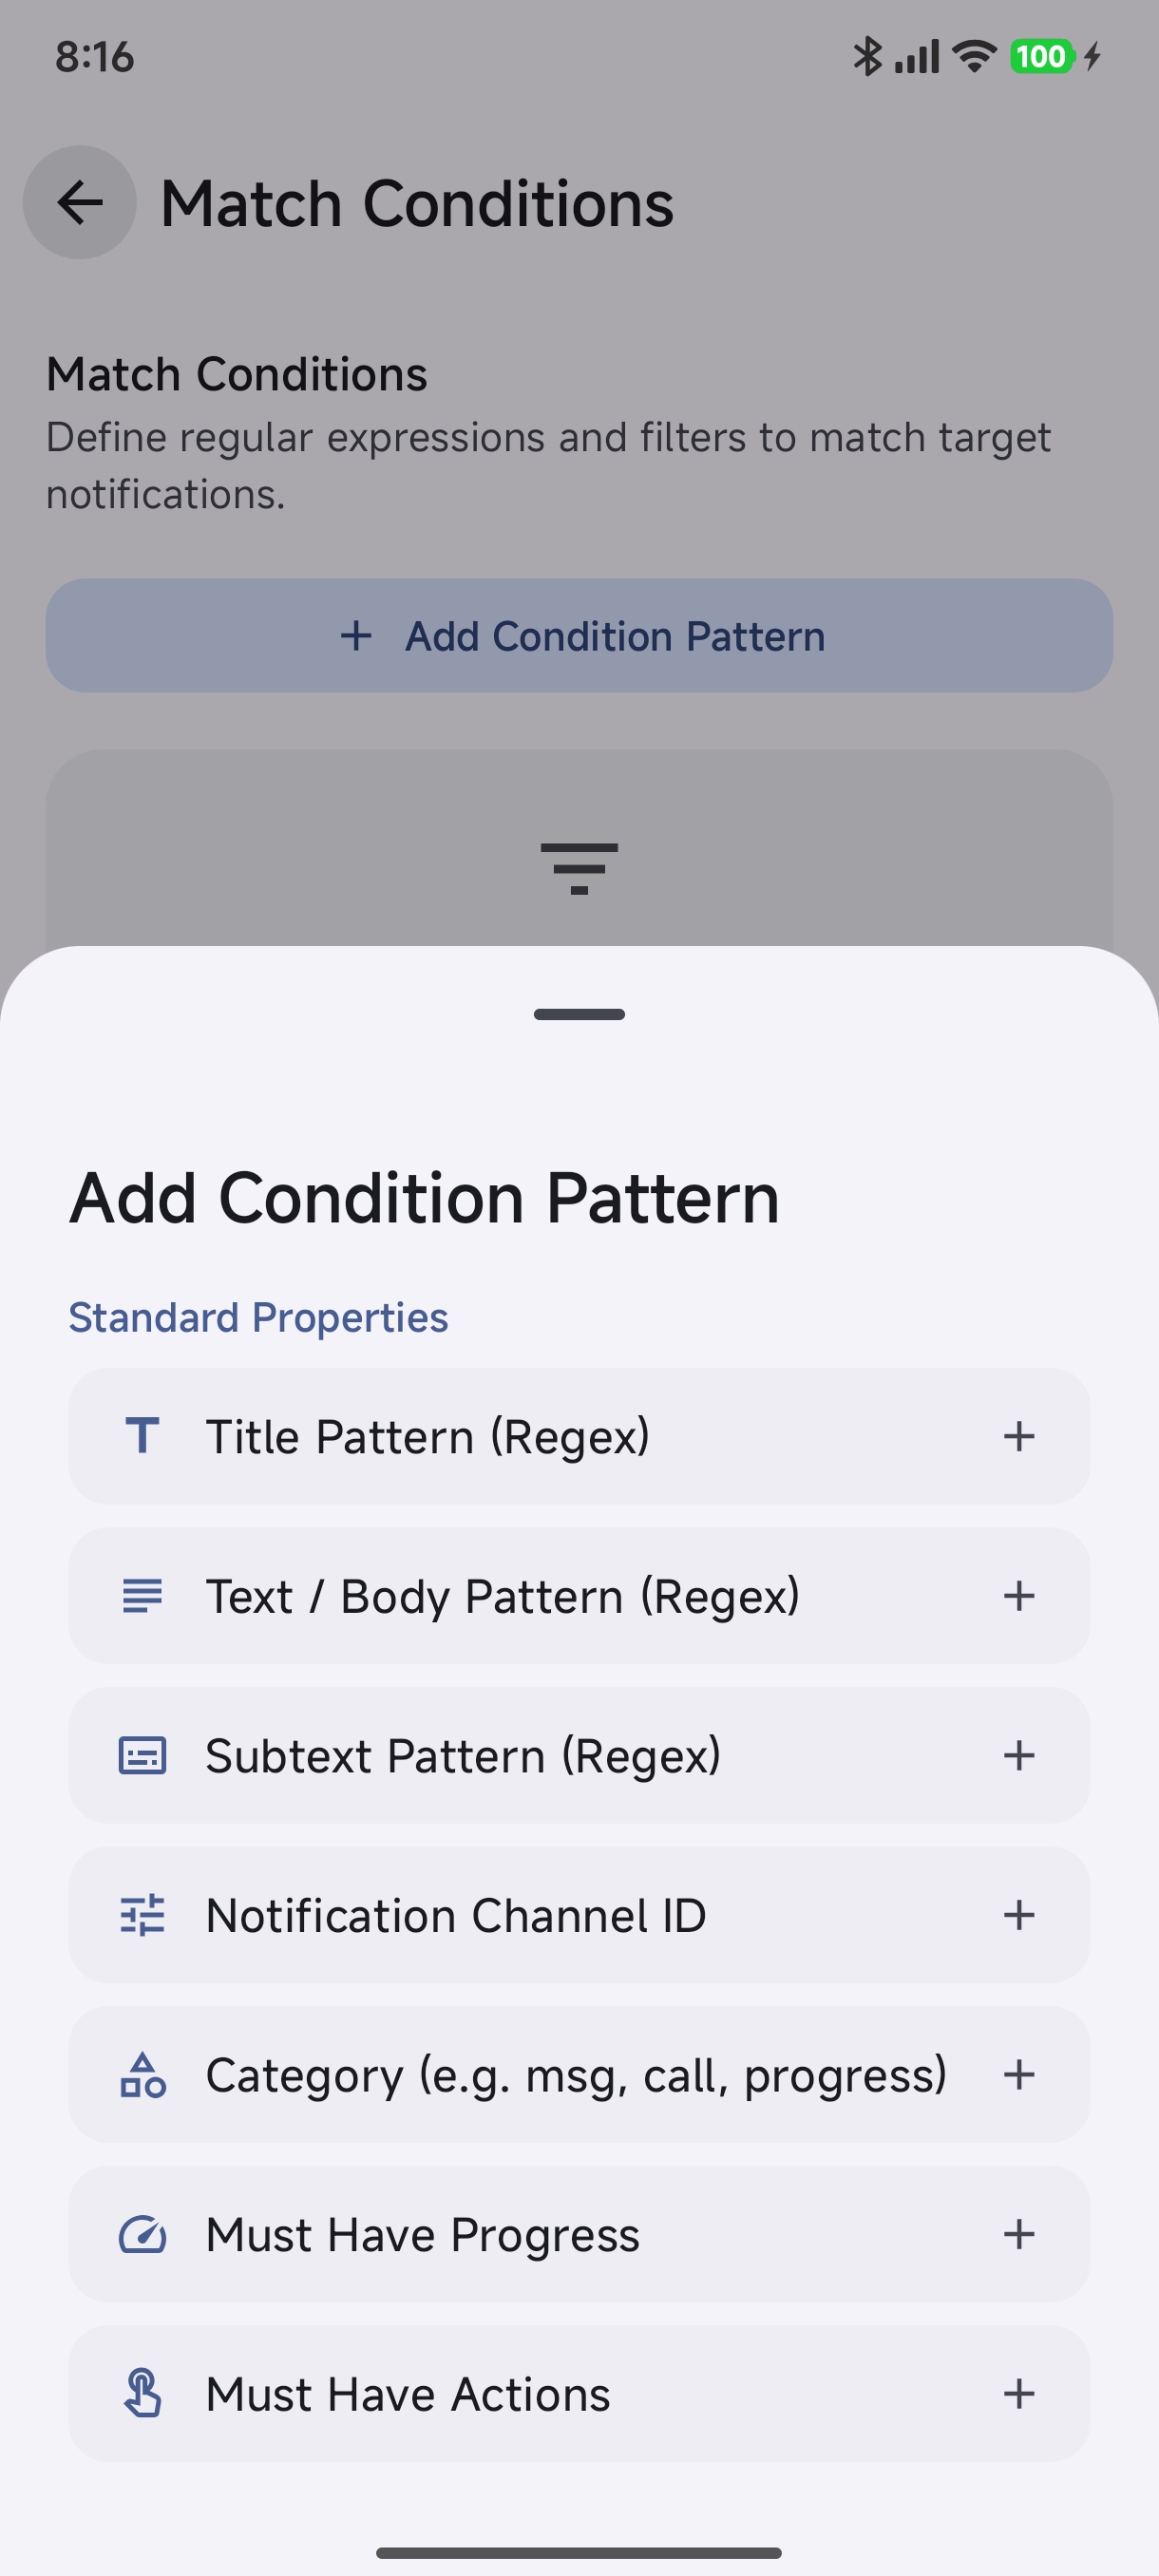
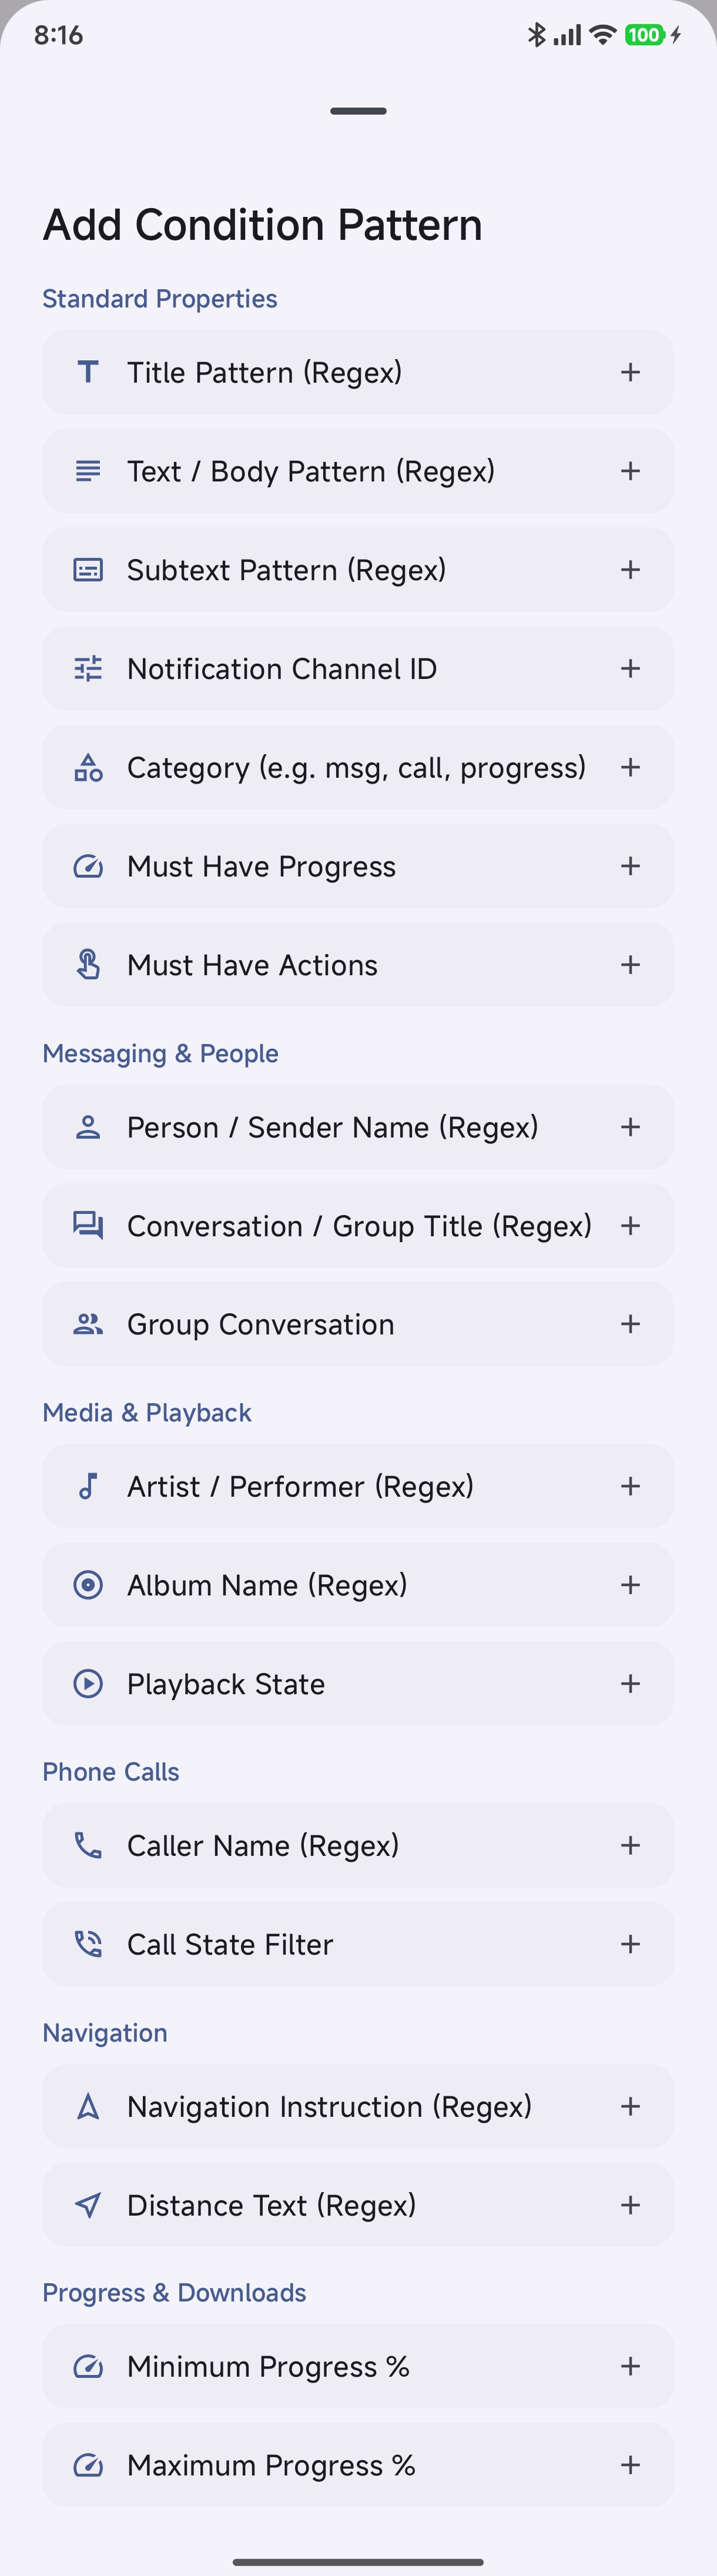
- Tap + Add Condition Pattern to view the extensive catalog of match targets across categories:
- Standard Properties: Title Pattern (Regex), Text / Body Pattern (Regex), Subtext Pattern (Regex), Notification Channel ID, Category (
msg,call,progress), Must Have Progress, Must Have Actions. - Messaging & People: Person / Sender Name (Regex), Conversation / Group Title (Regex), Group Conversation.
- Media & Playback: Artist / Performer (Regex), Album Name (Regex), Playback State.
- Phone Calls: Caller Name (Regex), Call State Filter.
- Navigation: Navigation Instruction (Regex), Distance Text (Regex).
- Progress & Downloads: Minimum Progress %, Maximum Progress %.
- Standard Properties: Title Pattern (Regex), Text / Body Pattern (Regex), Subtext Pattern (Regex), Notification Channel ID, Category (
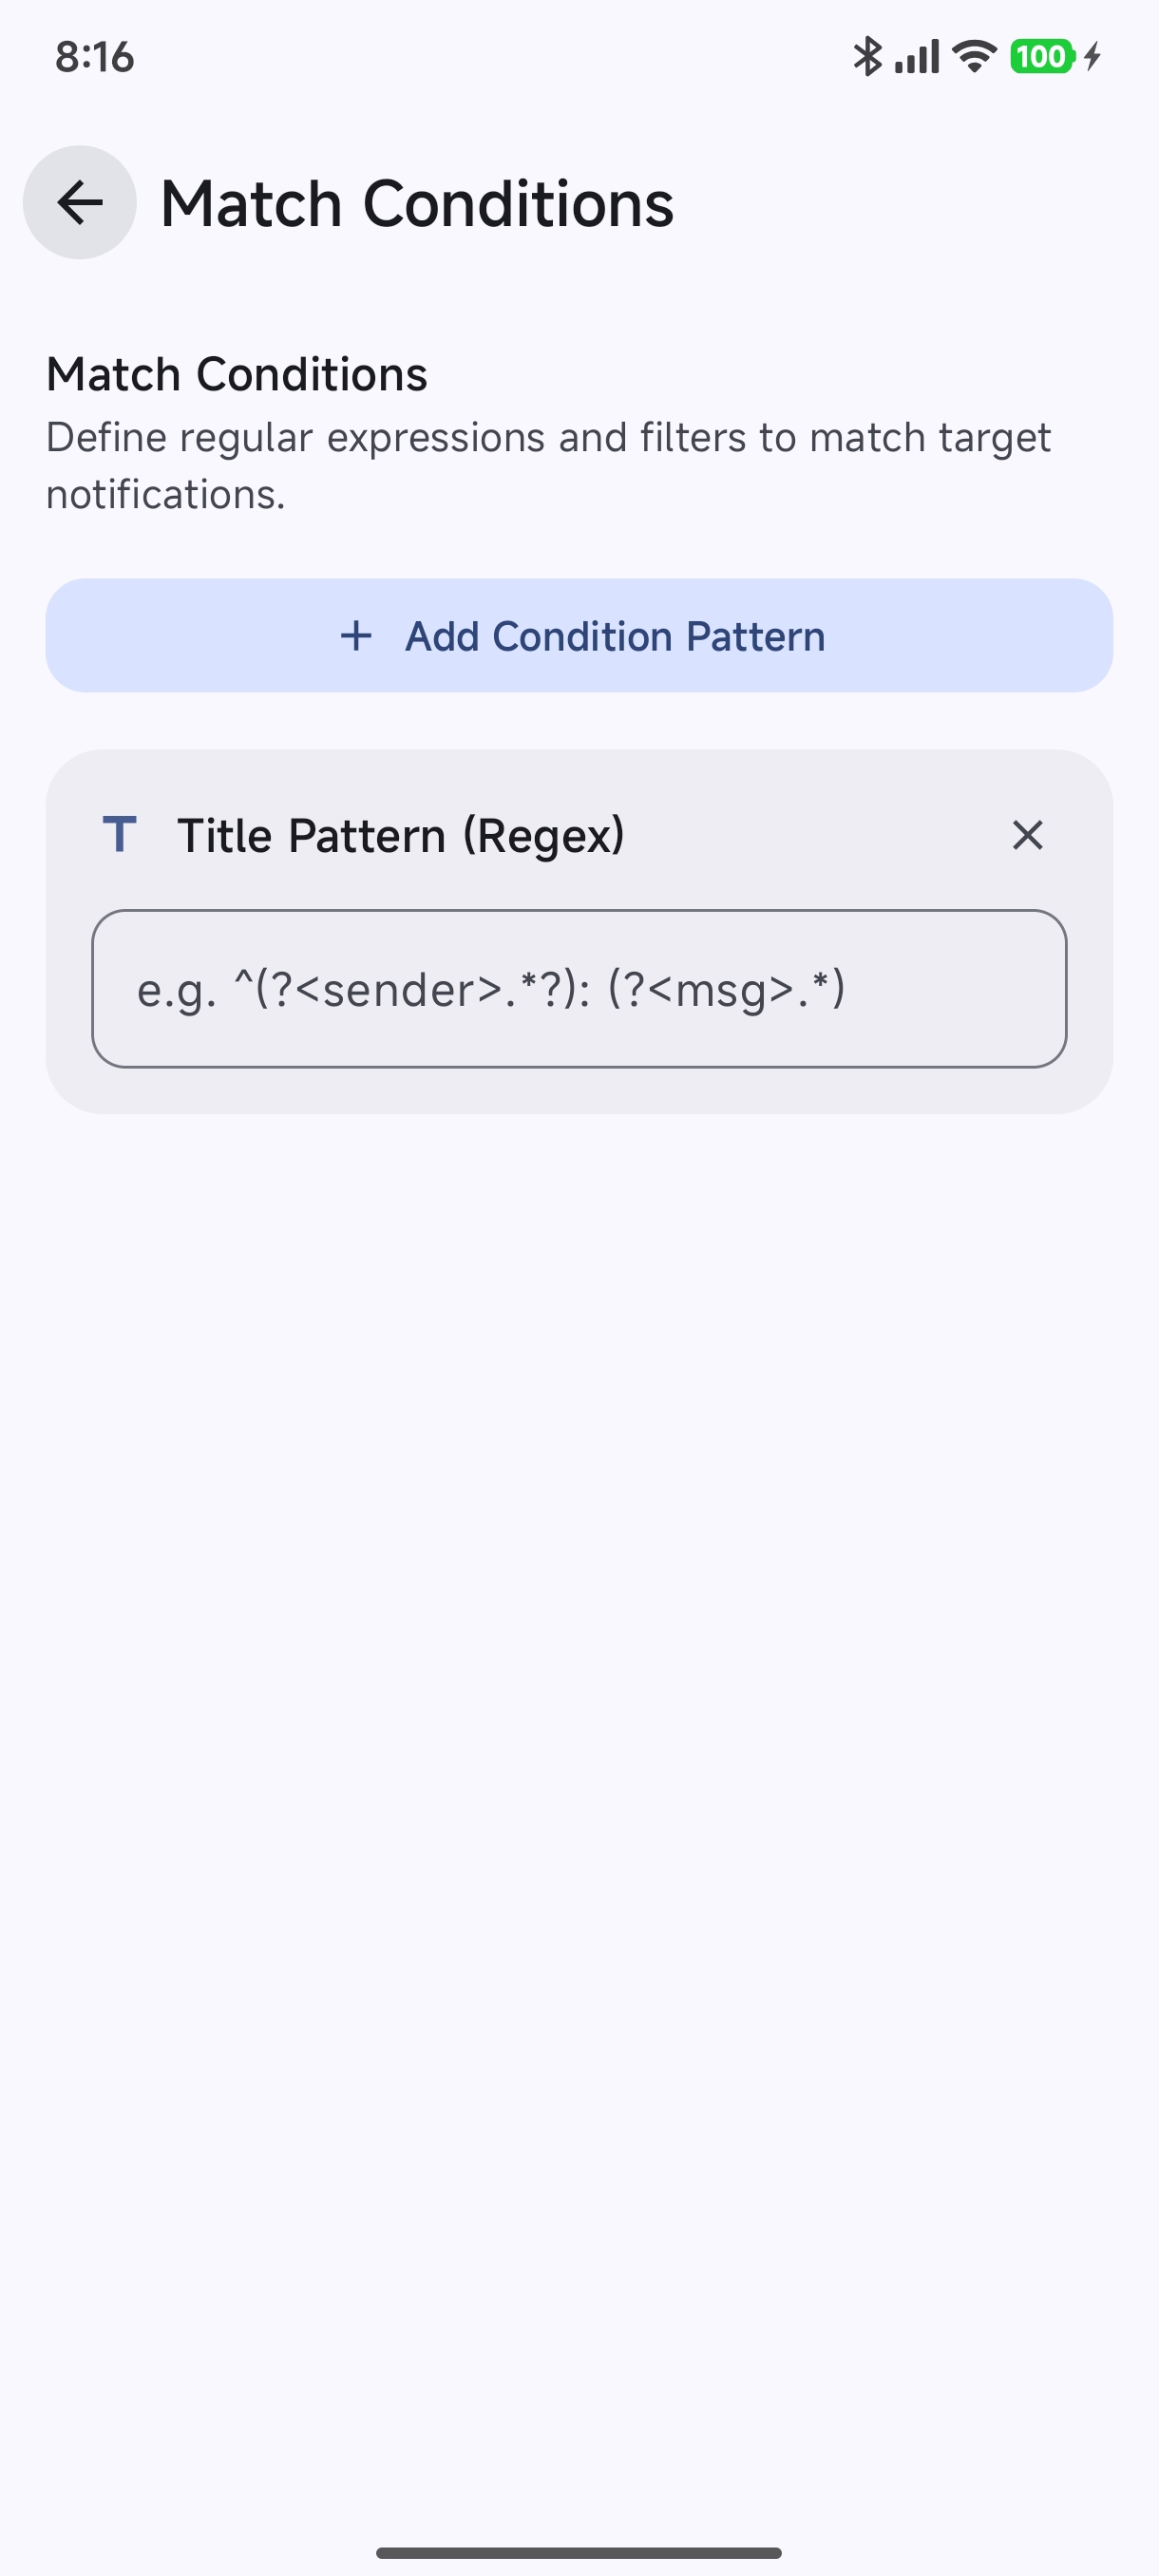
- Enter regex patterns with optional named capture groups (e.g.
^(?<sender>.*?): (?<msg>.*)).
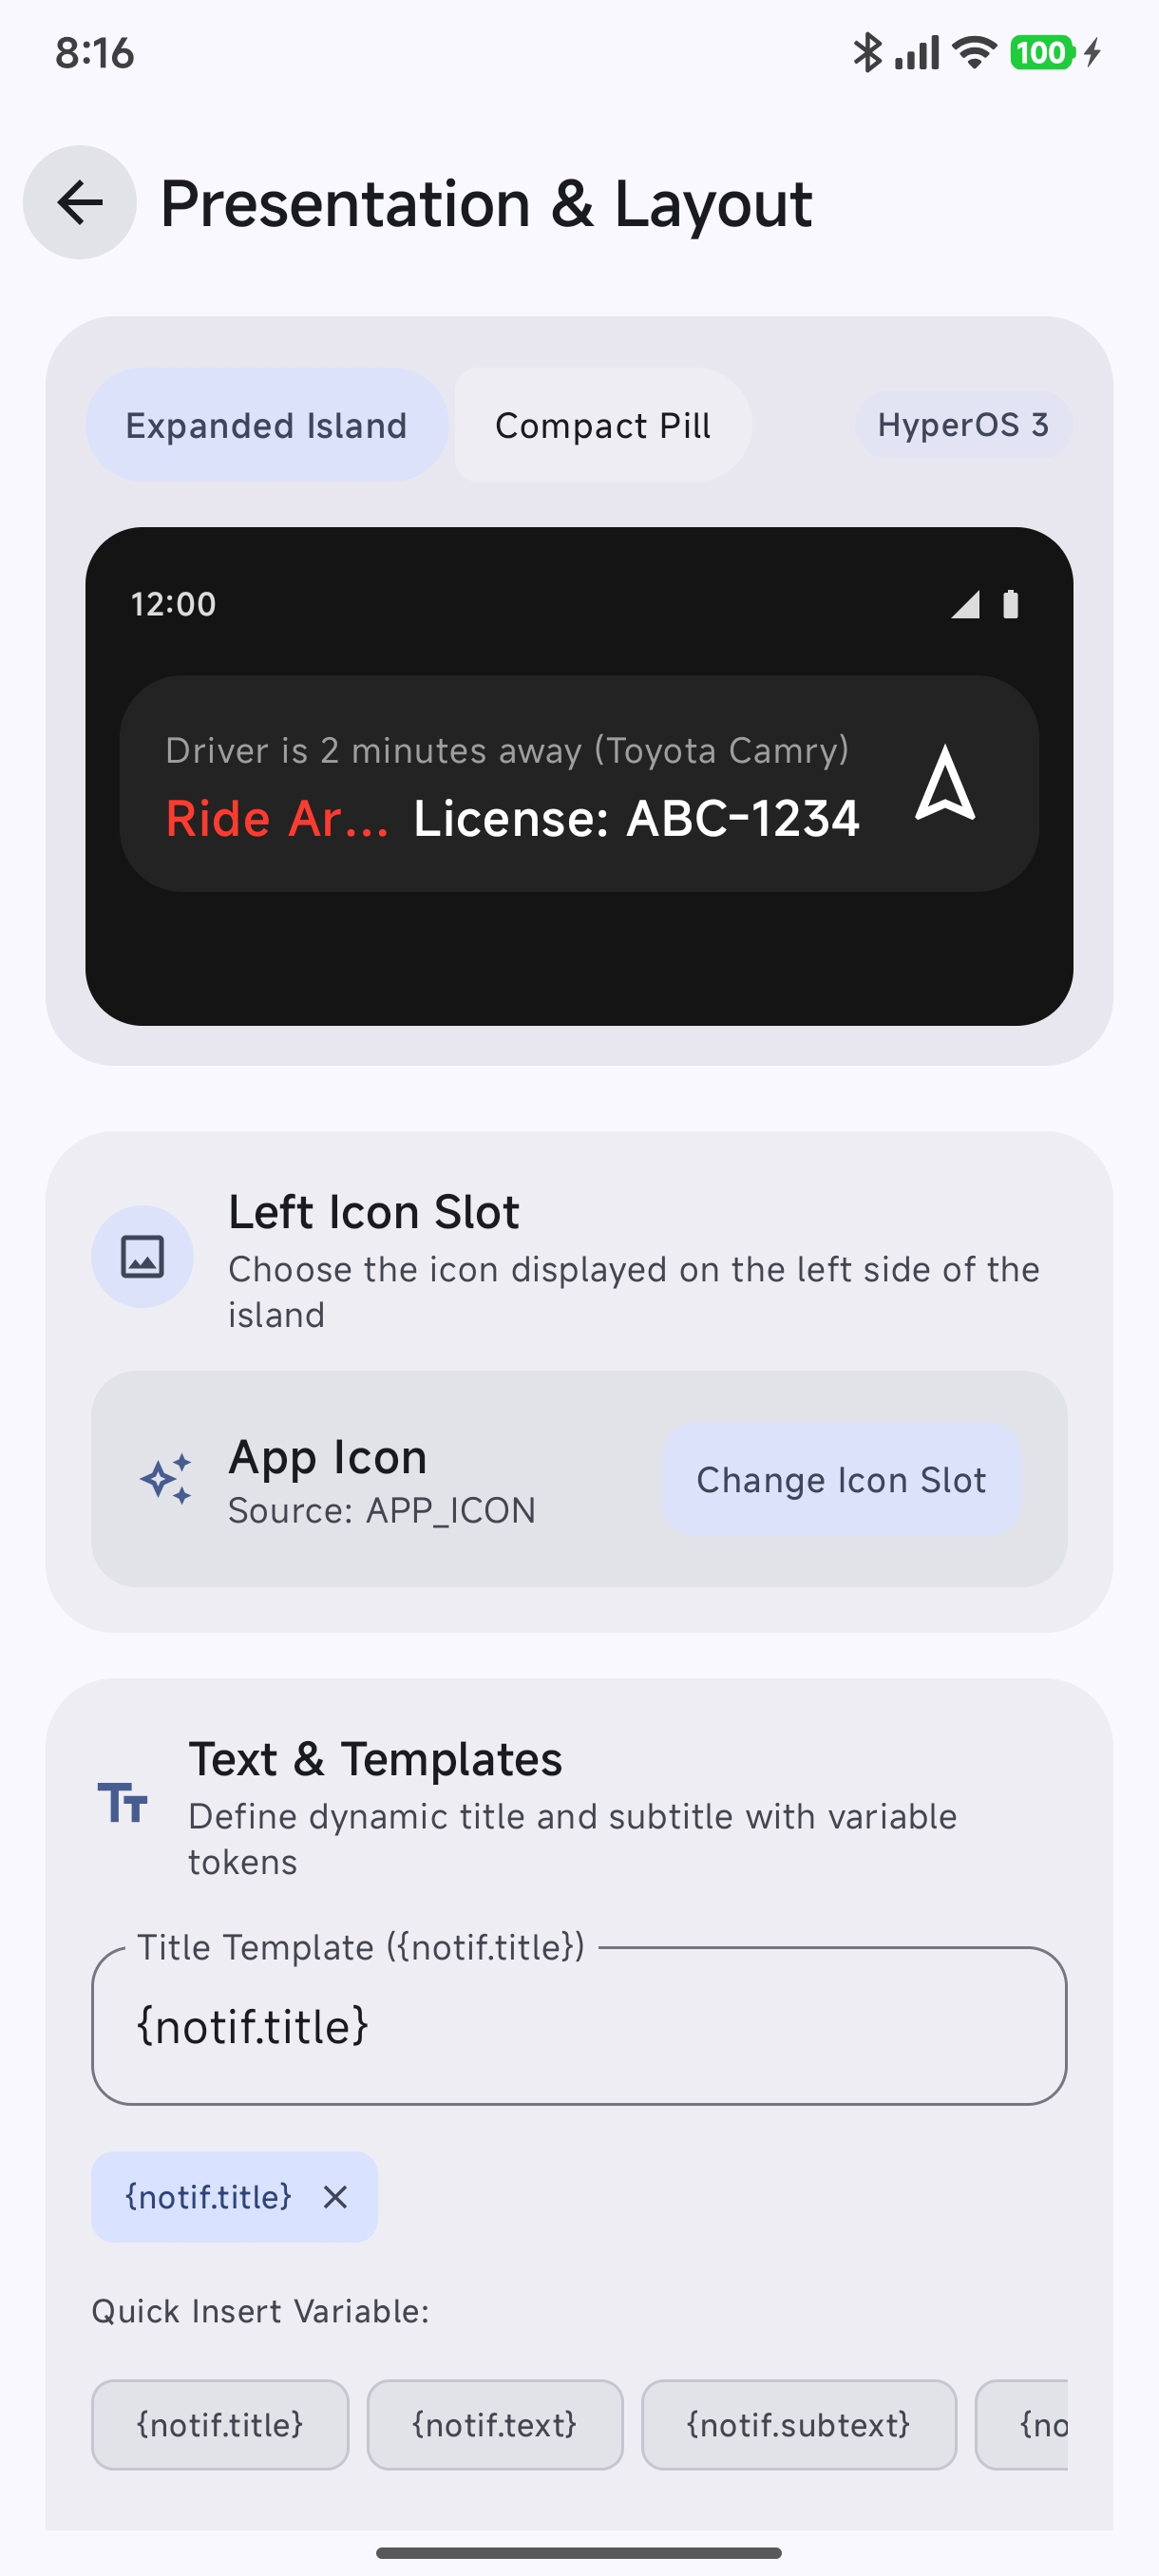
Module 5: Presentation & Layout Templates#
Control visual rendering mode and variable text templates:
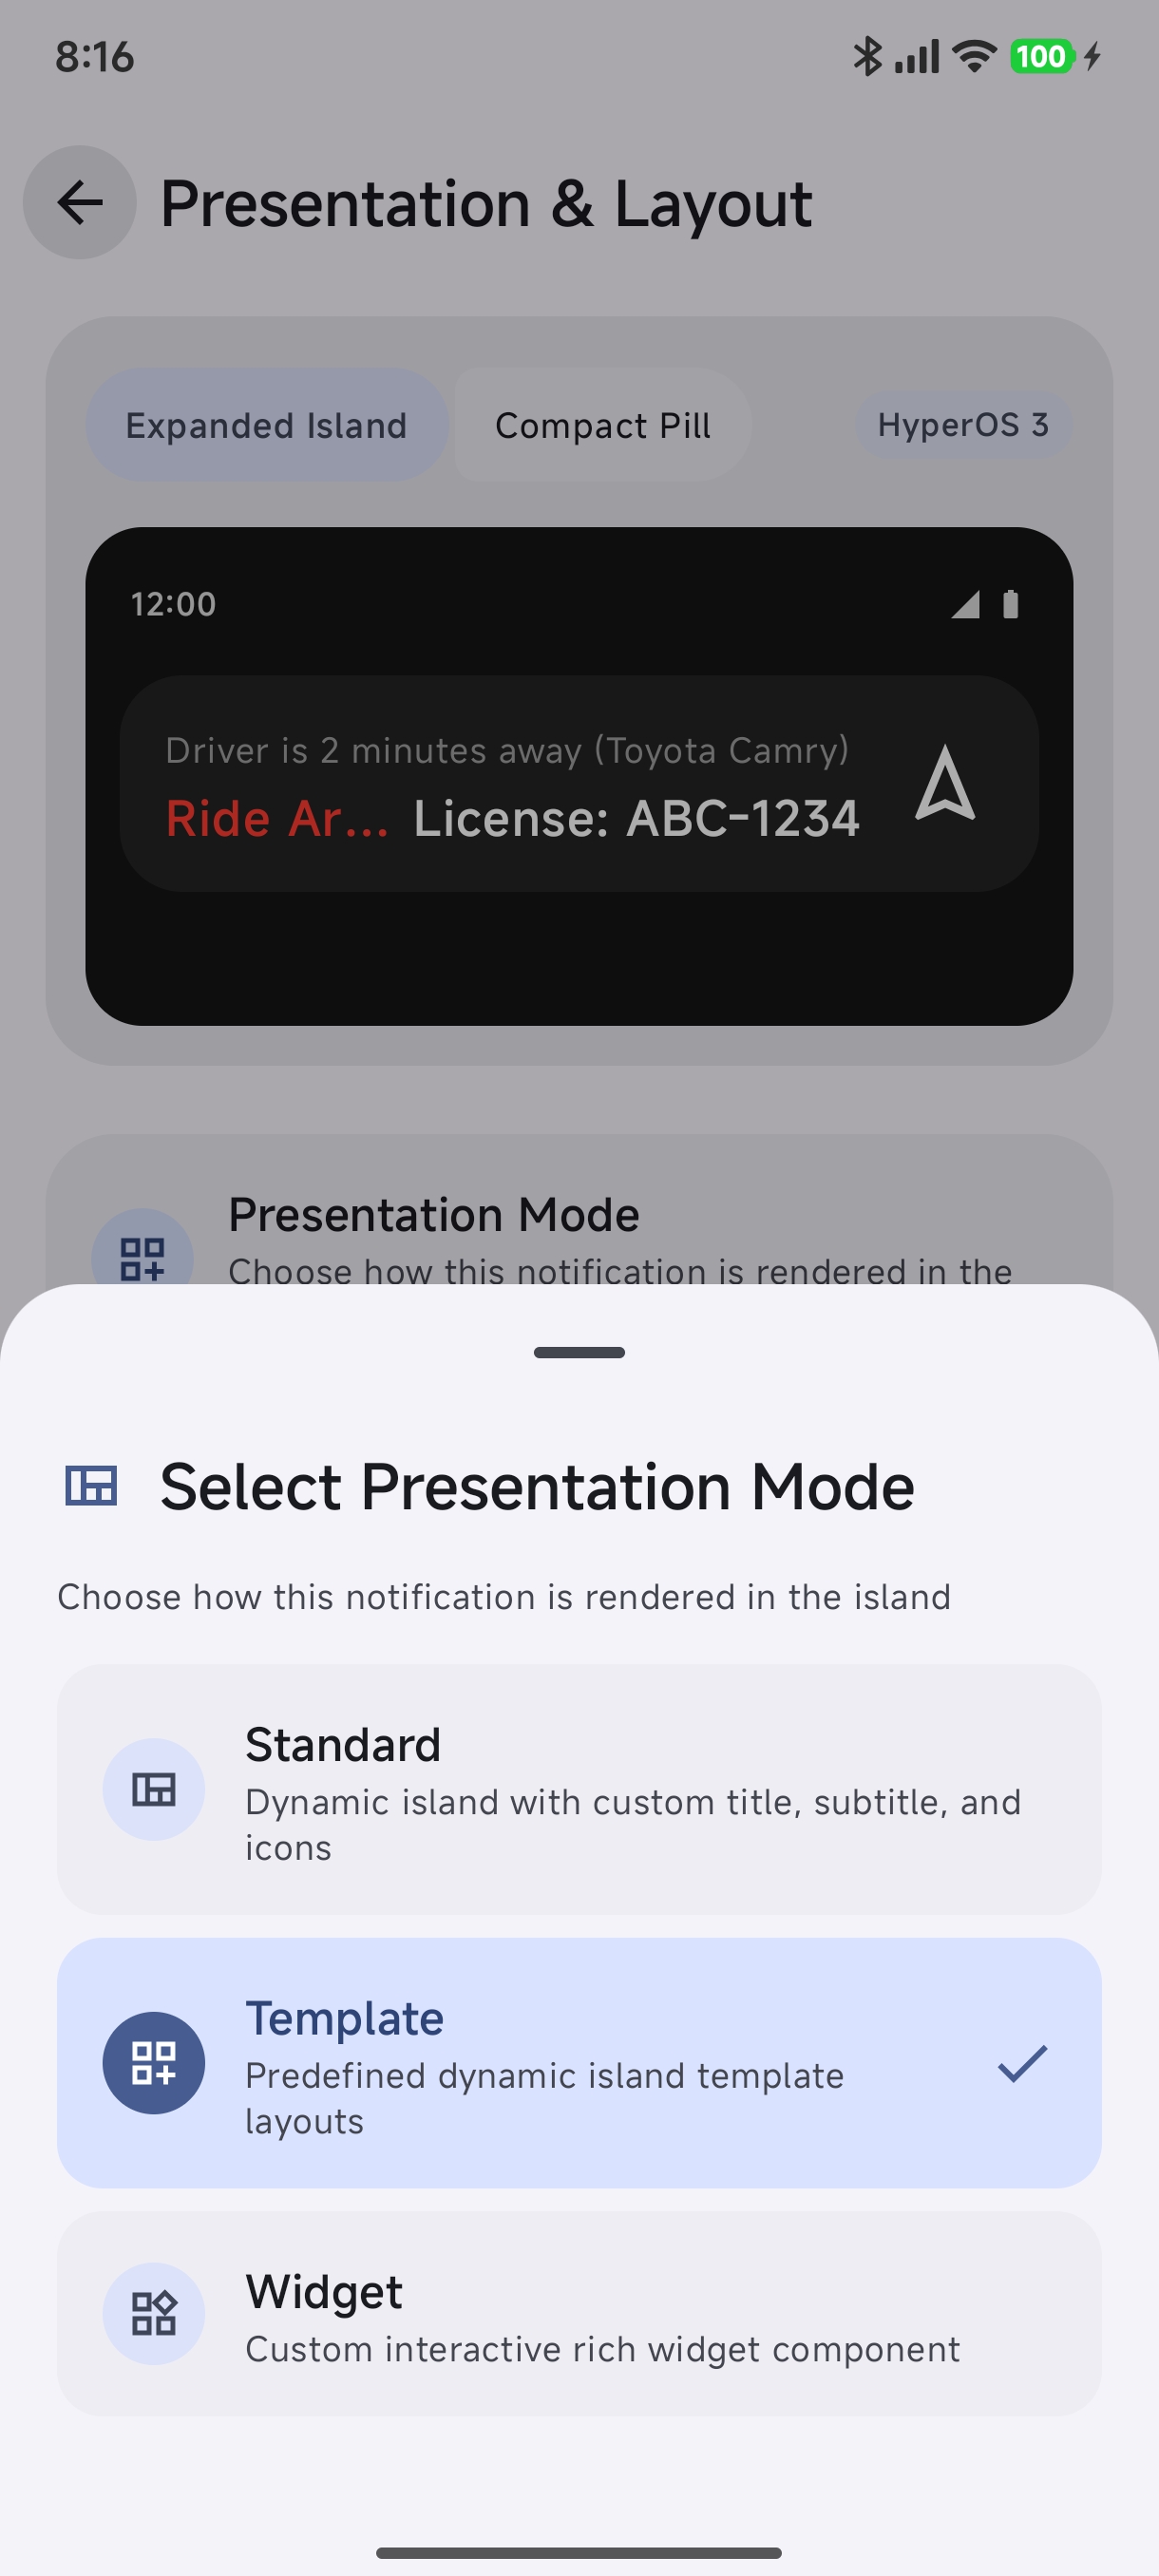
- Presentation Mode: Choose between:
- Standard: Clean default card layout with avatar/icon, title, subtitle, and action buttons.
- Template: Official predefined Xiaomi HyperIsland layouts (
tpl_weather_nav,tpl_payment_wallet,tpl_call_kit,tpl_ride_delivery,tpl_queue_wait,tpl_parking_meter,tpl_file_transfer,tpl_media_compact). - Widget: Interactive rich Android widget component.
- RAW_PARAM_V2 (Direct Xiaomi Island Protocol): Advanced mode for developers and theme authors. Allows supplying a raw Xiaomi HyperOS
param_v2JSON payload template with variable tokens, custom image injections, and direct action key bindings.Streamlined Editor Experience: WhenRAW_PARAM_V2is active, Hyper Bridge automatically hides manual visual builder tabs (Pill, Presentation slots, Progress, Action slots). The visual editor streamlines its interface to focus exclusively on Target Apps & Scope, Matching Conditions, Custom Variables & Regex, and Behavior Overrides.
- Template Selector: Switch between Xiaomi’s 10 official templates.
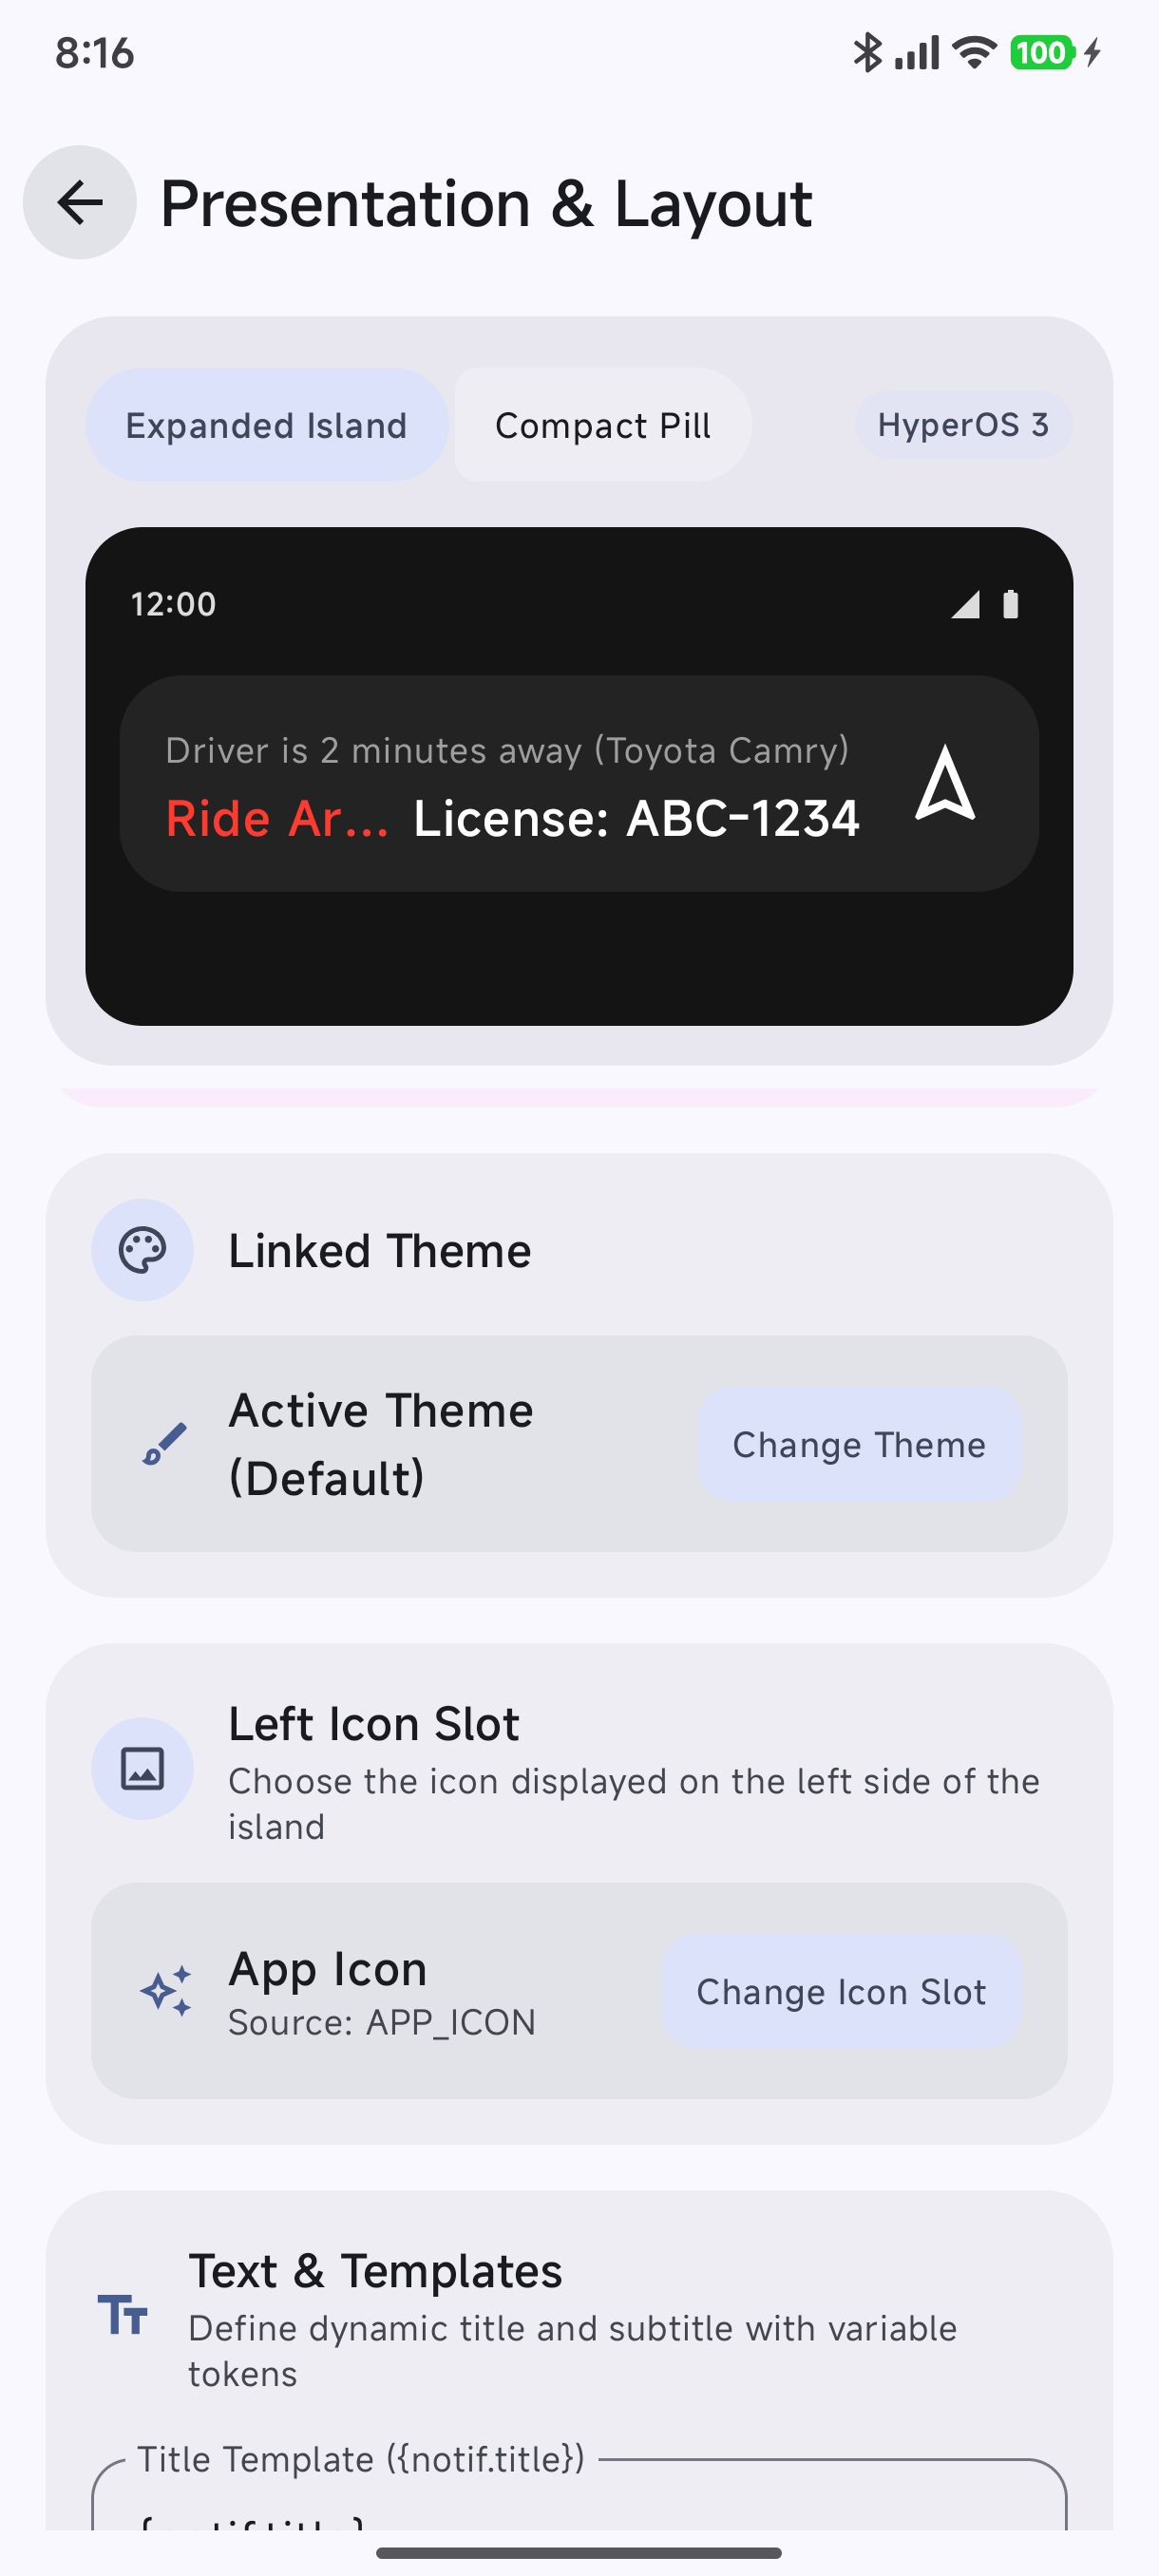
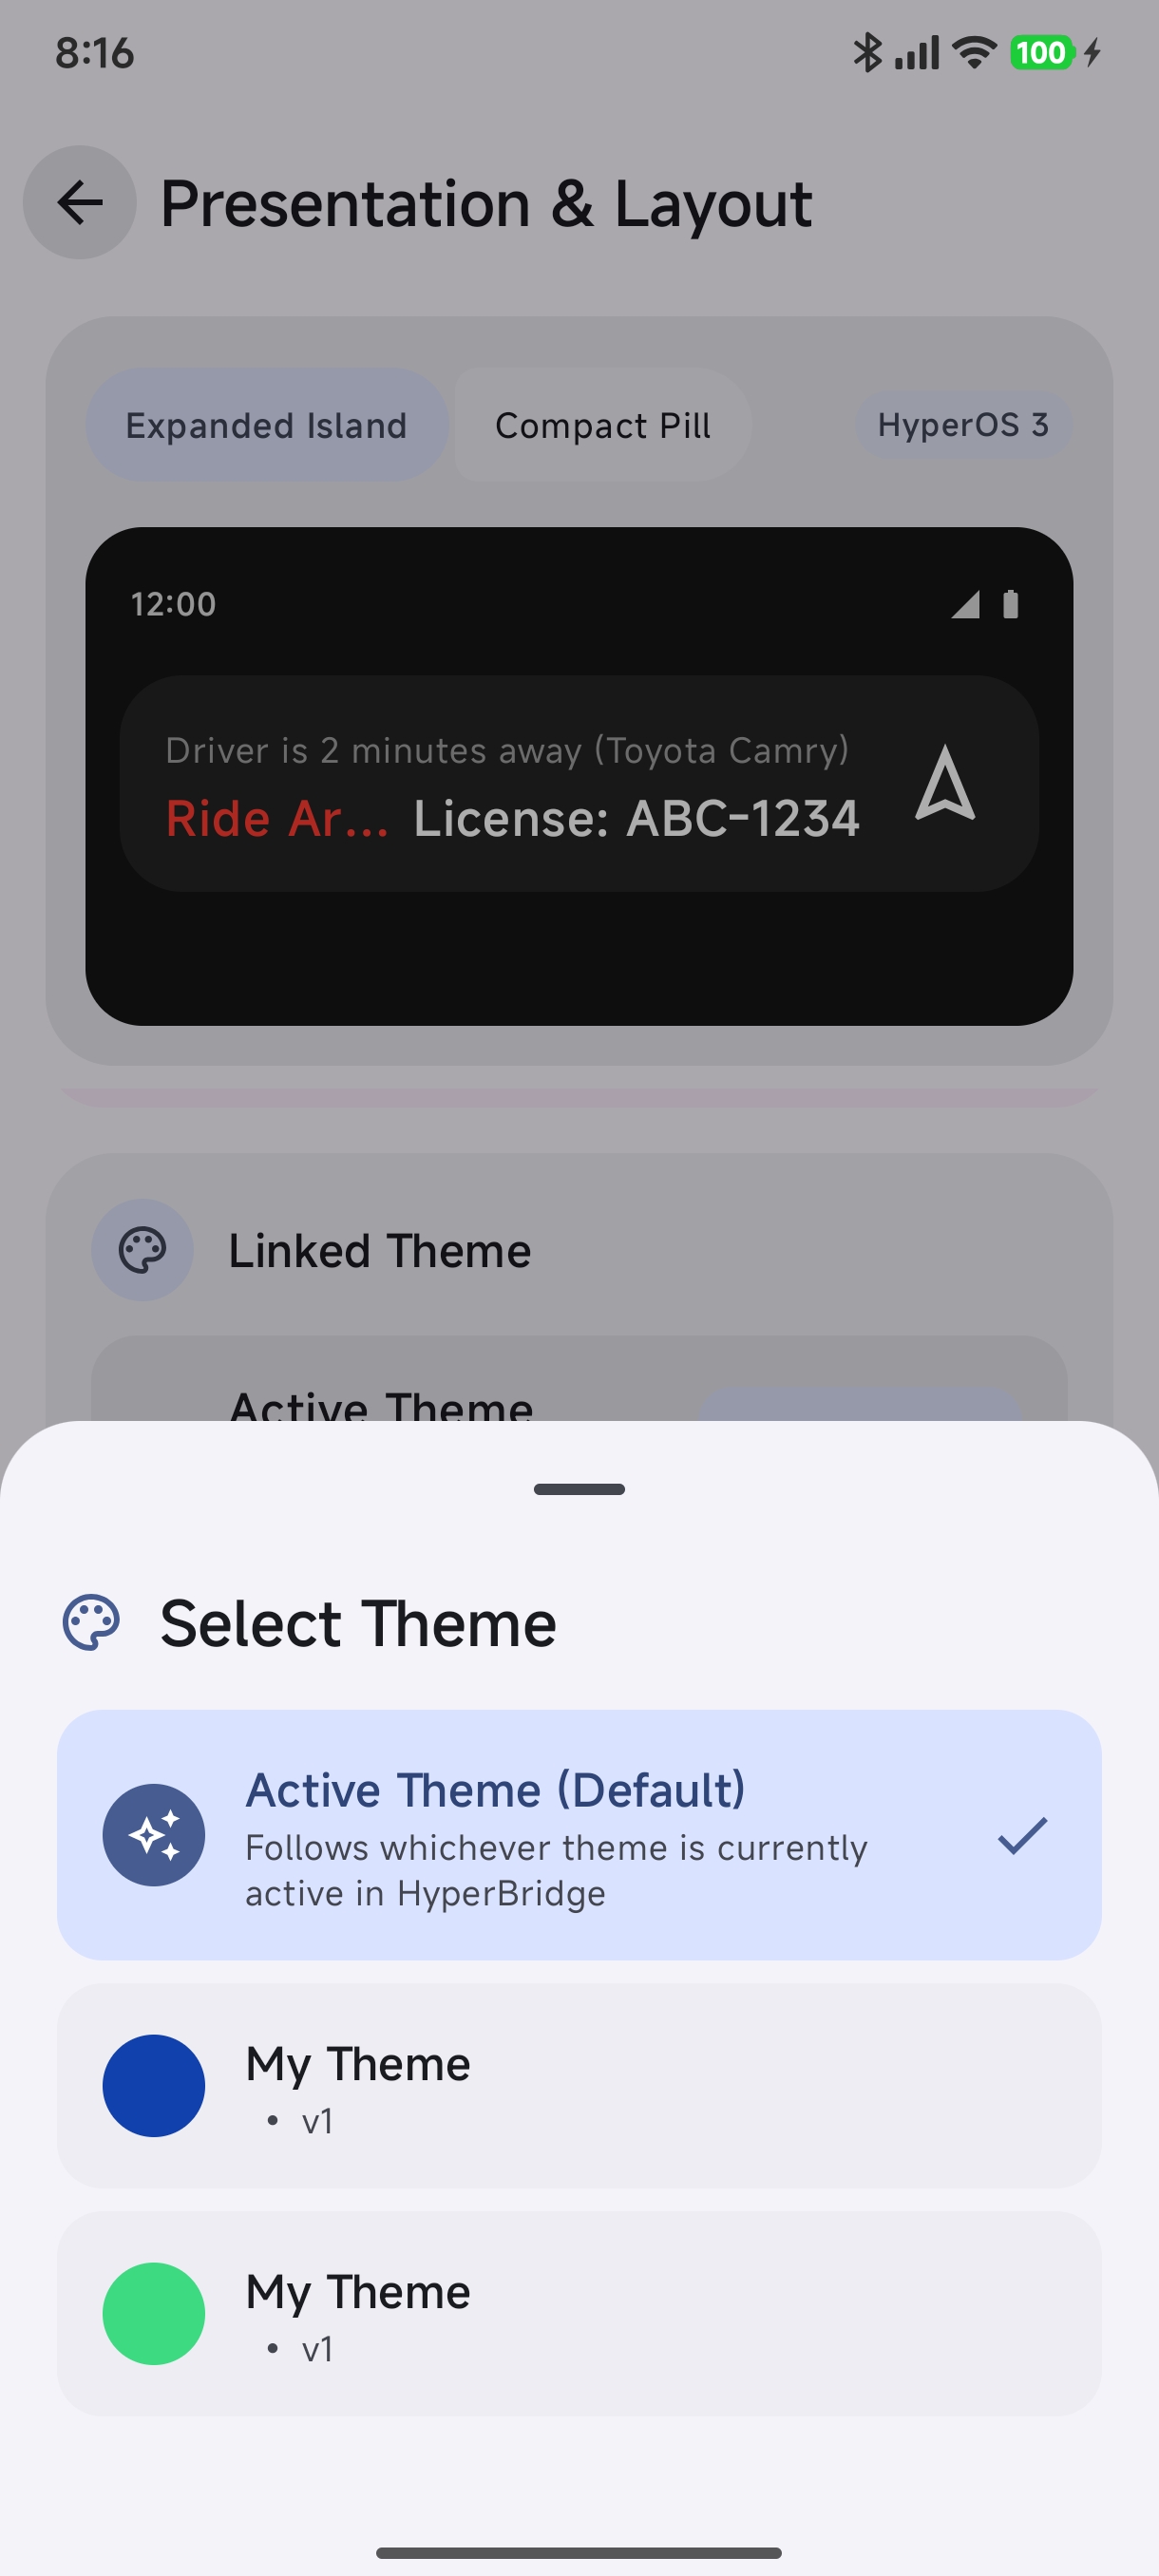
- Linked Theme: Inherit the globally active theme or bind to a custom installed theme.
- Left Icon Slot: Set the source icon displayed on the left side of the island (e.g., App Icon, Custom Icon, Contact Avatar).
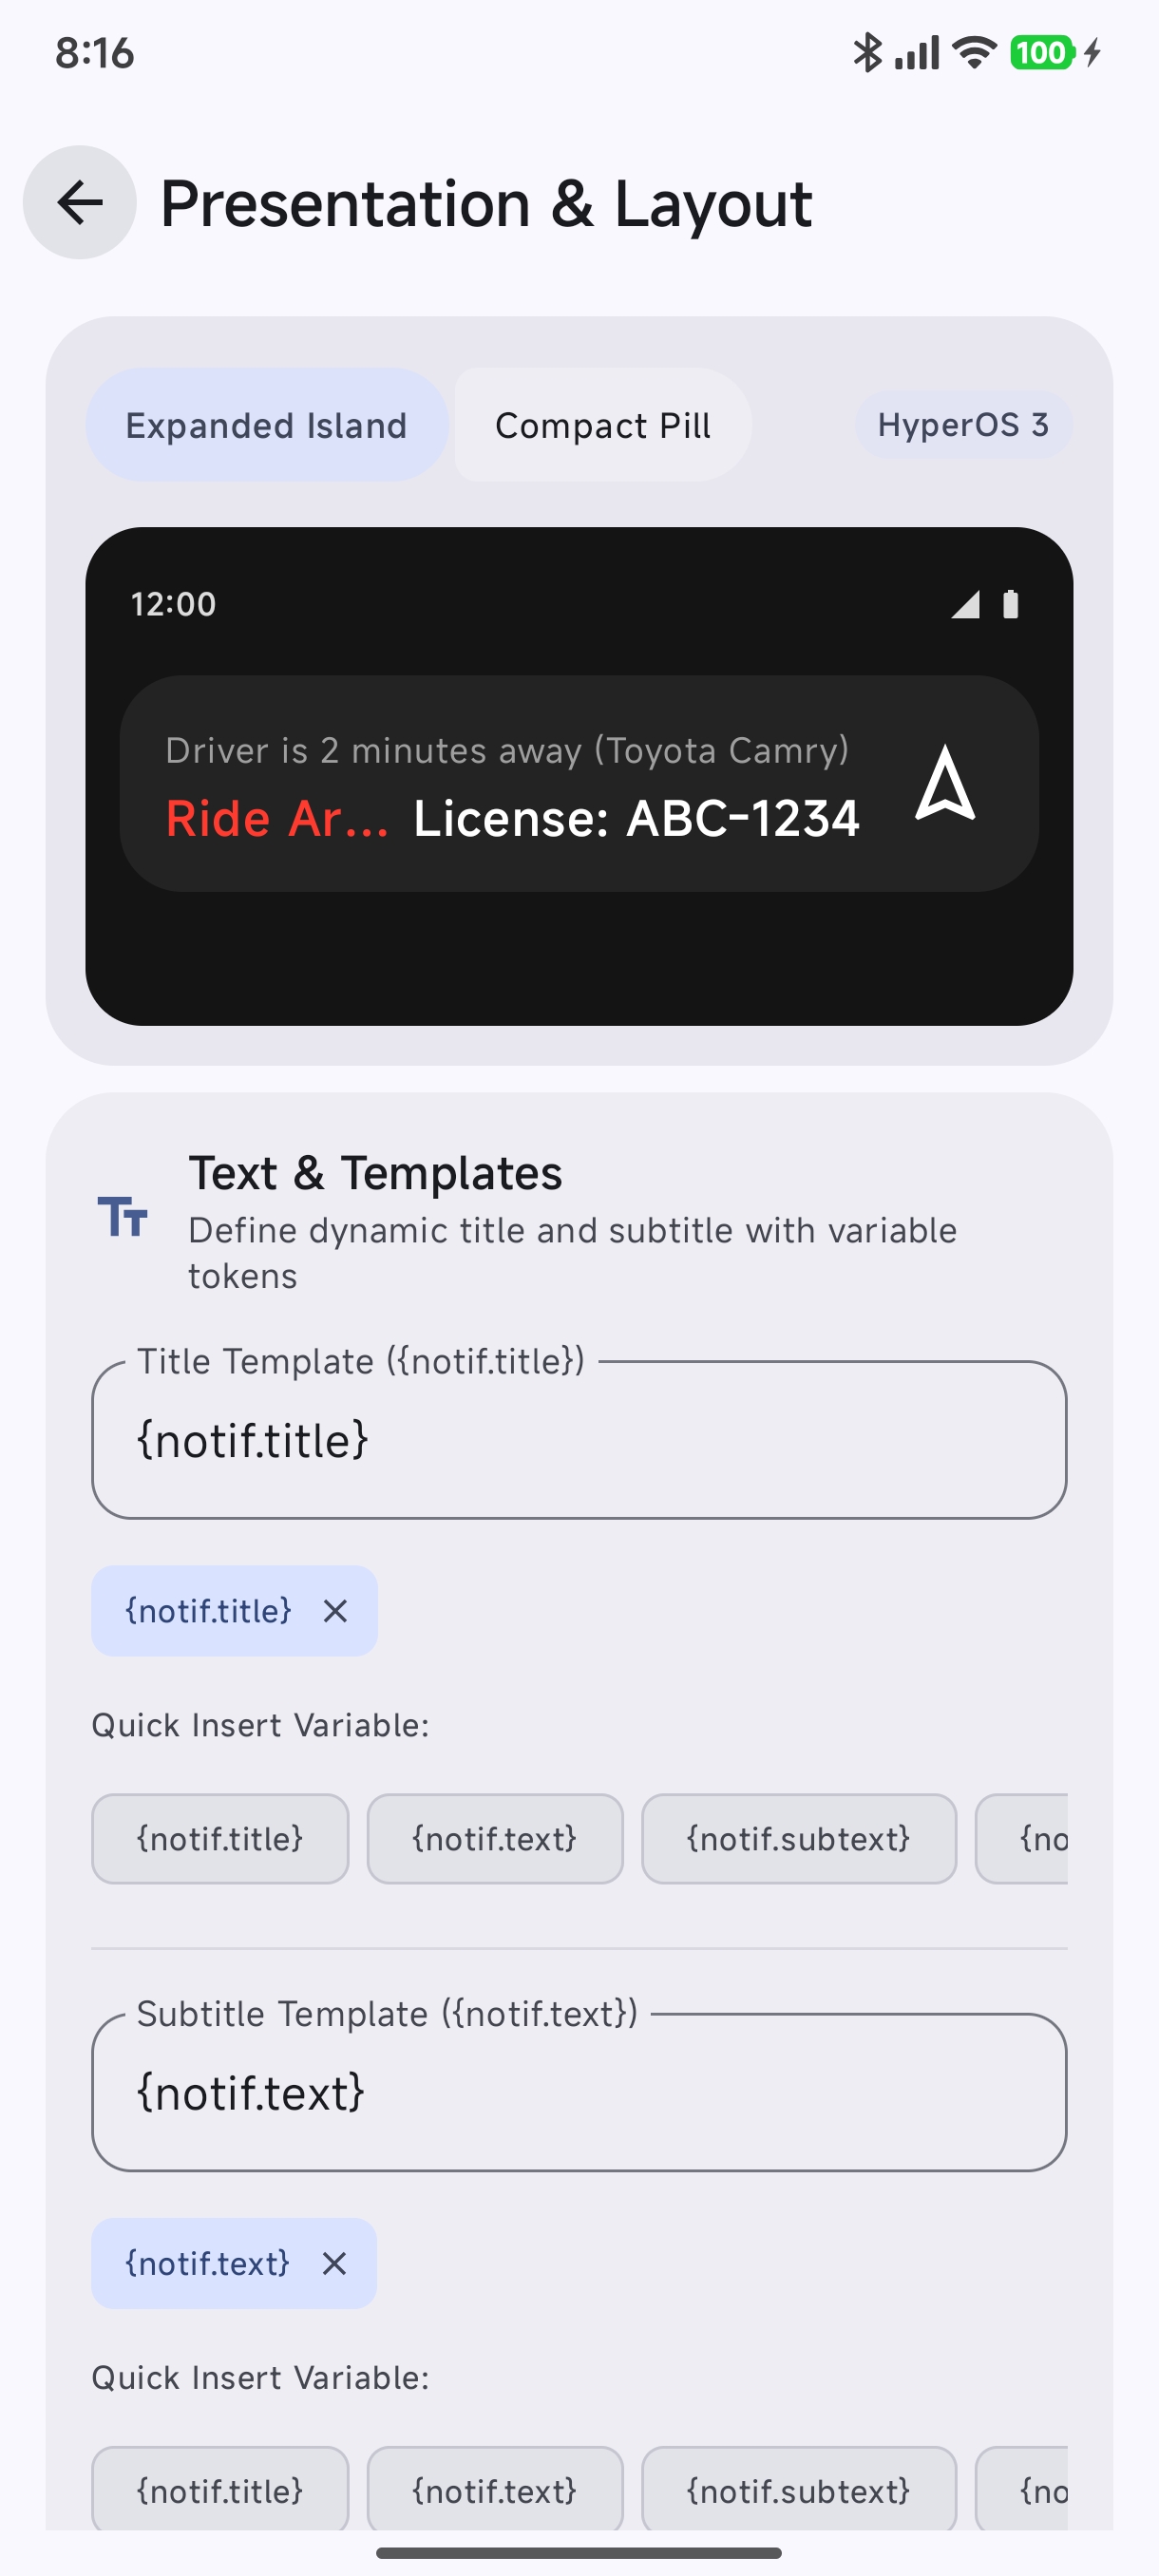
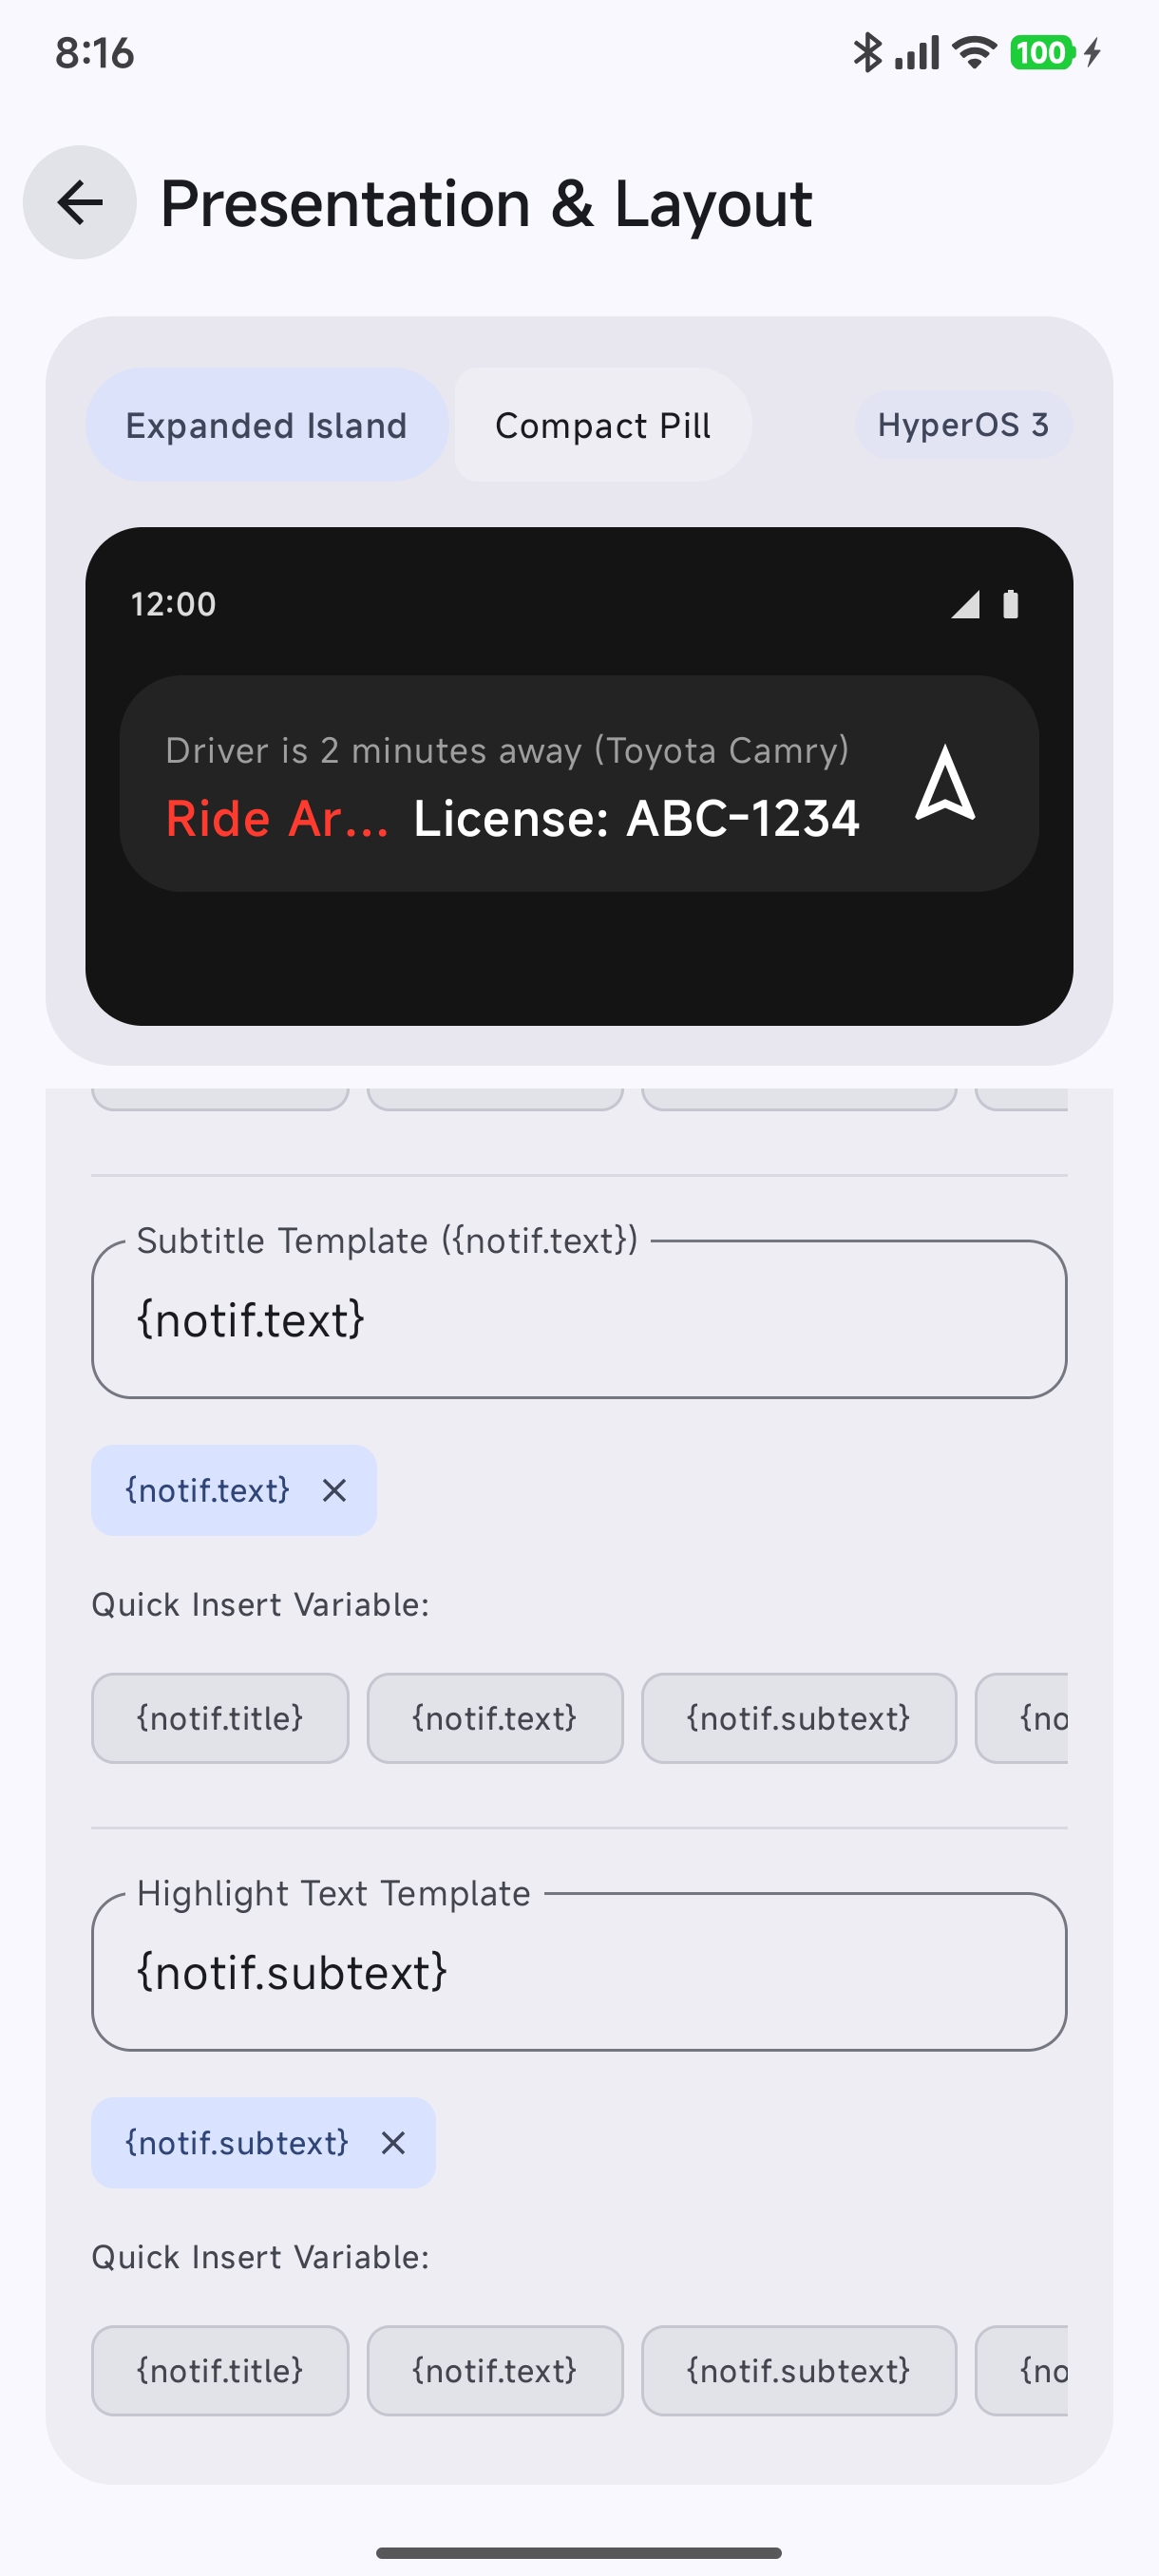
- Text & Templates with Dynamic Tokens & Cascading Fallbacks: Customize the Title Template, Subtitle Template, and Highlight Text Template using dynamic variable chips like
{notif.title},{notif.text},{notif.subtext}:- Built-in tokens:
{notif.title},{notif.text},{notif.sender},{notif.conversation_title},{notif.media_artist},{notif.progress},{app.name}. - Cascading fallbacks:
{media.artist | notif.text | "Unknown Artist"}or{var.driver ?: "Driver"}evaluate candidates from left to right, preventing blank placeholders.
- Built-in tokens:
Module 6: Compact Pill Customization#
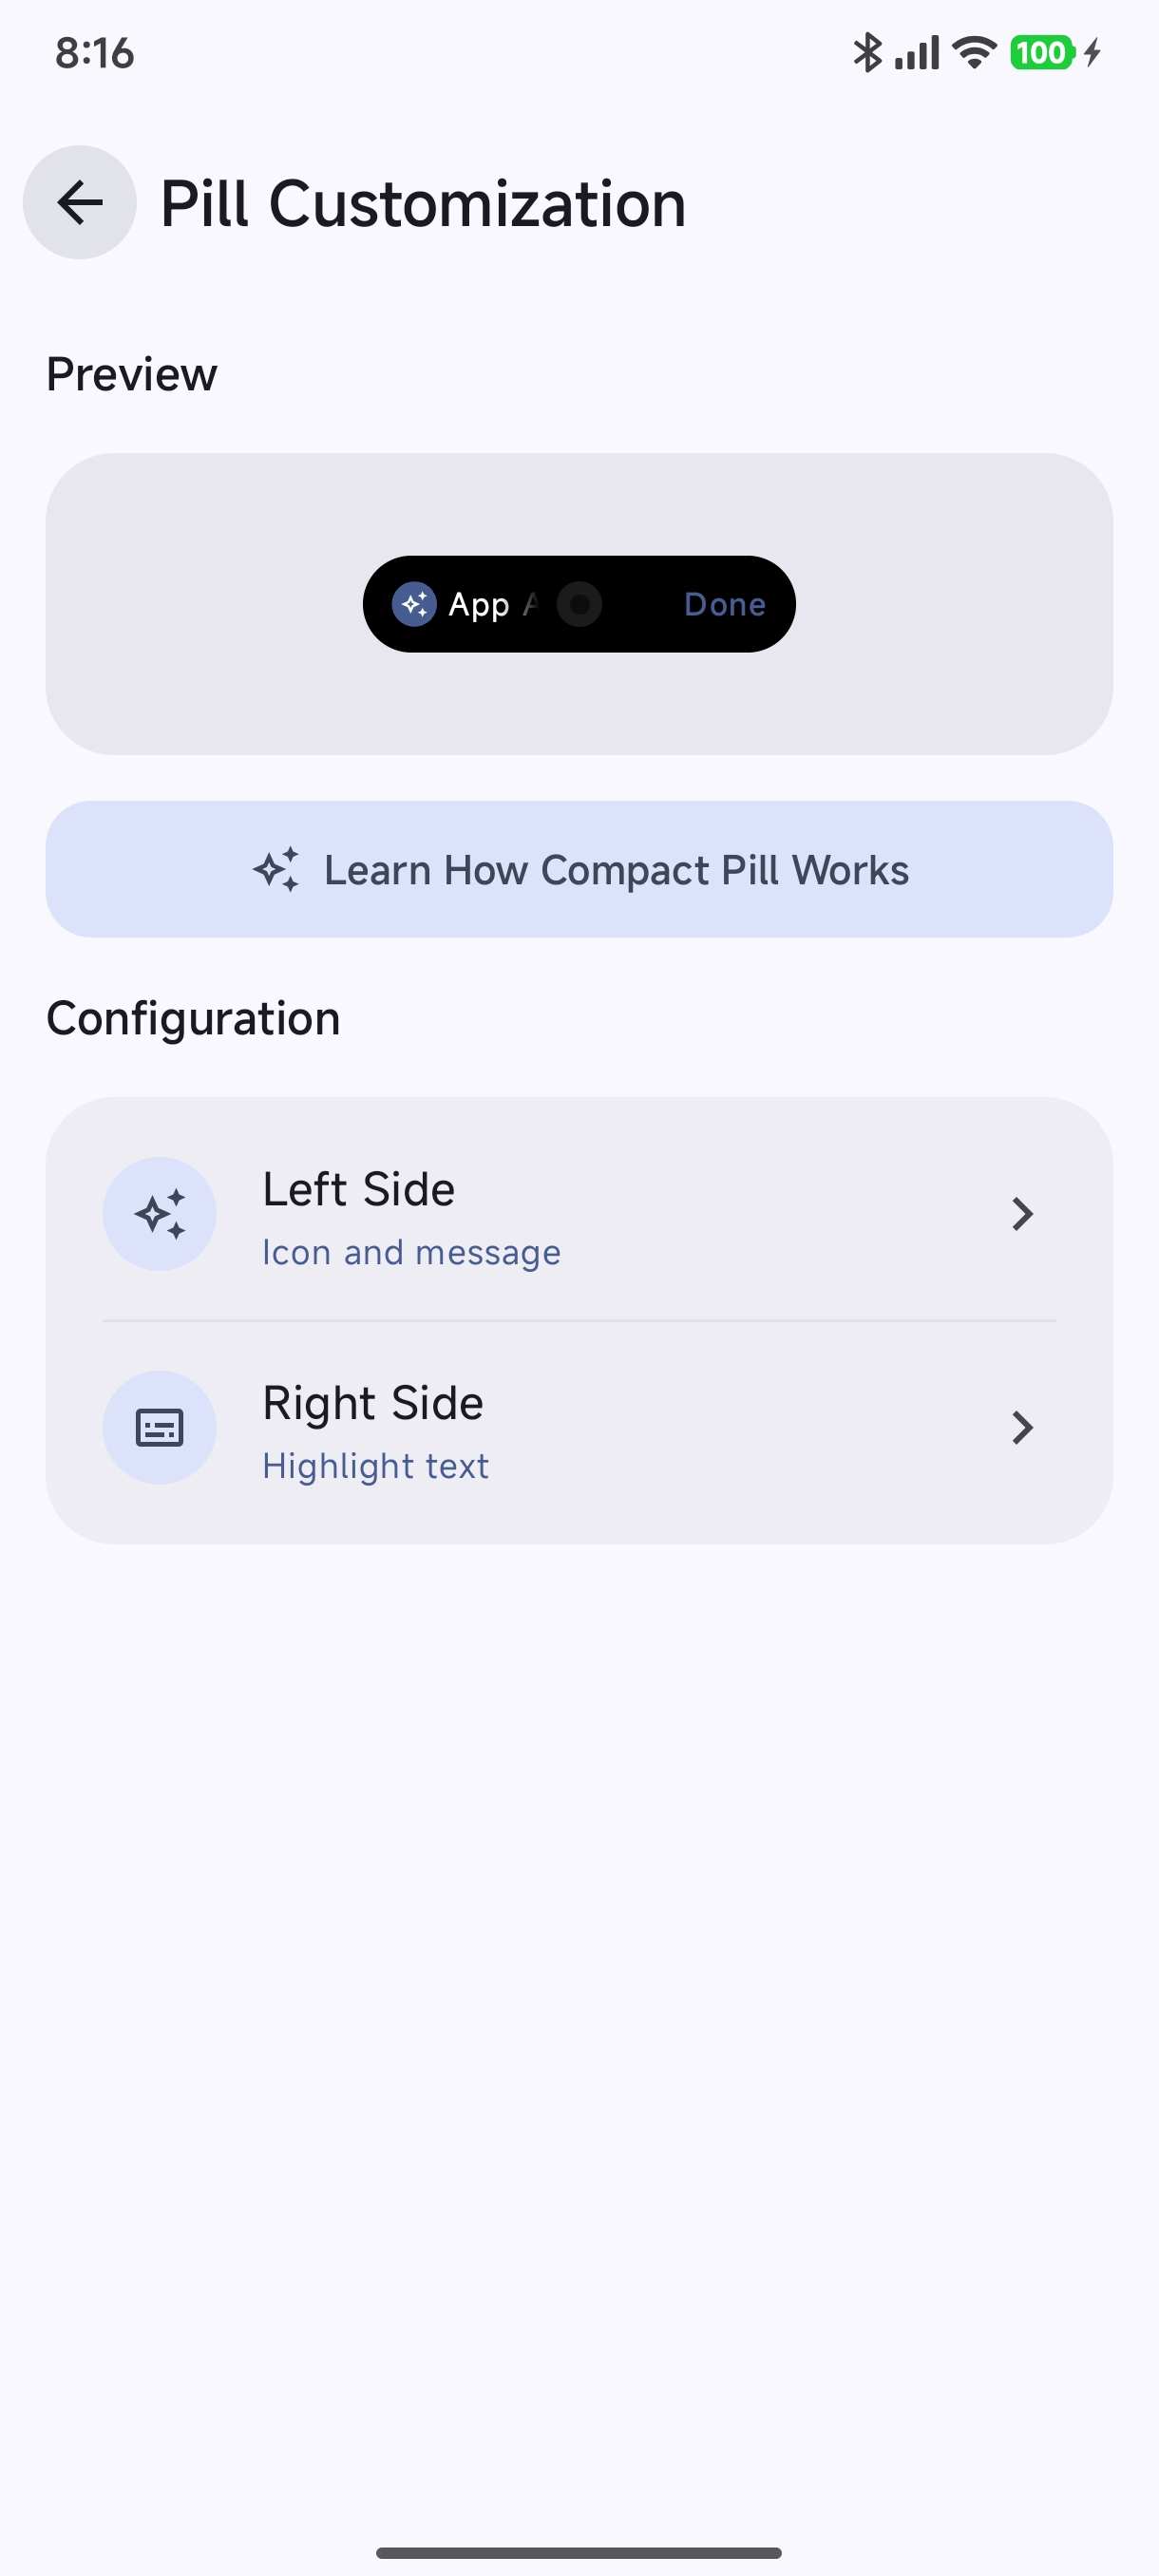
Configure how the compact status pill is displayed when collapsed around your camera cutout:
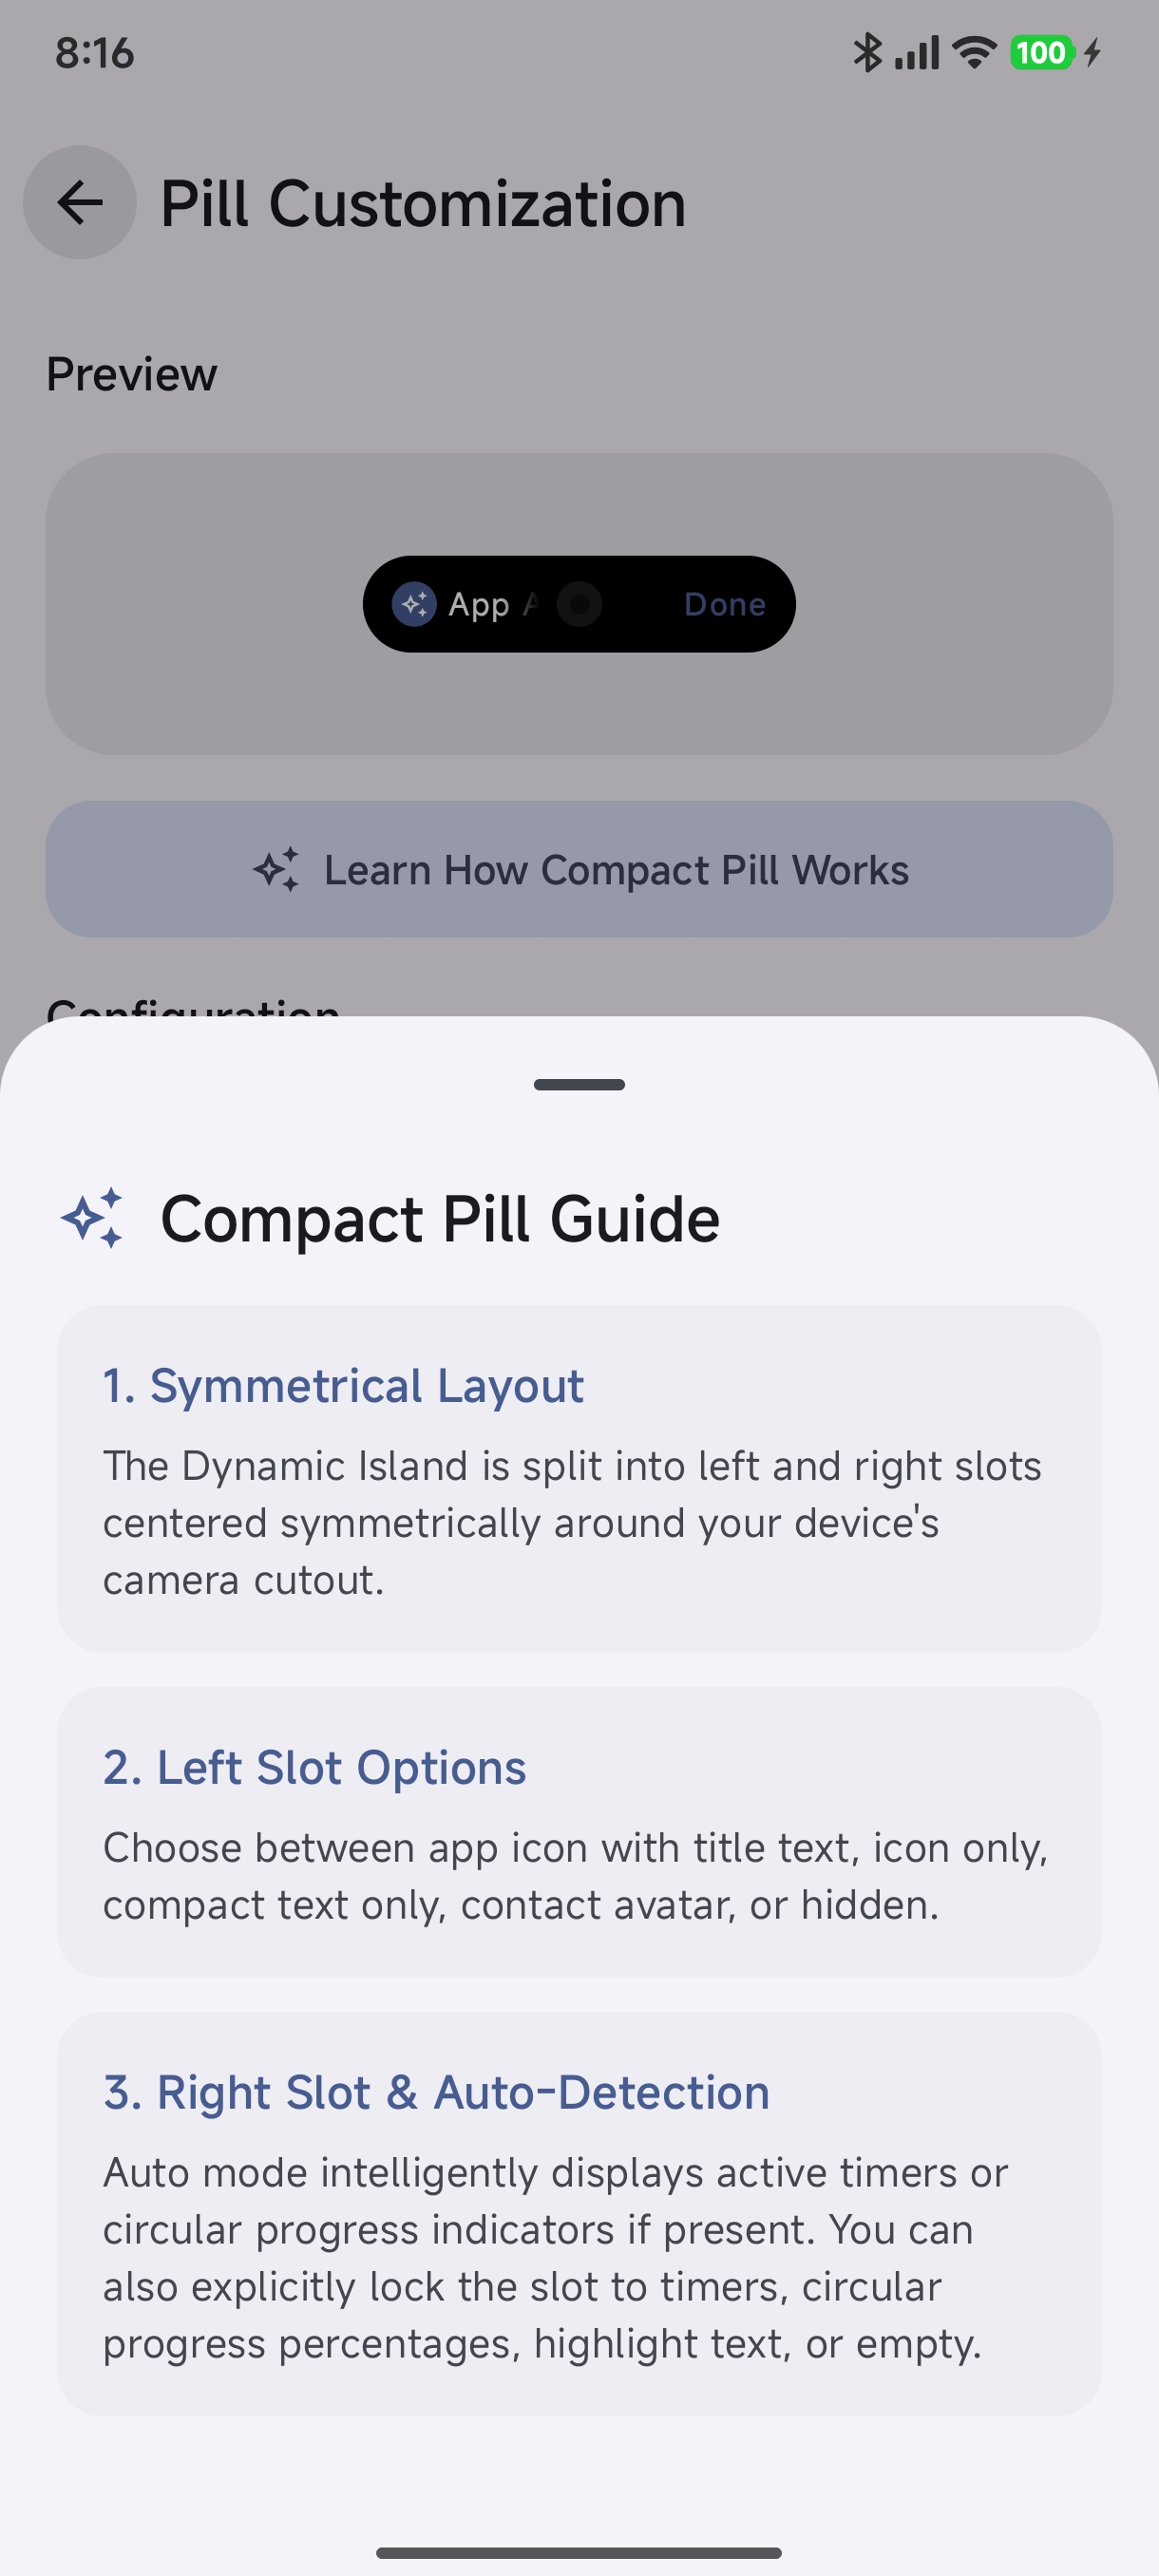
- Open Pill Customization to review the live pill preview and configure left/right sides.
- Read the Compact Pill Guide to understand symmetrical layout rules and auto-detection behaviors.
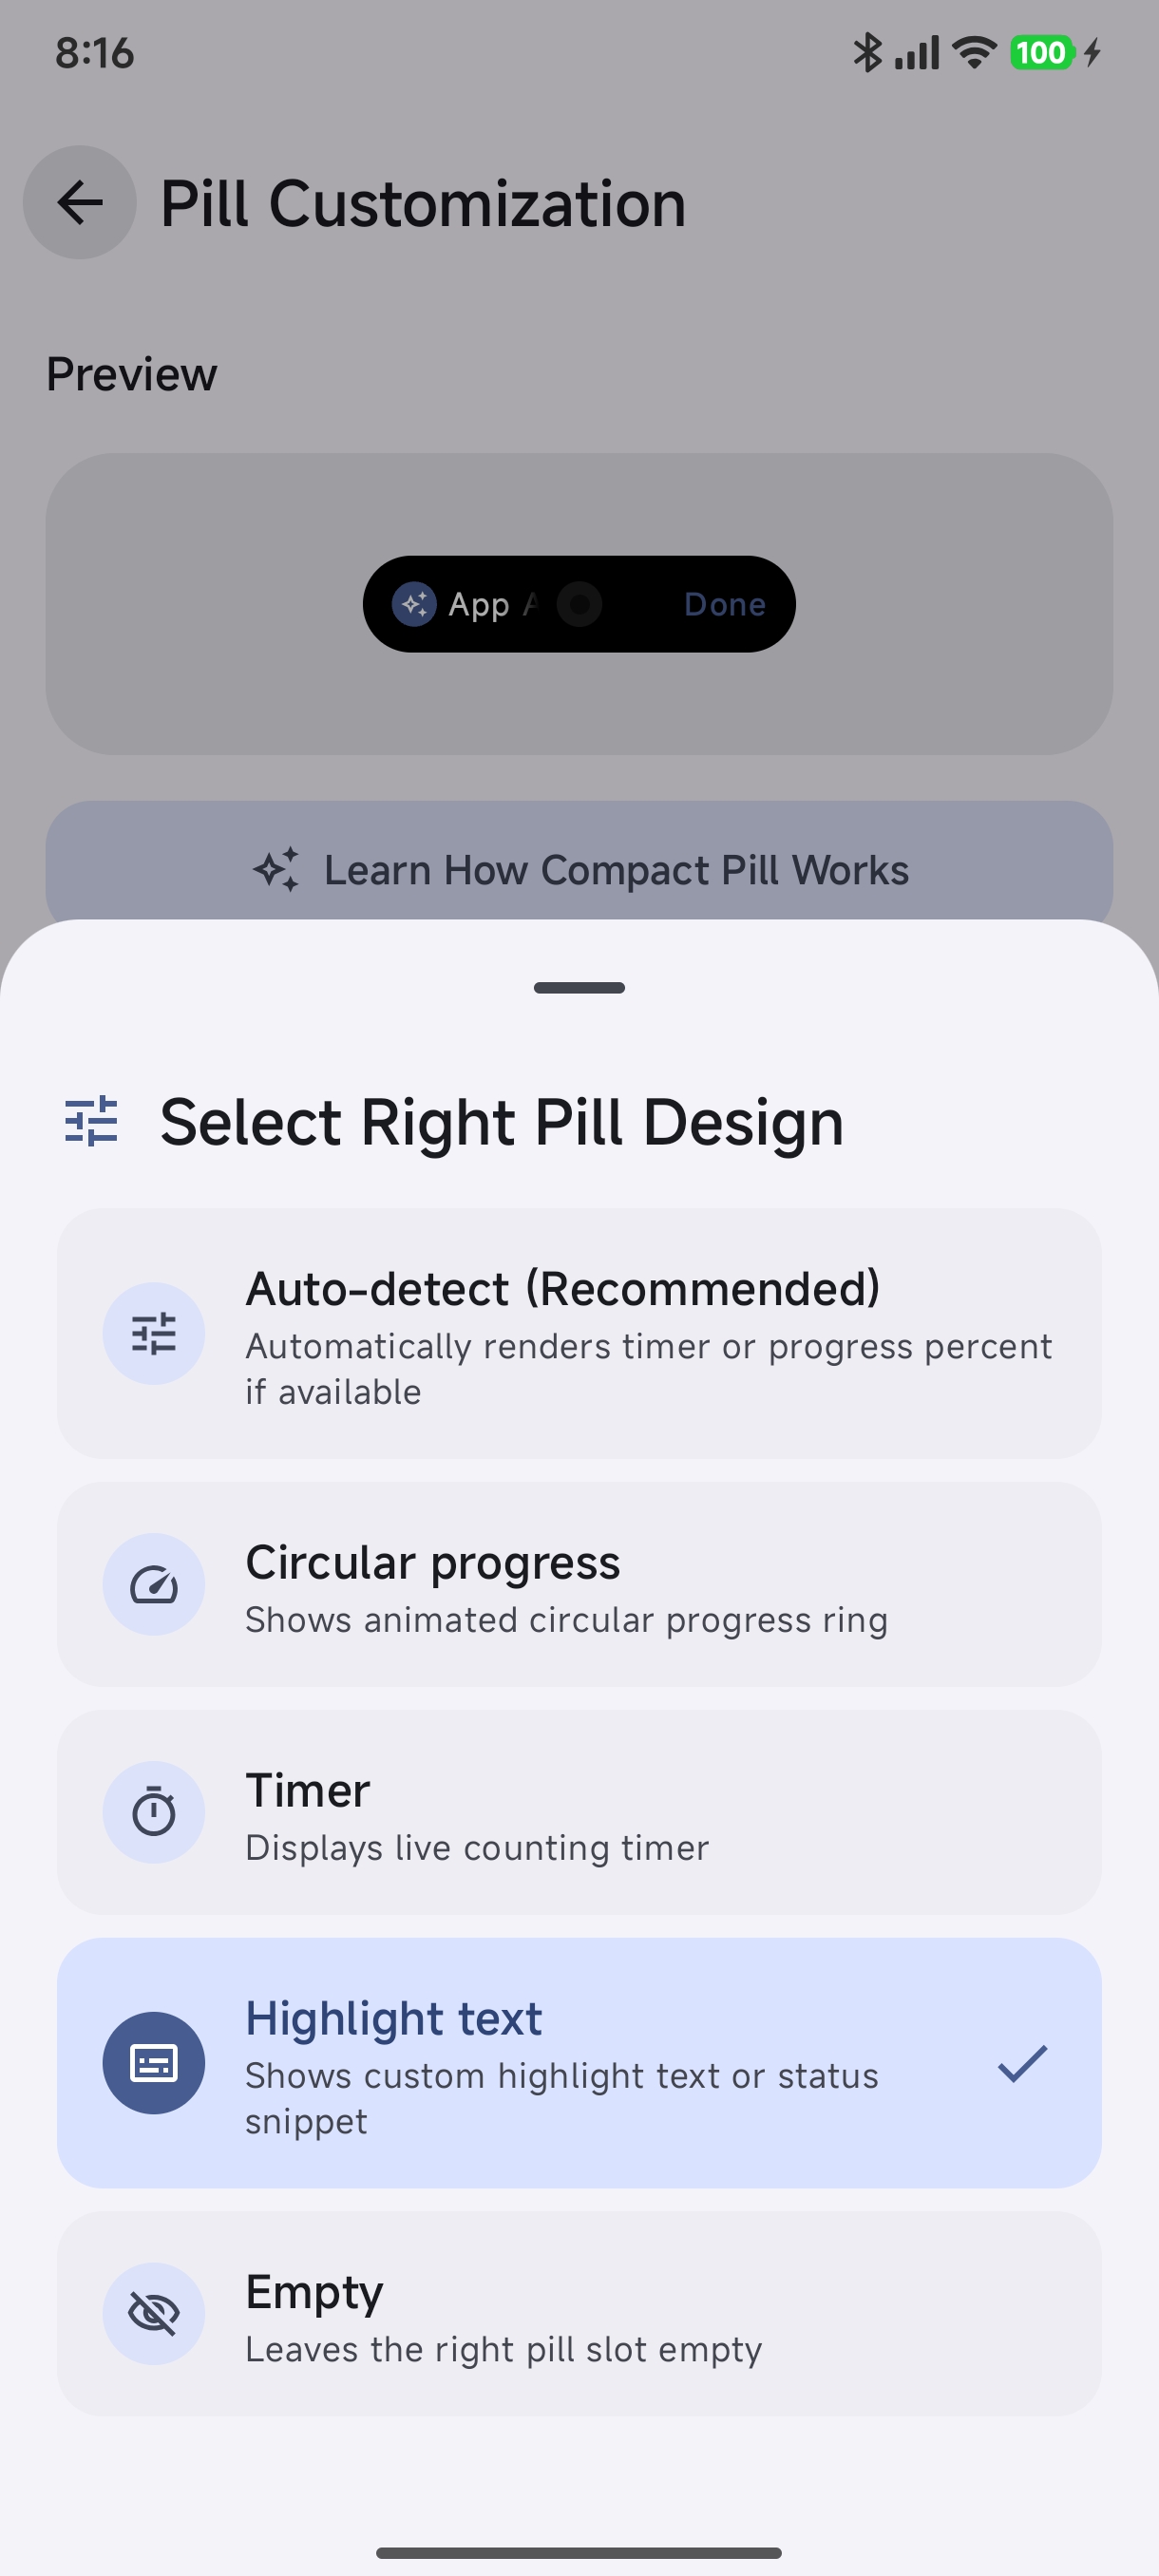
- Select Right Pill Design:
- Auto-detect (Recommended): Automatically renders a timer or circular progress percentage if present in the notification.
- Circular progress: Shows an animated circular progress ring.
- Timer: Displays a live counting chronometer.
- Highlight text: Shows custom highlight text or status snippet.
- Empty: Leaves the right pill slot blank.
Module 7: Progress & Timing Elements#
Configure progress indicators on the island:
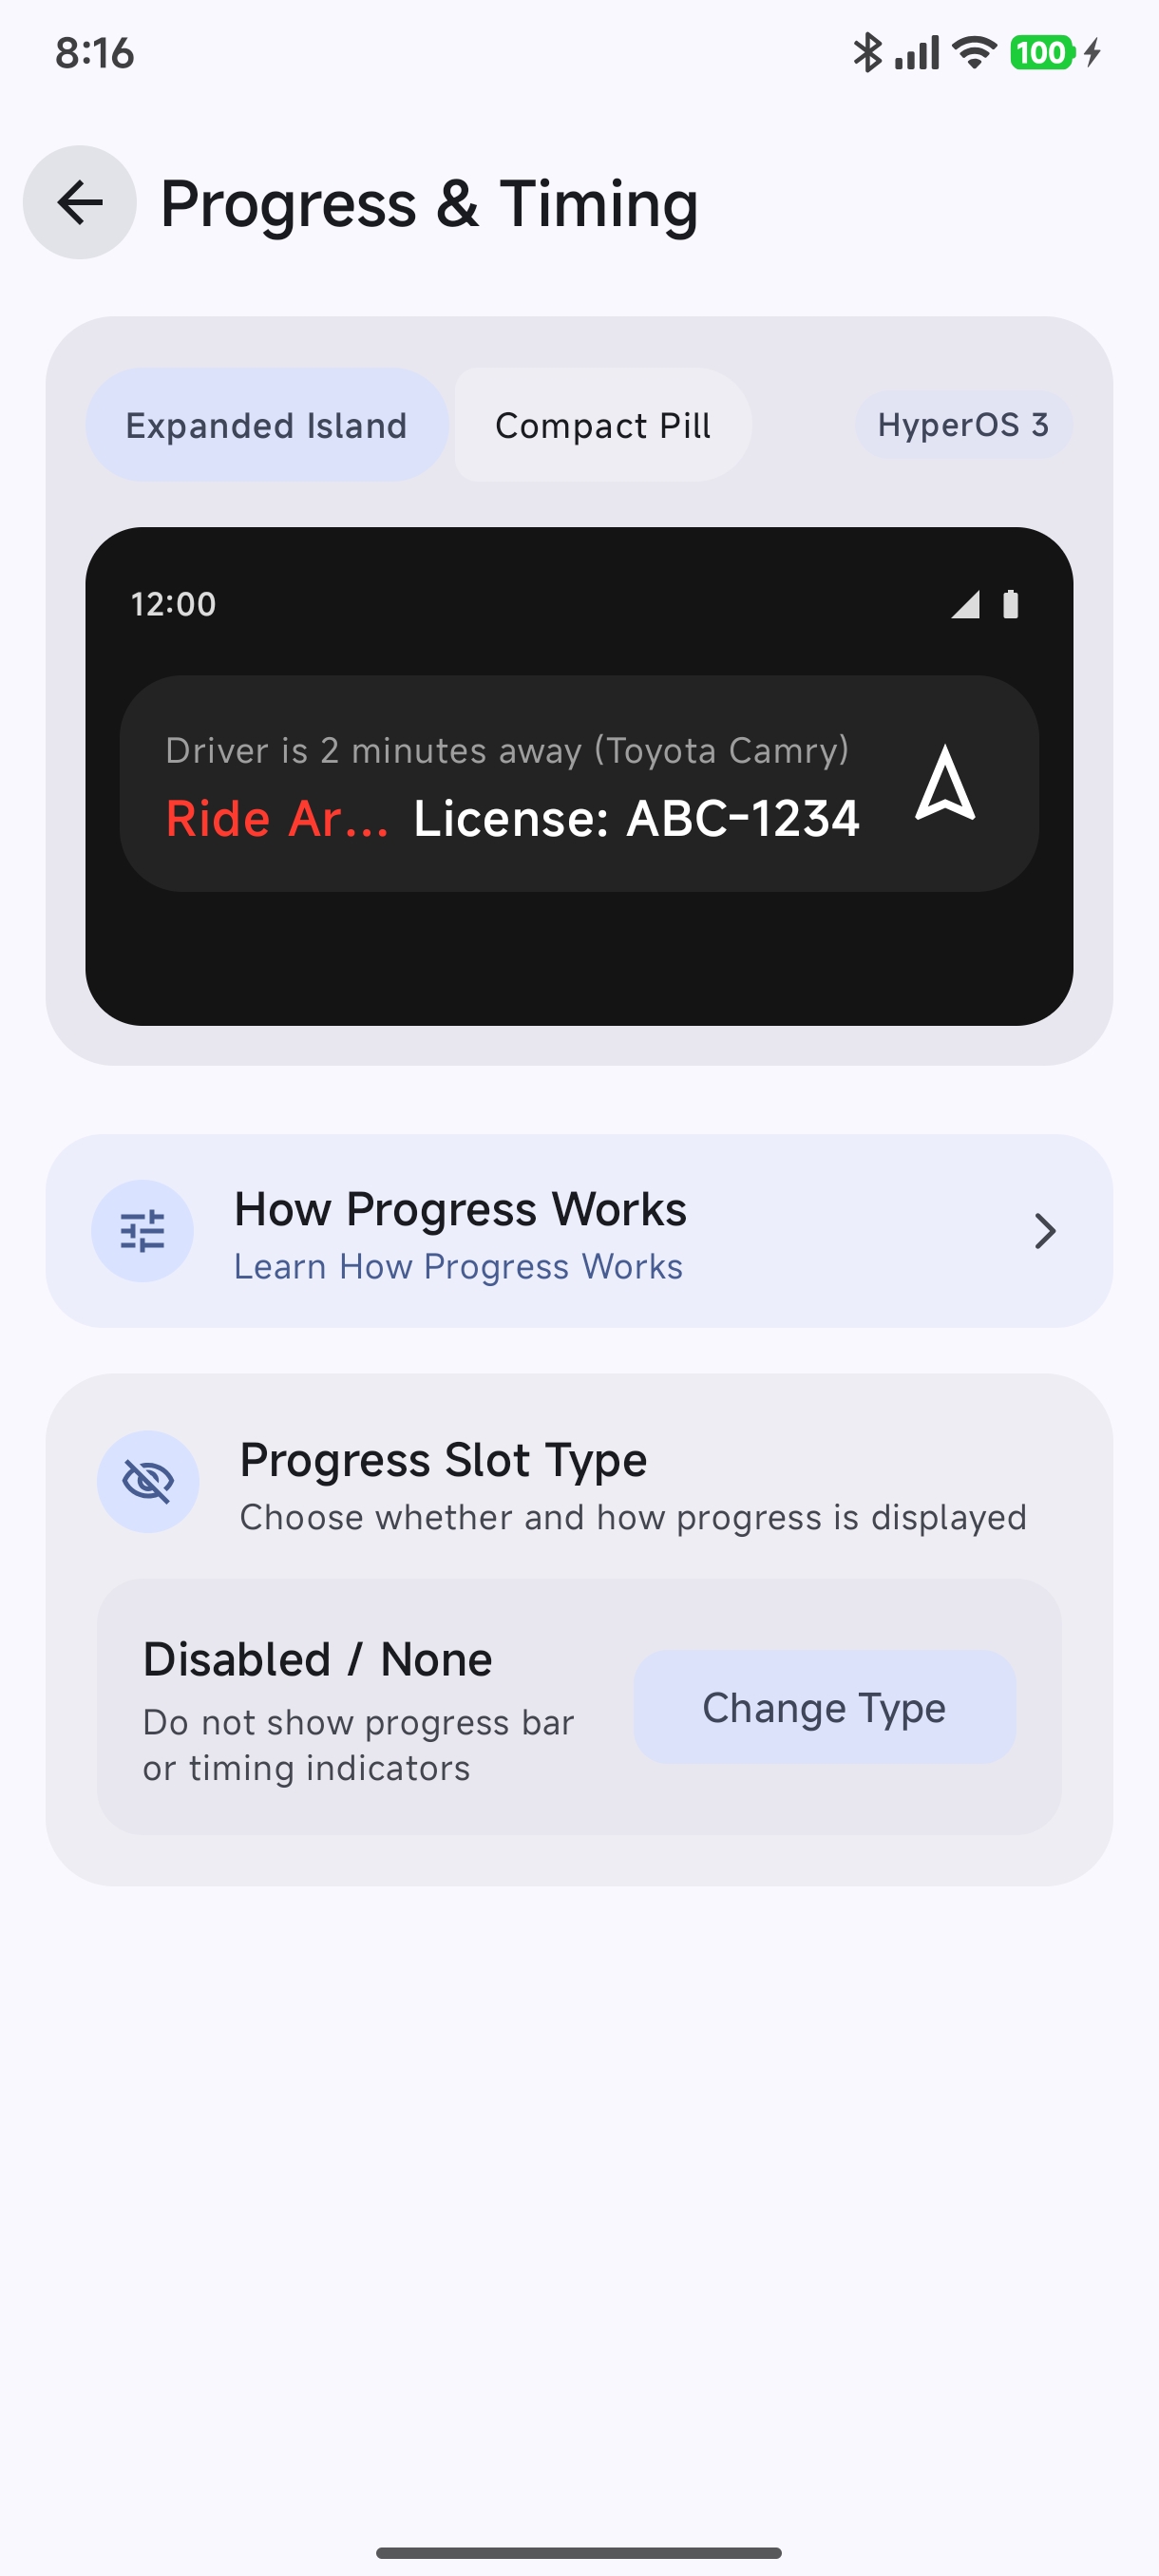
- Open Progress & Timing to adjust how progress is tracked and displayed.
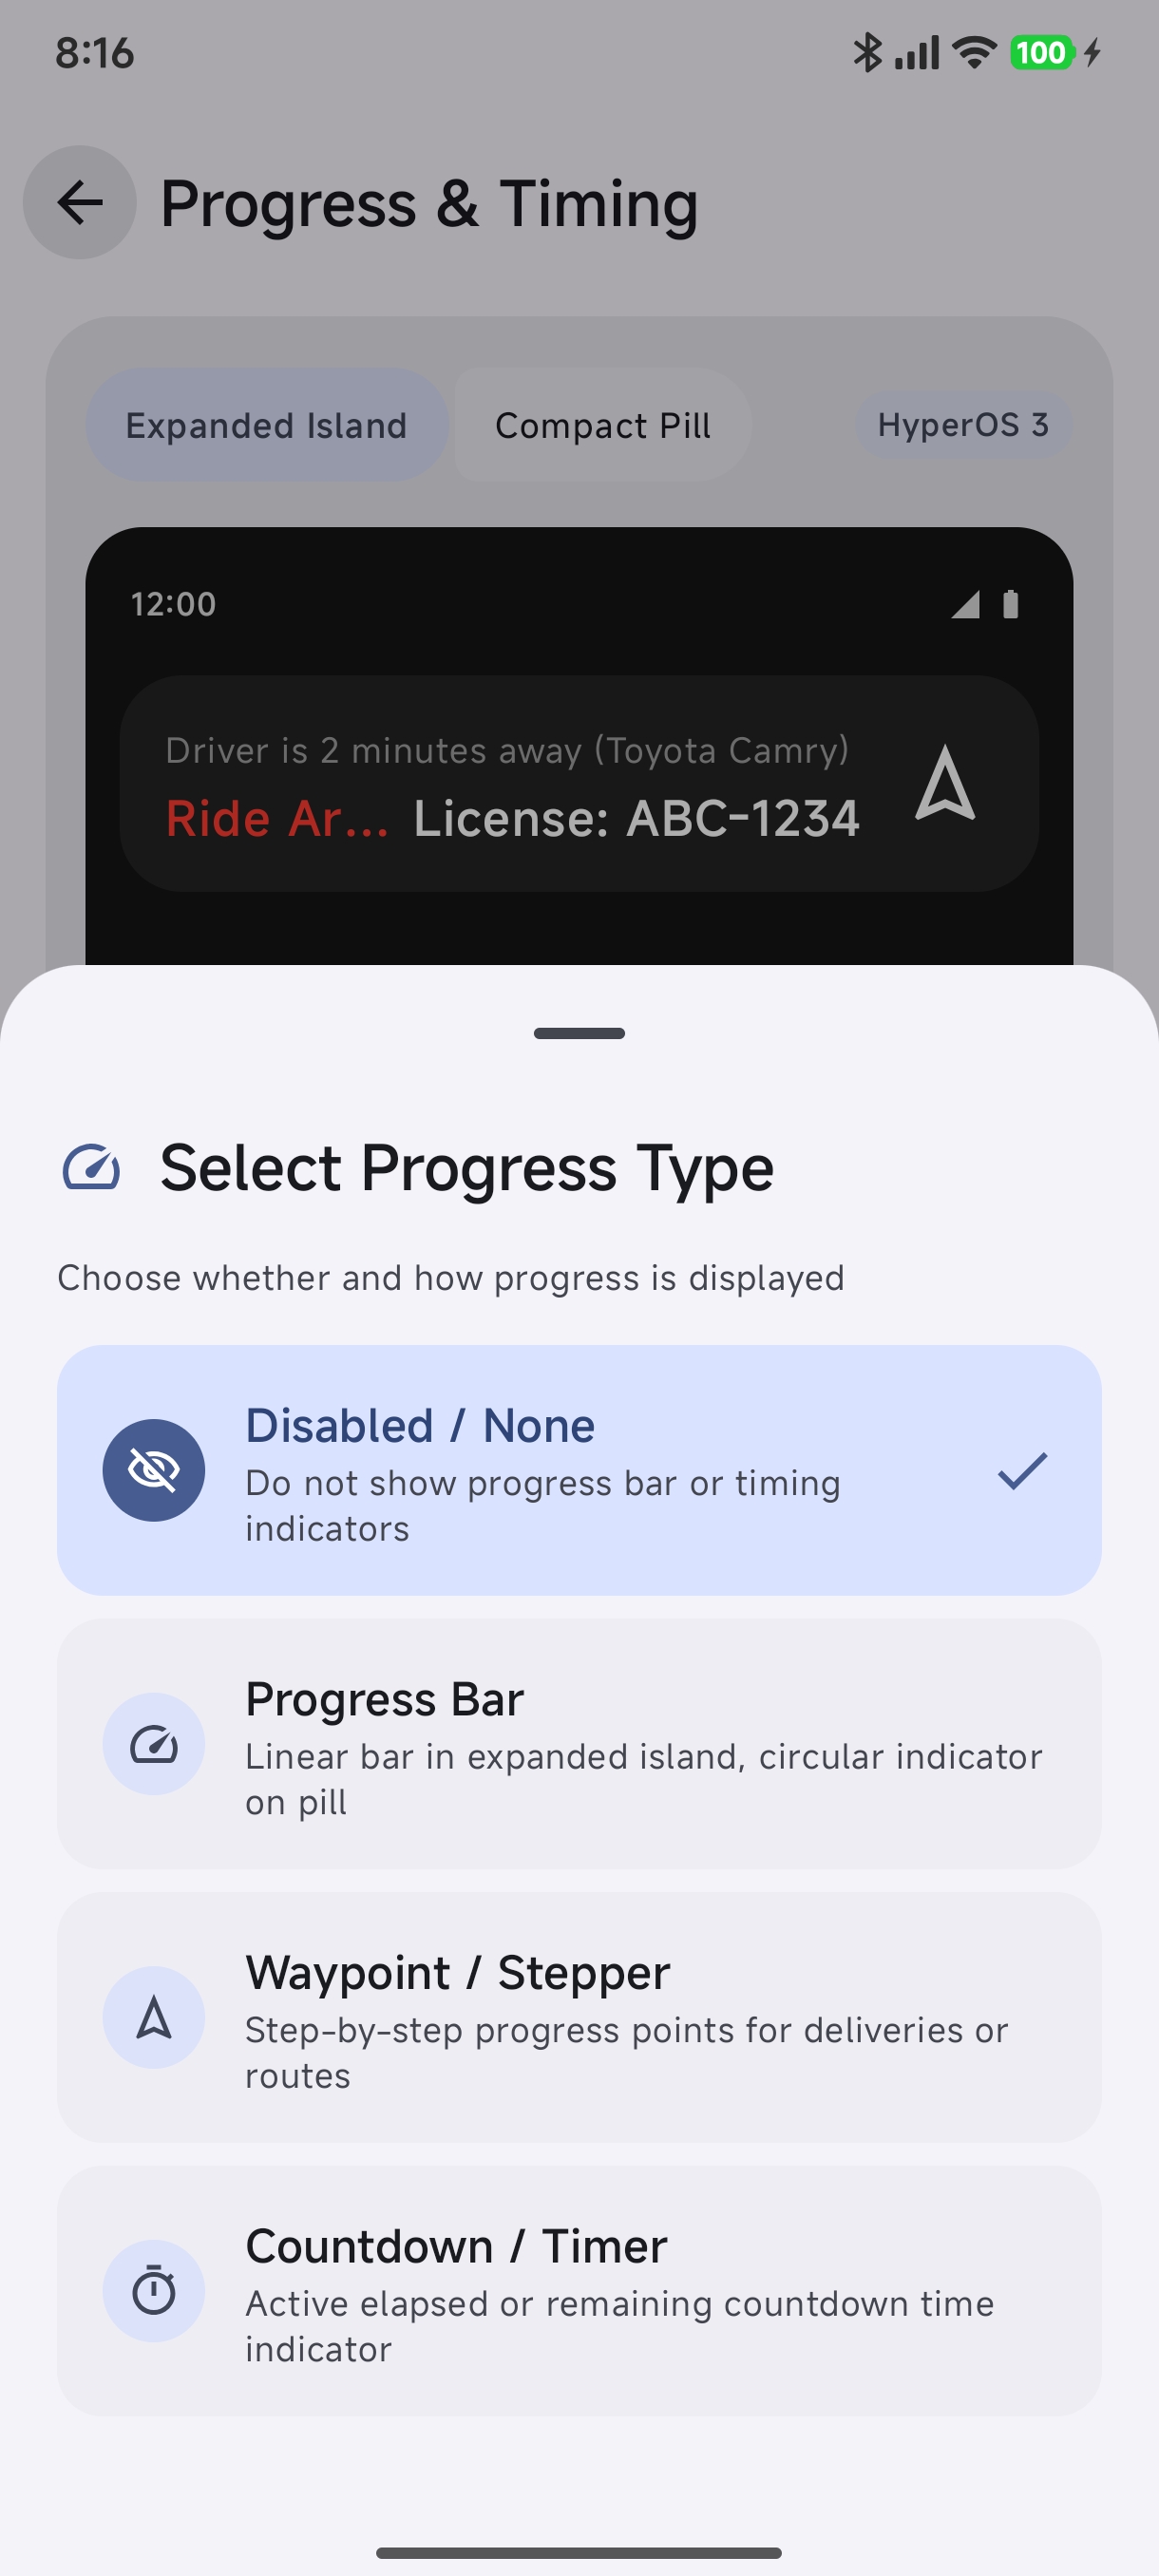
- Select Progress Type:
- Disabled / None: Do not show progress bar or timing indicators.
- Progress Bar: Linear bar in the expanded island, circular indicator on the pill.
- Waypoint / Stepper: Step-by-step waypoint markers for deliveries, routes, and milestones.
- Countdown / Timer: Active elapsed or remaining countdown time indicator.
Module 8: Action Buttons & Smart Actions#
Configure interactive buttons displayed on the expanded island card:
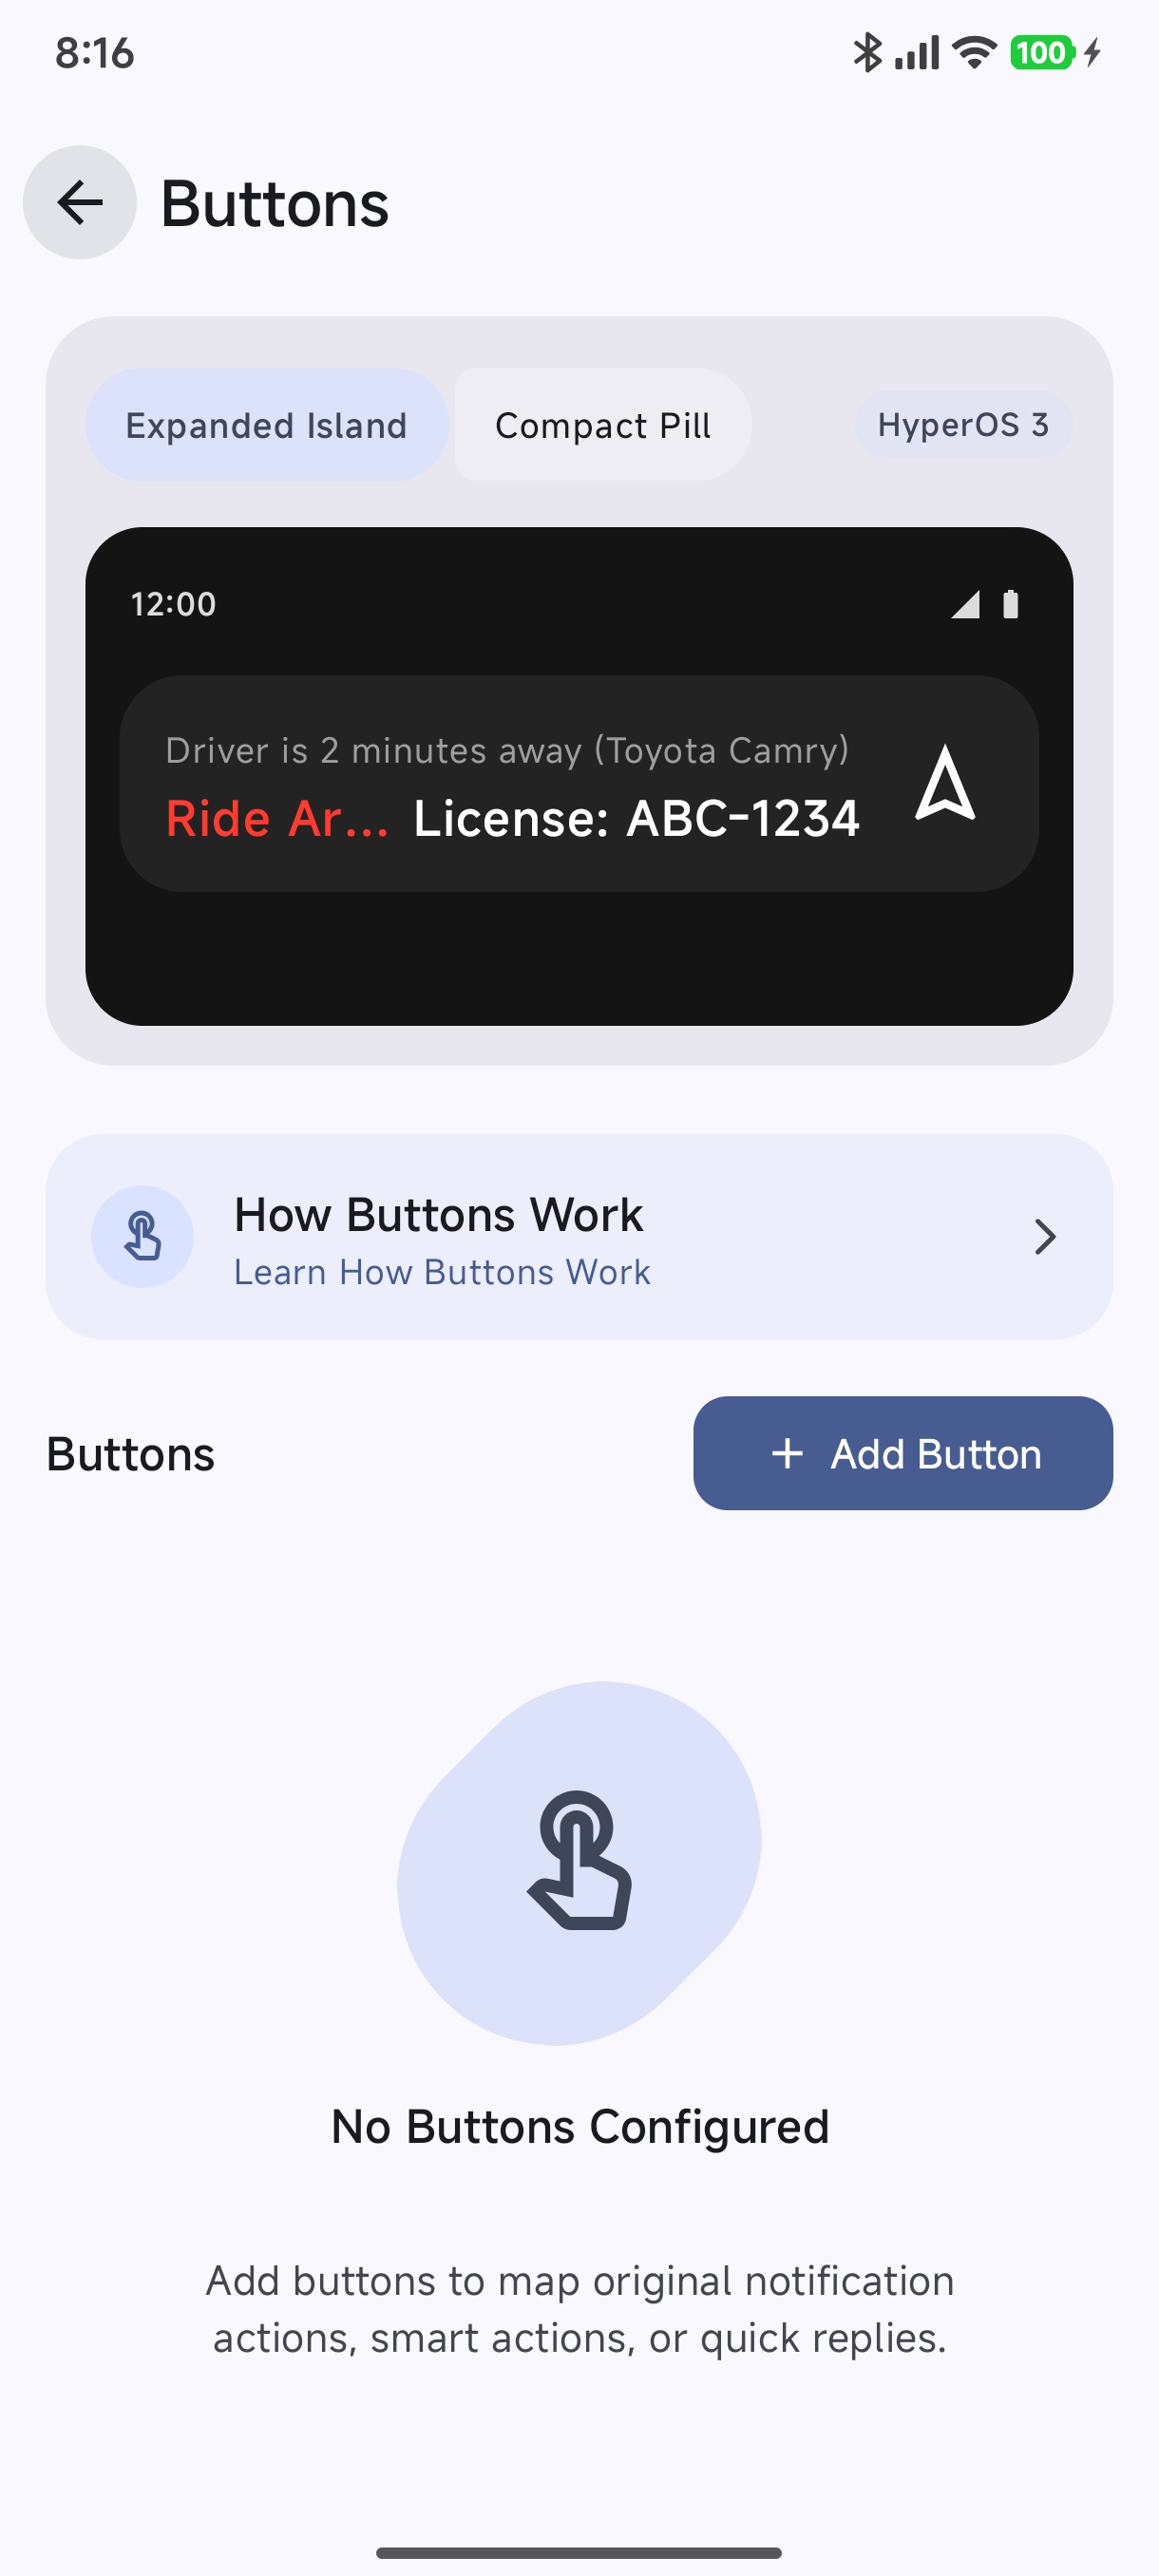
- Tap Buttons to manage button slots.
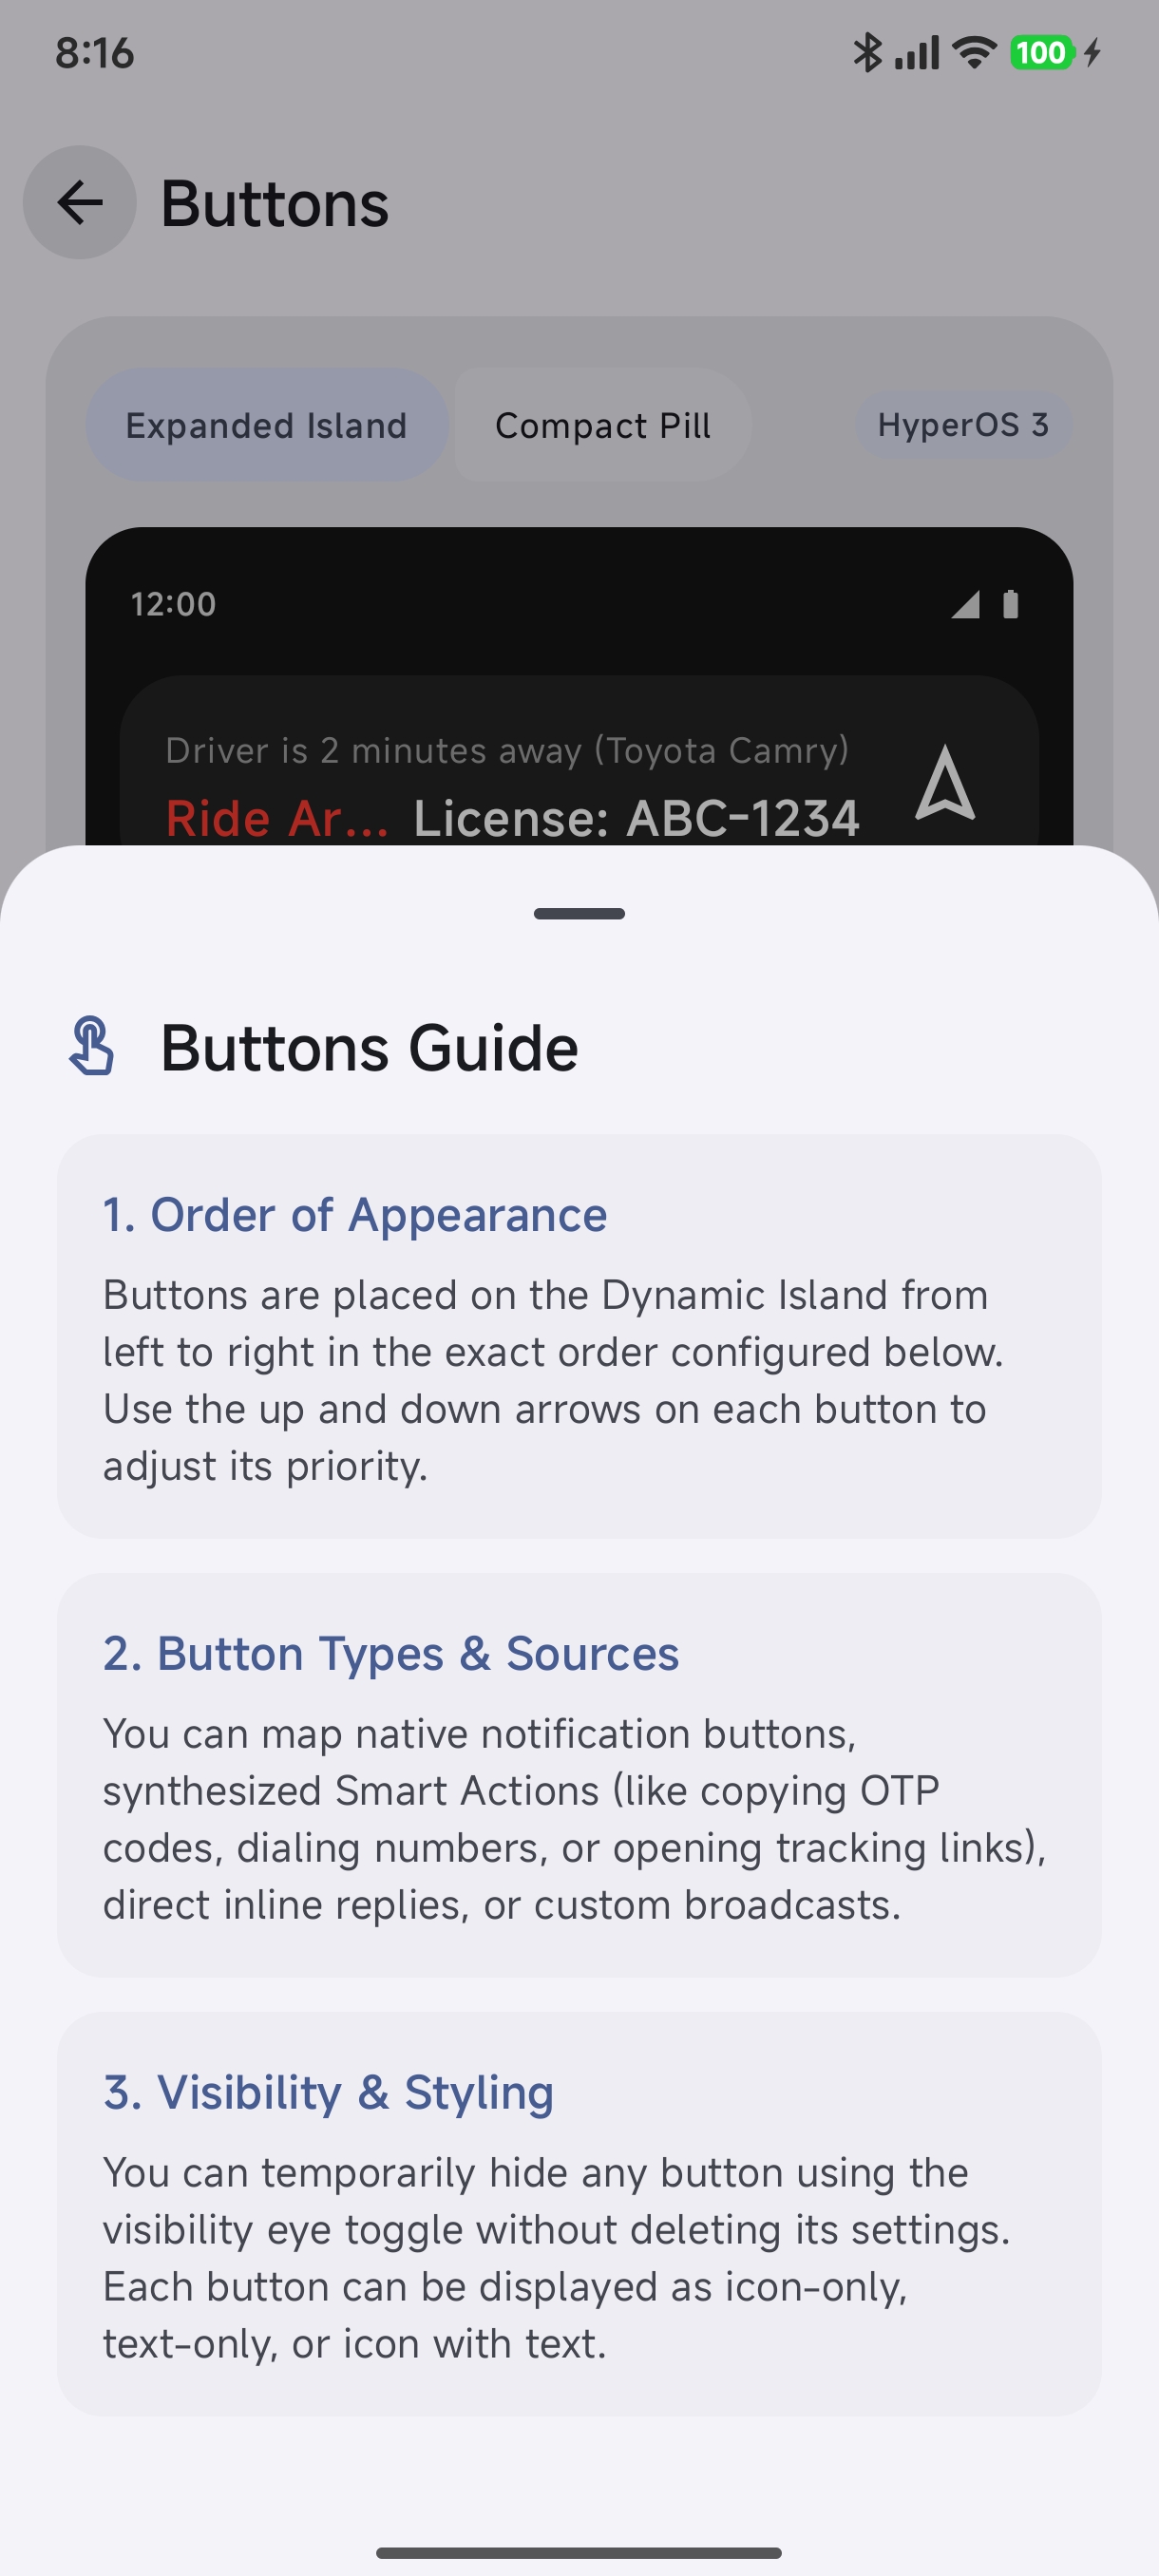
- Review the Buttons Guide:
- Order of Appearance: Buttons are placed left-to-right. Use the up and down arrow controls to adjust priority.
- Button Types & Sources: Map original notification buttons, synthesized Smart Actions (OTP copy, URL, phone dial), or inline replies.
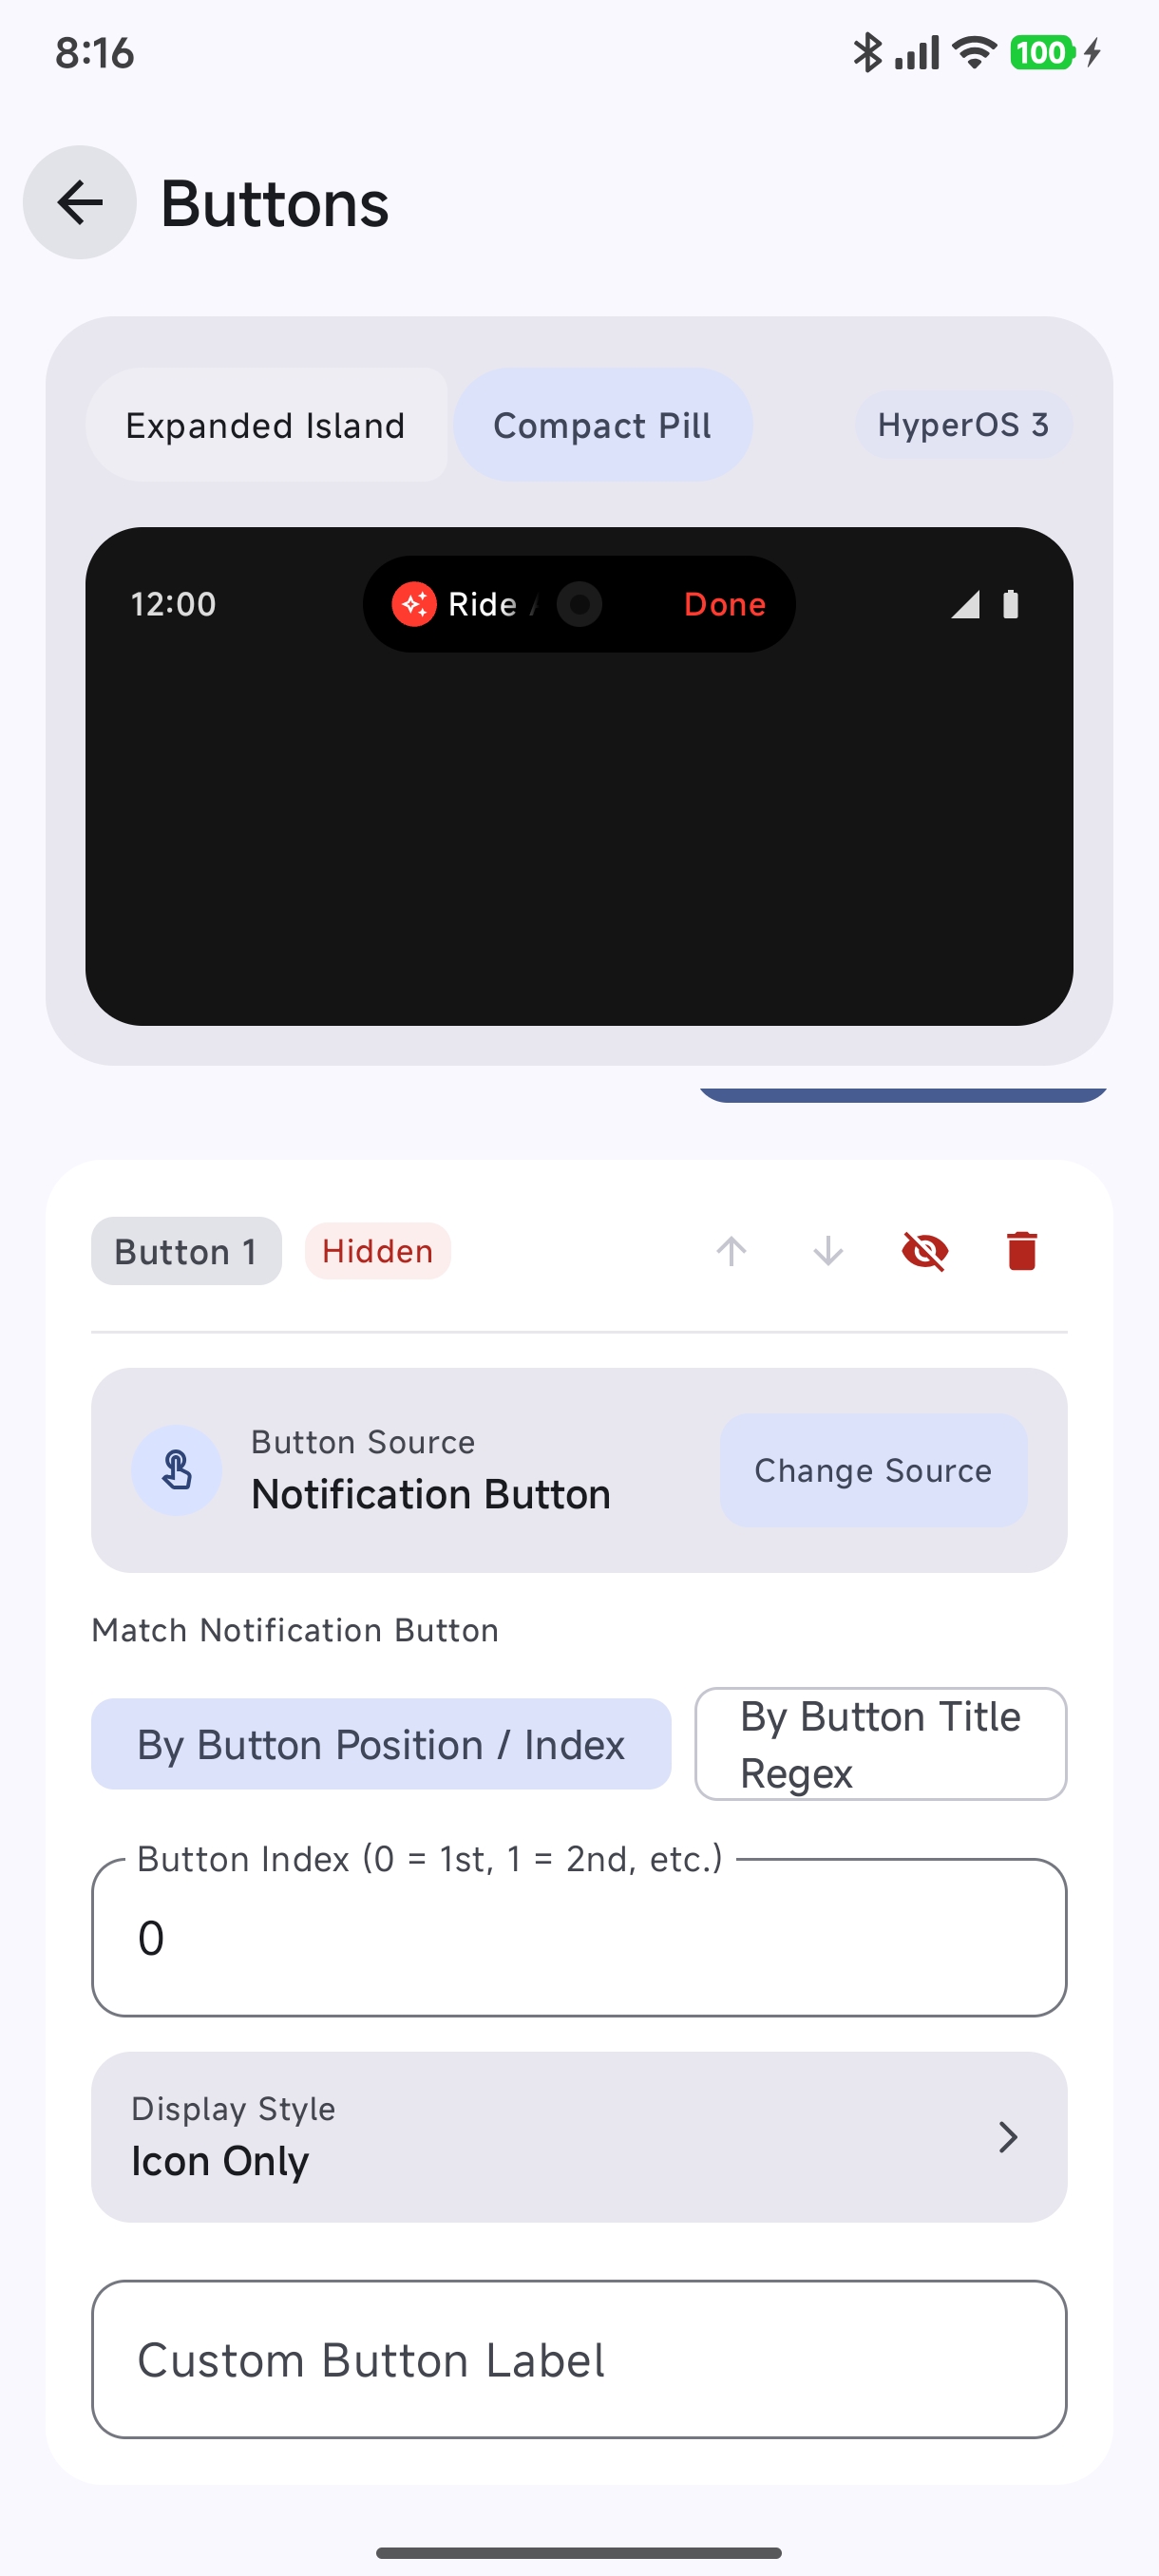
- Visibility & Styling: Temporarily hide any button with the eye toggle without losing its configuration. Style buttons as icon-only, text-only, or icon with text.
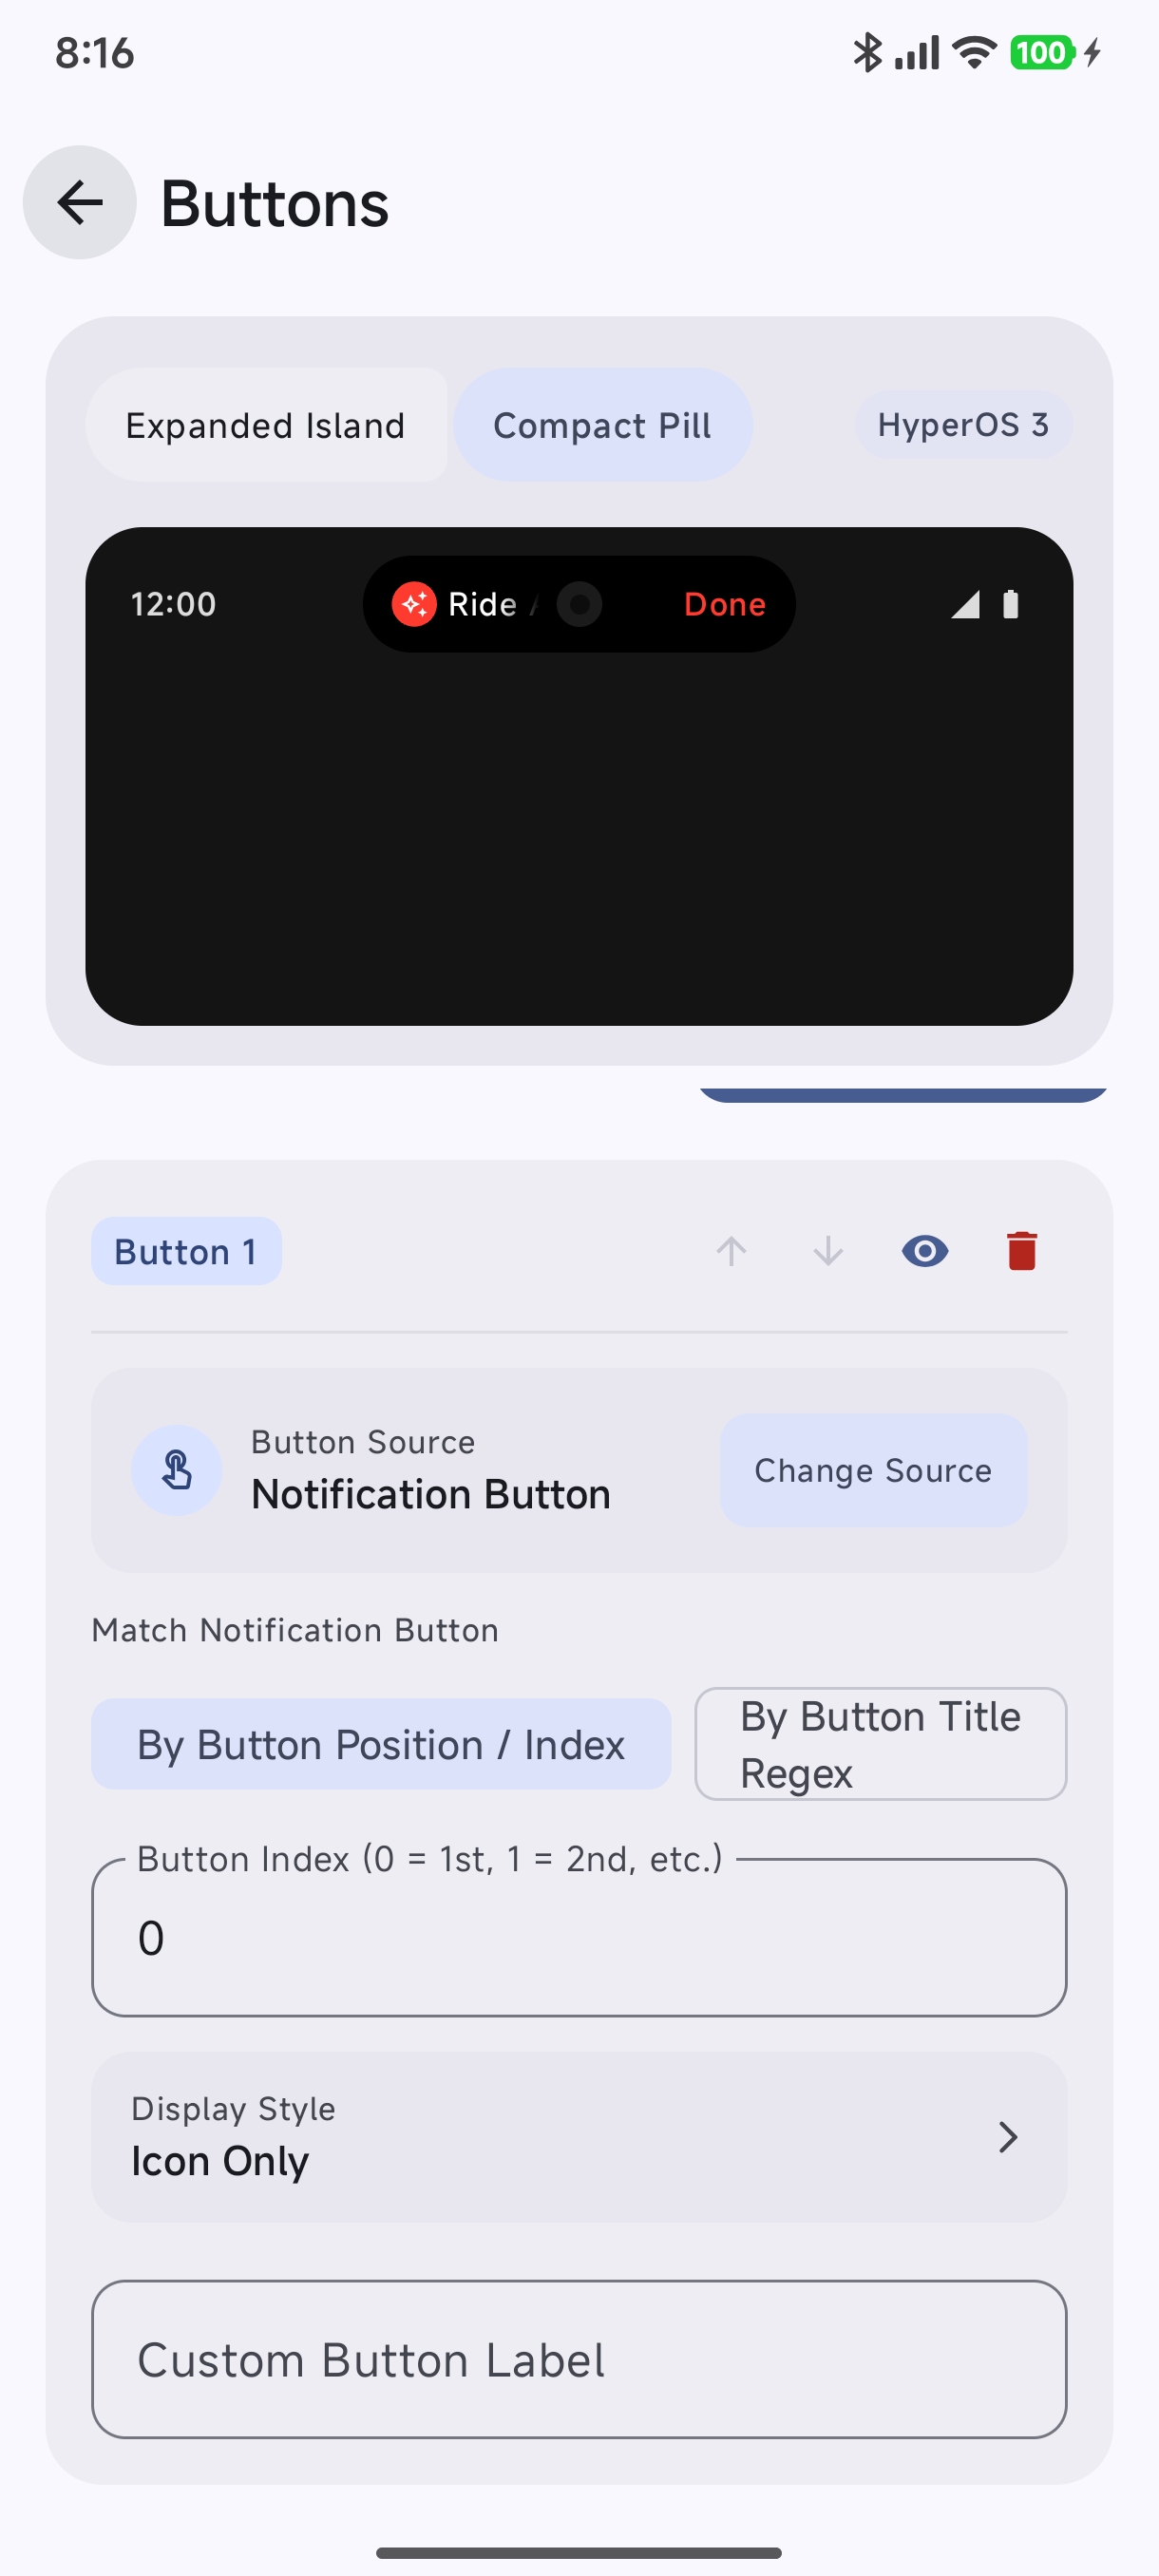
- Configure Button 1 (or additional slots):
- Choose Button Source (Notification Button vs. Smart Action).
- Match by position/index (
0 = 1st,1 = 2nd) or by Button Title Regex. - Set Display Style (
Icon Only,Text Only, etc.) and optional Custom Button Label. - Use the Visibility Toggle to hide redundant buttons.
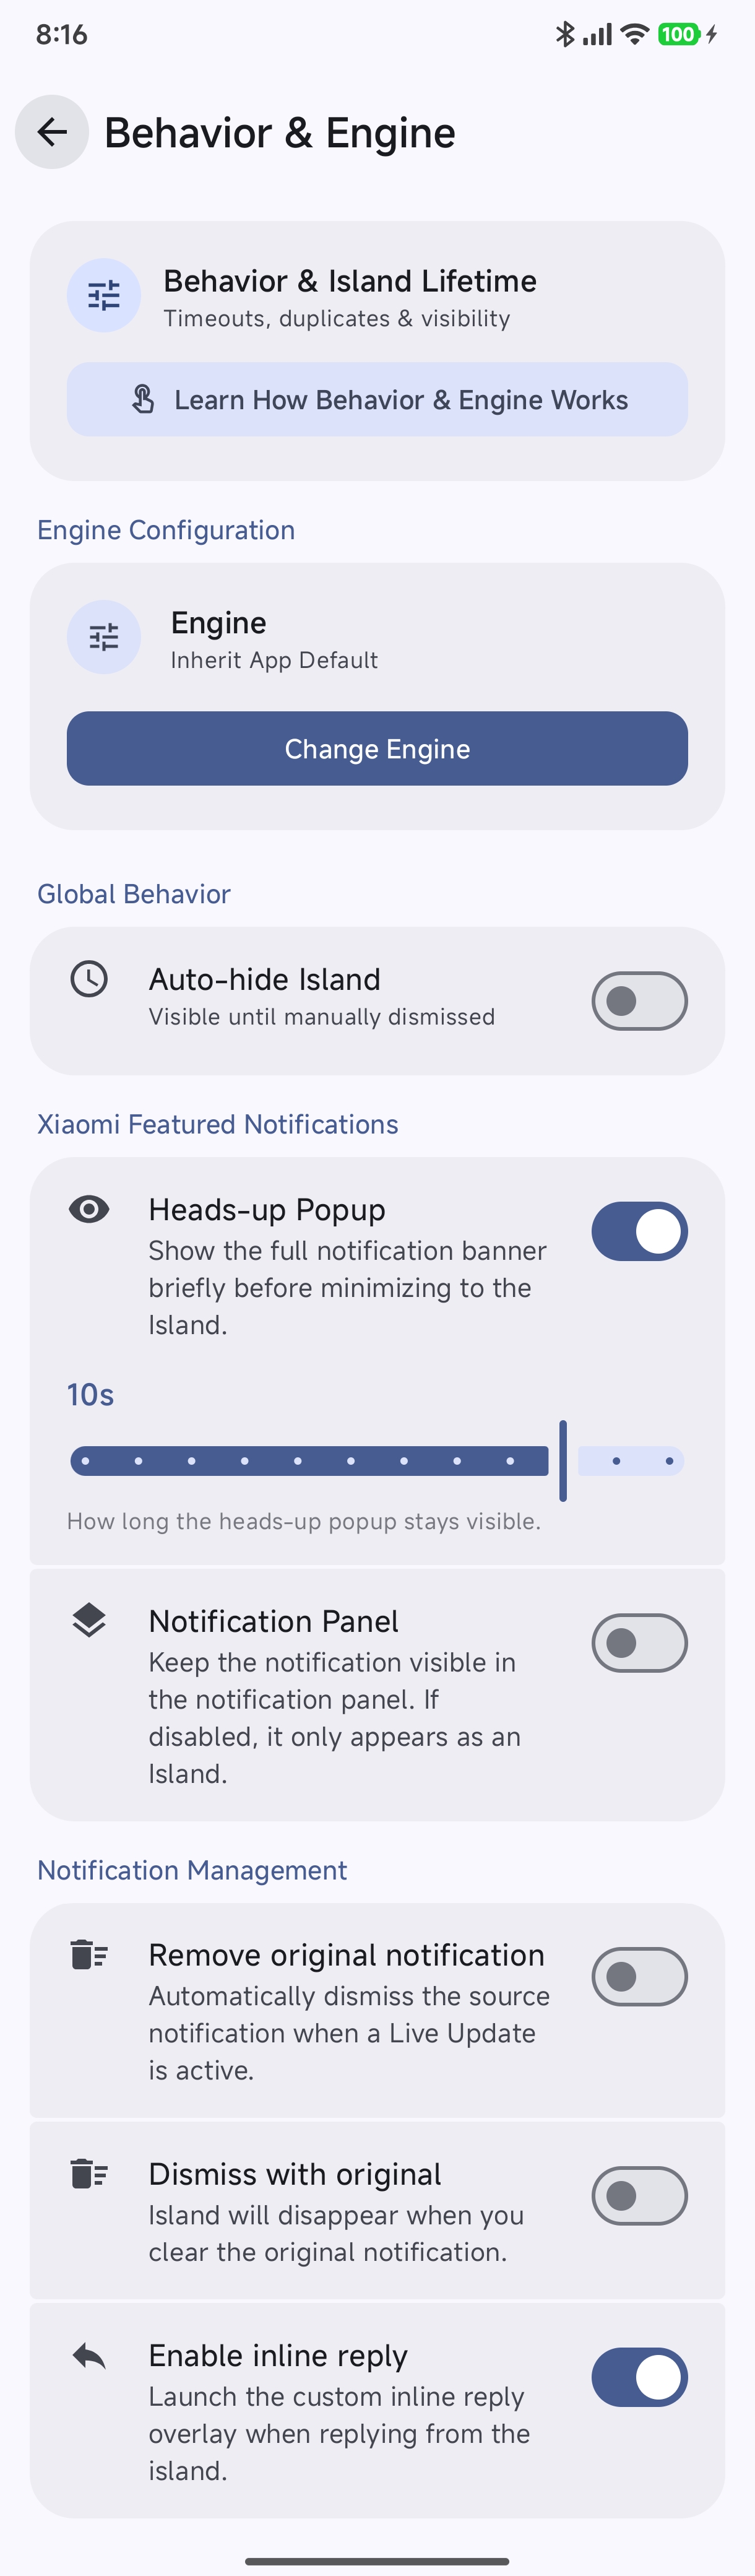
Module 9: Behavior & Engine Motor Settings#
Configure notification lifecycle, dismissal rules, and delivery engines:
- Engine Configuration: Choose between Inherit App Default, Custom Floating Island Engine, or Native Live Update Engine.
- Auto-hide Island: Automatically hide the expanded island after a duration or keep it visible until dismissed.
- Xiaomi Featured Notifications:
- Heads-up Popup: Show a brief banner popup before collapsing into the island (with duration slider, e.g. 10s).
- Notification Panel: Choose whether to keep the notification visible in the standard shade.
- Notification Management:
- Remove original notification: Automatically clear the source notification when a Live Update is active.
- Dismiss with original: Close the island when the source notification is swiped away.
- Enable inline reply: Launch a custom inline reply overlay when replying directly from the island.
Module 10: Testing with the Live Preview#
At the top of the editor, an interactive HyperOS 3 Island Preview updates in real-time as you tweak settings:
- Tap the Expanded Island / Compact Pill toggle to verify both states.
- Verify text wrapping, variable replacement, button styling, and theme colors before saving.
Importing, Exporting & Sharing#
Custom translators can be distributed as standalone files or bundled into complete theme packages:
1. The .htrans Package Format#
A standard .htrans file is a compressed ZIP archive containing:
translator.json: The complete declarative translator definition.icons/(optional): Custom vector or bitmap icons referenced by action buttons.
Hyper Bridge also seamlessly supports importing raw .json translator files.
2. Exporting a Translator#
- Open the Translator Manager.
- Tap the Export icon on any translator card.
- Choose a destination folder using Android’s Storage Access Framework (SAF) document picker to save your
.htransfile.
3. One-Tap Sharing#
Tap the Share button on any translator card to open the standard Android Share sheet. You can send your .htrans file directly via Telegram, Discord, Email, or WhatsApp.
4. Importing a Translator#
- In the Translator Manager, tap the Import button in the top app bar.
- Select any
.htransor.jsonfile from your device storage. - Hyper Bridge automatically validates the archive, extracts any bundled icons, verifies security against path traversal, and registers the translator in your database.
5. Theme-Pack Bundling (.htheme / .hbr)#
Theme creators can bundle custom translators directly inside their theme packages!
Simply include a translators/ folder inside your .htheme archive containing .htrans or .json files. When a user installs your theme, all bundled translators are automatically discovered and registered.
Next Steps#
- Check out the full Advanced Translators Technical Specification for complete JSON schemas, Room database entity structures, and runtime pipeline details.
- Explore the Theme Creator Guide to build complete icon and color themes for Hyper Bridge.
- Learn about Smart Actions to supercharge your notification buttons.